Table of Contents
- Special Walnut vs Provincial Stain on White Oak: Core Differences
- How special walnut vs provincial stain on white oak affects color depth
- Preparing White Oak for Staining: The Essential Steps
- Applying special walnut vs provincial stain on white oak: step‑by‑step
- Design Scenarios: Where Each Stain Shines
- Living Room with Large White Oak Flooring
- Modern Kitchen Cabinets
- Cozy Bedroom with White Oak Headboard
- Quick Stain‑Selection Tips
- Common Mistakes and How to Avoid Them
- Frequently Asked Questions
- Which stain is more resistant to fading, special walnut or provincial?
- Can I mix special walnut and provincial stains to create a custom hue?
- Is a wood conditioner necessary for both stains?
- How many coats of polyurethane should I apply after staining?
- Do these stains work on reclaimed white oak with a distressed finish?
- What is the best way to clean white oak after staining?
Special Walnut vs Provincial Stain on White Oak – Choosing the Right Finish
White oak is a favorite among designers for its strength, grain clarity, and subtle warm undertones. Yet the true personality of a white oak floor, a kitchen cabinet, or a living‑room accent wall often emerges only after the stain is applied. Two of the most popular choices in the market today are special walnut and provincial stains. Both promise rich, sophisticated hues, but they behave very differently on the porous surface of white oak.
Understanding the nuances between special walnut and provincial stain on white oak can save you from costly re‑finishes, ensure the final look matches your interior vision, and keep the project within budget. This guide walks you through the chemistry of each product, visual outcomes in real‑world rooms, application tricks, and common pitfalls to avoid. By the end, you’ll feel confident selecting the finish that best aligns with your design goals.
Special Walnut vs Provincial Stain on White Oak: Core Differences
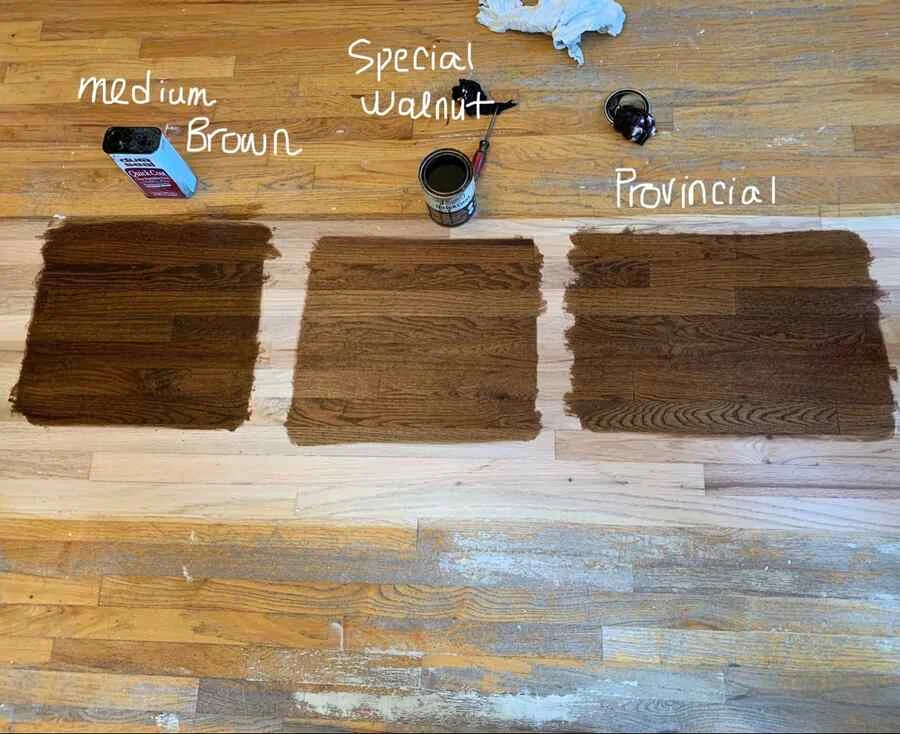
Both stains are oil‑based, but the pigment concentration, binder composition, and intended depth of color set them apart. Special walnut typically contains a higher load of natural walnut extract and synthetic dyes, delivering a deep, chocolate‑brown tone with a hint of amber. Provincial stain, on the other hand, leans toward a cooler, mid‑tone brown that mimics the look of weathered European timber.
The choice between the two hinges on three main factors:
- Desired contrast: Special walnut creates strong contrast against the light sapwood of white oak, while provincial offers a subtler, more blended appearance.
- Light exposure: In bright rooms, provincial tends to retain its nuance without appearing too dark; special walnut can look almost black under direct sunlight.
- Project scale: For large floor areas, provincial provides a uniform look that’s easier to touch up. For cabinets or accent pieces, special walnut adds drama.
How special walnut vs provincial stain on white oak affects color depth
The grain of white oak is open and pronounced, which means any stain will seep into the pores. Special walnut’s higher pigment load saturates the grain, highlighting the wood’s natural swirls and producing a three‑dimensional effect. Provincial’s lighter pigment lets more of the natural wood shine through, preserving the grain’s delicacy while still adding warmth.
When you test each stain on a scrap piece, you’ll notice:
- Special walnut: a deep, velvety finish that can mask minor imperfections.
- Provincial: a warm, honey‑brown veil that accentuates the grain rather than covering it.
Choosing the right one depends on whether you want the stain to be the star of the show (special walnut) or a supporting actor that lets the wood’s character take center stage (provincial).
Preparing White Oak for Staining: The Essential Steps
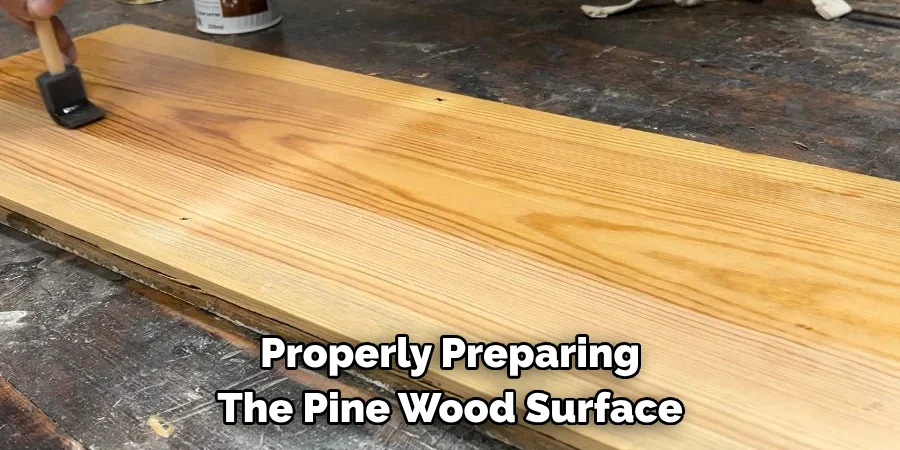
Regardless of which stain you select, preparation determines the final outcome. White oak should be sanded to a smooth, even surface and free of dust, oils, or previous finishes.
- Sand progressively: Start with 80‑grit, move to 120‑grit, and finish with 220‑grit for a feather‑light surface.
- Clean thoroughly: Use a vacuum followed by a tack cloth to capture all fine particles.
- Condition the wood: Apply a wood conditioner (especially on soft or uneven grain) to reduce blotchiness. Let it sit for 15 minutes before staining.
Skipping any of these steps can cause uneven absorption, leading to streaks that are difficult to correct after the stain dries.
Applying special walnut vs provincial stain on white oak: step‑by‑step
Below is a practical workflow that works for both products:
- Test first: Always apply a small amount on a hidden area to gauge color intensity.
- Stir, don’t shake: Mix the stain gently to avoid bubbles that could appear as speckles.
- Work in sections: Apply with a natural‑bristle brush or a lint‑free cloth, following the grain direction.
- Wipe excess: After 5‑10 minutes, wipe away surplus stain with a clean cloth. Longer dwell time deepens color.
- Let cure: Allow at least 24 hours for the stain to set before applying a protective topcoat.
For a smoother finish, apply a clear water‑based polyurethane after the stain has fully cured. This protects the wood while preserving the hue you’ve carefully crafted.
Design Scenarios: Where Each Stain Shines
Choosing a stain is not just about color; it’s about how that color interacts with the rest of the room. Below are three common design contexts and the stain that typically works best.
Living Room with Large White Oak Flooring
In open‑plan living areas with abundant natural light, provincial stain on white oak can create an inviting, cohesive backdrop. The lighter brown complements neutral sofas, glass coffee tables, and metallic accents without overwhelming the space. Pair it with woven décor accents for added texture.
Modern Kitchen Cabinets
For sleek, contemporary kitchens, special walnut offers a bold contrast against stainless steel appliances and matte black hardware. The deep, rich hue adds a sense of luxury while still feeling warm. A high‑gloss topcoat can amplify the modern vibe.
Cozy Bedroom with White Oak Headboard
If you prefer a softer, more romantic feel in the bedroom, provincial stain on a white oak headboard pairs beautifully with pastel linens and soft amber lighting. The subtle grain visibility adds depth without dominating the serene palette.
Quick Stain‑Selection Tips
- Match the stain intensity to the room’s natural light—darker for low‑light, lighter for bright spaces.
- Consider future resale: neutral provincial tones often appeal to a broader audience.
- Always test on a scrap piece before committing to the entire project.
Common Mistakes and How to Avoid Them
Even seasoned DIYers can slip up when working with special walnut vs provincial stain on white oak. Here are the most frequent errors and corrective actions.
- Over‑sanding: Removing too much of the wood’s natural texture can make the stain look flat. Stick to the recommended grits.
- Skipping wood conditioner: Especially on white oak, this leads to blotchy, uneven color. Apply conditioner uniformly.
- Applying too thick a coat: Excess stain pools, creating dark spots. Thin coats and wipe promptly.
- Insufficient drying time: Rushing the topcoat traps moisture, causing peeling later. Respect the 24‑hour cure period.
- Choosing the wrong finish for the environment: For high‑traffic areas, use a durable oil‑based polyurethane rather than a delicate water‑based one.
Frequently Asked Questions
Which stain is more resistant to fading, special walnut or provincial?
Both stains are oil‑based and fairly UV‑stable, but special walnut’s higher pigment concentration can retain its richness slightly longer in direct sunlight. Adding a UV‑blocking topcoat extends the life of either finish.
Can I mix special walnut and provincial stains to create a custom hue?
Yes, blending small amounts of each can produce a unique shade. Start with a 1:1 ratio on a test board, then adjust until you achieve the desired tone. Keep in mind that mixing may affect drying time.
Is a wood conditioner necessary for both stains?
While not always mandatory, a conditioner is highly recommended for white oak because it evens out absorption, preventing the “blotchy” look that can happen with either special walnut or provincial.
How many coats of polyurethane should I apply after staining?
Two to three thin coats are ideal. Allow each coat to dry for at least four hours and sand lightly with 320‑grit sandpaper between coats for a smooth finish.
Do these stains work on reclaimed white oak with a distressed finish?
Both special walnut and provincial can enhance the character of reclaimed wood. Provincial often highlights the weathered patina, while special walnut can mask some imperfections if you prefer a more uniform look.
What is the best way to clean white oak after staining?
Use a soft, lint‑free cloth to remove dust before applying the stain. After the final topcoat, clean with a mild wood soap and a damp cloth; avoid abrasive cleaners that could dull the finish.
Choosing between special walnut and provincial stain on white oak is more than a color decision—it’s a strategic move that influences the mood, durability, and resale appeal of your space. By understanding how each product interacts with white oak’s grain, preparing the wood correctly, and applying the stain with care, you can achieve a finish that feels both timeless and tailored to your personal style.
Ready to bring your vision to life? Test both stains, consider the lighting and traffic of each room, and remember that a well‑executed finish can become the foundation of a beautifully cohesive home. For more inspiration on pairing wood finishes with modern décor, explore our guide on dark walnut vs espresso stain and discover how subtle color shifts can transform an entire interior.
Happy staining, and may your white oak surfaces shine with the perfect blend of elegance and warmth.