Table of Contents
- how to plumb multiple shower heads a step by step diagram guide
- how to plumb multiple shower heads a step by step diagram guide – detailed layout considerations
- Planning Your Shower System Layout
- Choosing the Right Materials and Valves
- Installing the Supply Manifold and Branch Lines
- Mounting and Connecting Multiple Shower Heads
- Testing, Balancing, and Finishing Touches
- Quick Tips for Multi‑Shower Plumbing
- Common Mistakes to Avoid
- Frequently Asked Questions
- Final Thoughts
How to Plumb Multiple Shower Heads: Step‑by‑Step Diagram Guide
Adding more than one shower head can transform an ordinary bathroom into a spa‑like retreat. Whether you’re planning a dual‑head rain shower, a handheld plus a fixed head, or a full waterfall experience, the plumbing behind the scenes must be carefully designed and executed. A well‑executed installation not only delivers consistent water pressure but also protects your home from leaks, corrosion, and costly repairs. This guide walks you through every stage—from initial layout to final testing—using clear, diagram‑style explanations that make the process approachable for confident DIYers and seasoned tradespeople alike.
In the sections that follow, you’ll discover how to assess water supply capacity, select the right manifold, route branch lines, and balance flow among multiple heads. You’ll also find quick tips, common pitfalls, and a FAQ that addresses the most frequent concerns homeowners encounter. By the end of this article, you’ll have a practical blueprint you can reference on the job site, ensuring each shower head delivers the luxurious experience you envisioned.
how to plumb multiple shower heads a step by step diagram guide
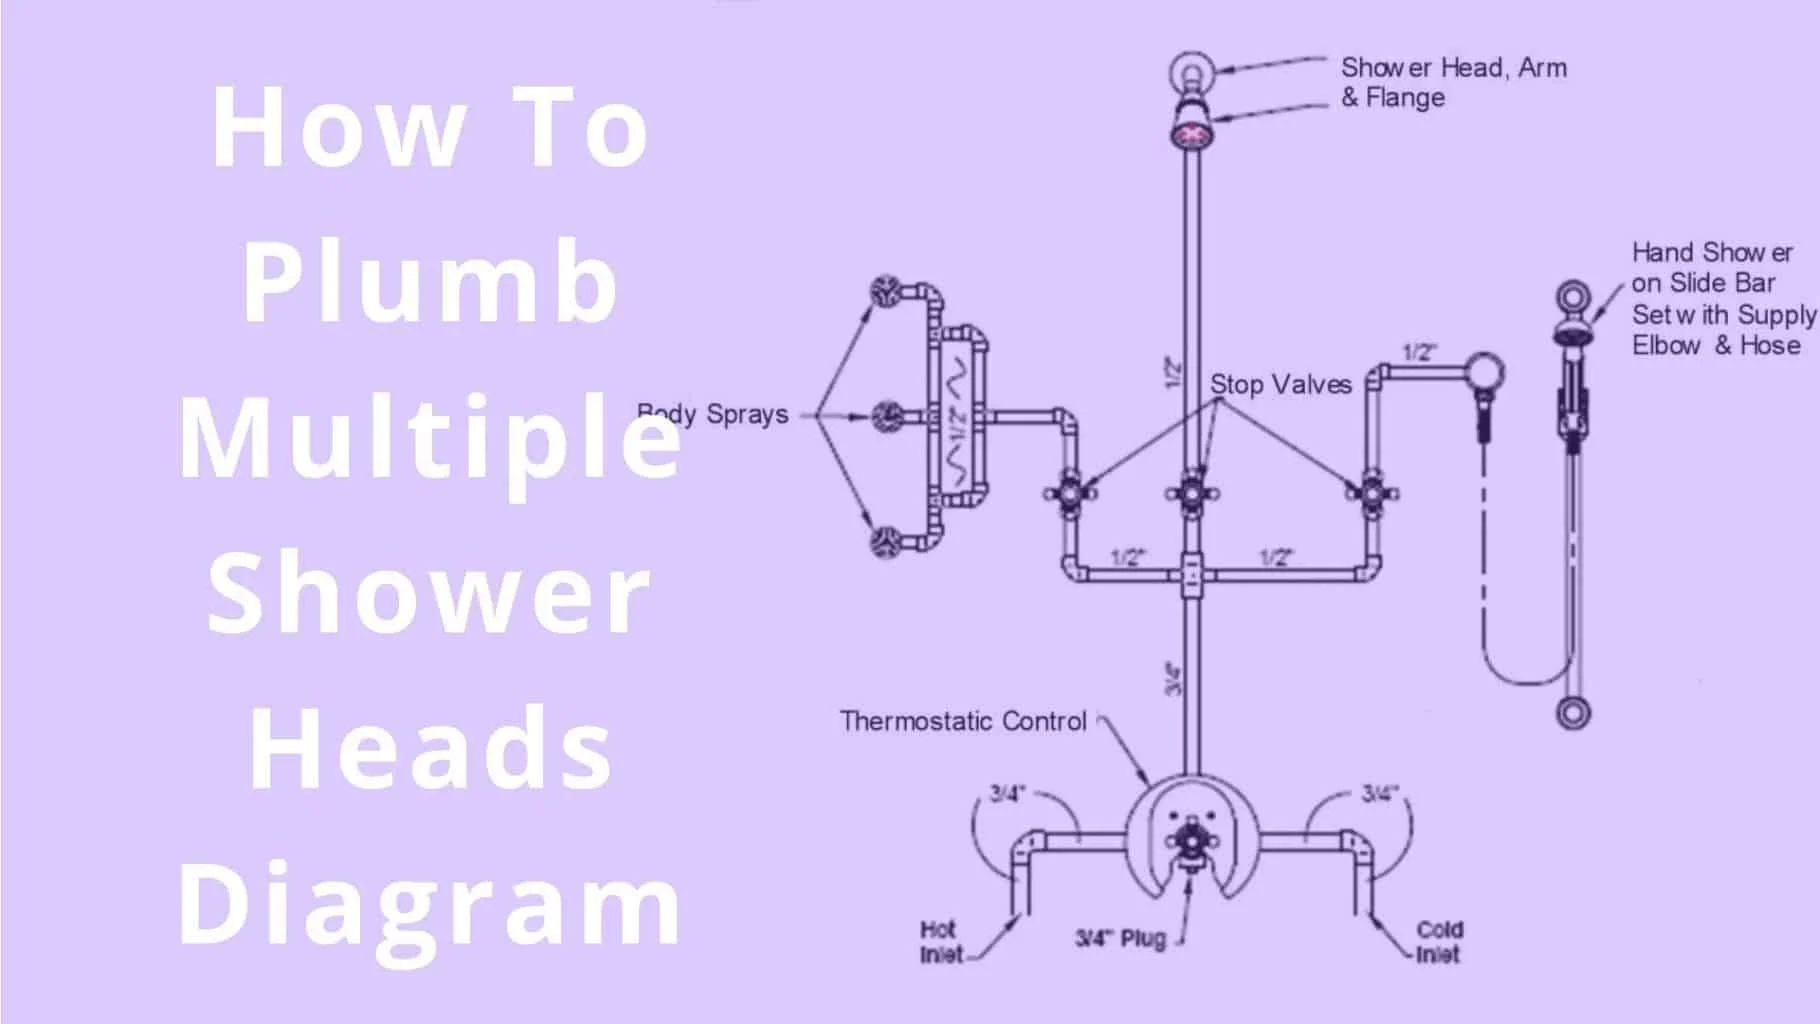
The heart of any multi‑shower system lies in a clear, logical diagram that maps out every pipe, valve, and connector. Begin by sketching a simple layout on graph paper or a digital design tool. Mark the main cold‑water supply line, then draw a line for the dedicated shower manifold—a central hub that distributes water to each head. From the manifold, extend branch lines to the locations of each shower head, keeping the runs as short and straight as possible to minimize pressure loss.
Key components to include in your diagram are:
- Shut‑off valves for each branch (allows individual control and maintenance).
- Pressure‑balancing or thermostatic mixing valves (ensures consistent temperature).
- Check valves (prevents backflow into the system).
- Pipe size annotations (typically ½‑inch for residential shower circuits).
Once the diagram is complete, double‑check the total demand. A typical 2‑head shower can draw 4–6 gpm (gallons per minute) each, so verify that your home’s water‑heater capacity and main supply line can support the combined flow without a noticeable drop in pressure. With a solid visual plan, you’ll move to the physical installation with confidence.
how to plumb multiple shower heads a step by step diagram guide – detailed layout considerations
When translating the diagram to reality, pay attention to the elevation of each component. The manifold should sit at a comfortable working height—usually 4‑5 feet off the floor—to allow easy access for future service. Pipe slopes are also important: a slight downward slope toward the shower heads helps prevent air pockets. If you’re installing a thermostatic mixing valve, position it upstream of the manifold so temperature regulation applies uniformly to all heads.
Remember to label each branch on the actual pipe with a waterproof marker or tag. This small step saves hours of confusion later, especially if you need to isolate a single head for repair. By keeping the diagram and on‑site labeling in sync, you create a maintenance‑friendly system that lasts for years.
Planning Your Shower System Layout

The first practical step after drawing a diagram is to assess the physical space. Measure the distance between the existing water supply and the desired locations of each shower head. Consider the type of heads you want—rain, handheld, body spray—and the mounting hardware each requires. For a rain head, you’ll need a ceiling or wall mount with adequate clearance; handhelds often require a flexible hose and a bracket.
In larger bathrooms, a ceiling‑mounted manifold can distribute water evenly while keeping the walls free for tile work. In tighter spaces, a wall‑mounted manifold saves space and simplifies pipe routing. When planning the layout, also think about future upgrades: leaving extra length on the manifold’s ports can accommodate additional heads or a future body jet without rewiring the whole system.
Finally, verify local plumbing codes. Some jurisdictions require a dedicated shut‑off valve for each shower circuit, while others mandate a minimum pipe size for multi‑head installations. Compliance not only avoids costly inspections but also ensures safety and reliability.
Choosing the Right Materials and Valves

Material selection influences both performance and aesthetics. Copper piping offers durability and resistance to corrosion, but it can be expensive and harder to bend on tight corners. PEX (cross‑linked polyethylene) is flexible, easier to install, and less prone to freezing, making it a popular choice for modern bathroom remodels. For visible sections, such as the manifold and exposed elbows, chrome‑plated brass fittings complement the sleek look of contemporary shower hardware.
Valves are the control points of your system. A pressure‑balancing valve maintains a stable temperature despite fluctuations in water pressure, while a thermostatic mixing valve (TMV) locks in a precise temperature setting. When you have multiple heads, a TMV placed before the manifold ensures all heads receive the same temperature, preventing one head from feeling scalding while another runs lukewarm.
Don’t forget to use pipe‑thread sealant or Teflon tape on all threaded connections. This prevents leaks that could damage tile, drywall, or flooring. For a polished finish, cap any unused ports on the manifold with threaded plugs that match your pipe material.
Installing the Supply Manifold and Branch Lines
Start by turning off the main water supply and draining the lines. Install a main shut‑off valve if one isn’t already present, then connect the manifold to the dedicated shower supply line using a short length of ½‑inch copper or PEX, depending on your chosen material. Secure the manifold to a sturdy stud or framing member with appropriate brackets; it should not shift when you tighten fittings.
Next, run the branch lines from the manifold to each shower head location. Keep the runs as straight as possible, using elbows only when necessary to avoid excessive turbulence that can affect flow. If you’re using PEX, a simple push‑through or crimp connection system speeds up the process and reduces the need for soldering.
For each branch, install a shut‑off valve near the shower head. This allows you to isolate one head without draining the entire system—a valuable feature for maintenance or when replacing a single head. Mark each valve on your diagram so you can quickly locate it later.
Mounting and Connecting Multiple Shower Heads
With the manifold and branch lines in place, it’s time to install the shower heads themselves. For ceiling‑mounted rain heads, locate the ceiling joists and drill pilot holes for the mounting bracket. Use a toggle bolt or a specialized ceiling flange to support the weight of the head and the water pressure it will endure.
Handheld heads require a wall‑mounted bracket and a flexible hose. Attach the hose to the branch line using a threaded fitting, then secure the bracket at a comfortable height—typically 48‑56 inches from the floor. Body spray or wall‑mounted fixed heads follow a similar process: attach a mounting plate, then tighten the head onto the threaded pipe.
After each head is mounted, wrap the threaded connection with Teflon tape and hand‑tighten the nut. Use a pipe wrench for the final quarter turn, being careful not to overtighten and strip the threads. Once all heads are connected, cover any exposed pipe with decorative escutcheon plates that match your bathroom hardware for a cohesive look.
Testing, Balancing, and Finishing Touches
Before sealing the walls or applying final tile work, turn the main water supply back on and open each shut‑off valve. Check each connection for leaks, tightening as needed. Run each shower head individually, then together, to observe water pressure and temperature consistency. If one head receives weaker flow, adjust the branch line diameter or install a flow‑balancing valve on that line.
Balancing the system may also involve trimming the length of flexible hoses or adding restrictors to ensure equal distribution. Once satisfied with performance, secure all loose pipe with pipe clamps and apply silicone sealant around any penetrations in walls or ceilings.
Finally, consider adding a decorative trim or a waterproof trim rail that runs along the shower wall. Not only does this protect the tile edge, but it also gives a finished appearance that aligns with modern home décor trends. For inspiration on complementary bathroom styling, see our guide on bathroom décor with woven trays – stylish storage & style.
Quick Tips for Multi‑Shower Plumbing
- Use a dedicated hot‑water line for the shower circuit to prevent temperature fluctuations caused by other fixtures.
- Install a pressure‑reducing valve if your home’s main pressure exceeds 80 psi; this protects fixtures and extends their lifespan.
- Leave extra length on each branch line (about 6‑12 inches) to allow for future adjustments or additional heads.
- When using PEX, opt for the “expansion” type with a crimp ring for the most secure connection.
- Label every valve and pipe on the manifold; a simple color‑coded tag system saves time during repairs.
Common Mistakes to Avoid
Even experienced DIYers can slip up when tackling a complex plumbing project. Here are the most frequent errors and how to sidestep them:
- Undersizing the Supply Line: Using ¼‑inch pipe for the main shower feed will choke flow, especially with multiple heads. Always use at least ½‑inch copper or PEX for the primary circuit.
- Skipping the Pressure‑Balancing Valve: Without a balancing valve, any other fixture turning on (like a toilet flush) can cause a sudden temperature shift, leading to uncomfortable or unsafe showers.
- Improper Slope: Forgetting to slope branch lines slightly downward can trap air, resulting in sputtering water. Aim for a 1‑2% slope toward the heads.
- Over‑tightening Connections: Overtightening can strip threads or crack fittings, causing leaks that may go unnoticed for weeks.
- Neglecting Code Requirements: Local codes often demand a dedicated shut‑off valve per shower circuit. Skipping this can lead to failed inspections and costly re‑work.
Frequently Asked Questions
Can I add three or more shower heads to a single manifold?
Yes, but you must verify that your water‑heater and supply line can handle the combined flow. Typically, each head draws 2‑3 gpm; a three‑head setup may require a larger‑capacity heater or a booster pump.
Do I need a separate hot‑water line for each shower head?
No, a single hot‑water line feeding a mixing valve before the manifold is sufficient. The mixing valve ensures uniform temperature across all heads.
What is the best pipe material for a bathroom remodel?
PEX offers flexibility, ease of installation, and resistance to corrosion, making it ideal for most remodels. Copper remains a solid choice for visible sections or where code mandates metal piping.
How can I prevent water hammer in a multi‑shower system?
Install water‑hammer arrestors on each branch line, especially near fast‑closing valves like the shut‑off or pressure‑balancing valve. This cushions the sudden stop of water flow.
Is it possible to install a multi‑shower system in a rental unit?
Yes, provided you obtain landlord permission and follow local code. Using PEX with push‑through fittings allows for a reversible installation that can be removed without major damage.
For a broader perspective on bathroom styling, you might also enjoy reading how to store Lush bath bombs for long‑lasting luxury, which pairs beautifully with a multi‑head shower experience.
Final Thoughts
Plumbing multiple shower heads may sound intimidating, but with a clear diagram, the right materials, and careful attention to flow balancing, the project becomes a rewarding upgrade that elevates both function and luxury. By following this step‑by‑step diagram guide, you’ll avoid common pitfalls, ensure code compliance, and create a system that delivers consistent pressure and temperature to every head. As you finish the installation, take a moment to appreciate the sleek lines of the manifold hidden behind the wall and the soothing cascade of water from each head—proof that thoughtful design and precise plumbing go hand in hand. If you’re inspired to explore more modern bathroom ideas, The Homara offers endless décor inspiration to complement your newly upgraded shower space.