

Table of Contents
- Understanding the Basics of Tempering Chocolate
- Step‑by‑Step Tempering for Beginners
- Essential Tools and Materials for Chocolate Artistry
- Techniques for Creating Different Types of Chocolate Decorations
- 1. Chocolate Shavings and Curls
- 2. Piped Chocolate Designs
- 3. Molded Shapes and Figures
- 4. Chocolate Paint and Airbrushing
- 5. Chocolate Dusting and Stamping
- Incorporating Chocolate Decorations into Home Décor
- Quick Tips for Perfect Chocolate Decorations
- Common Mistakes and How to Avoid Them
- Frequently Asked Questions
- Can I use a microwave to temper chocolate?
- Do I need a special mold for intricate designs?
- How long do homemade chocolate decorations last?
- Is it safe to eat chocolate decorations that have been painted with edible colors?
- Can I incorporate chocolate decorations into non‑dessert décor?
- What’s the best way to clean tools after working with chocolate?
How to Make Chocolate Decorations at Home: A Complete Guide
Chocolate isn’t just a sweet treat; it’s a versatile medium that can turn an ordinary dessert into a work of art. Whether you’re planning a birthday cake, a festive holiday platter, or a simple after‑dinner treat, mastering how to make chocolate decorations at home opens up endless possibilities for personal expression and impressive presentation.
For many home cooks, the idea of creating professional‑looking chocolate accents can feel intimidating. The good news is that with a few basic tools, a little patience, and the right techniques, you can achieve glossy, crisp, and intricate chocolate pieces that rival those from a boutique patisserie. This guide walks you through every step—tempering, molding, painting, and finishing—so you can confidently add a touch of elegance to your kitchen creations.
In the sections that follow, you’ll learn practical tips, avoid common pitfalls, and discover creative ideas that fit both small‑space apartments and spacious kitchens. By the end, you’ll be ready to answer the question, “how to make chocolate decorations at home,” with confidence and flair.
Understanding the Basics of Tempering Chocolate
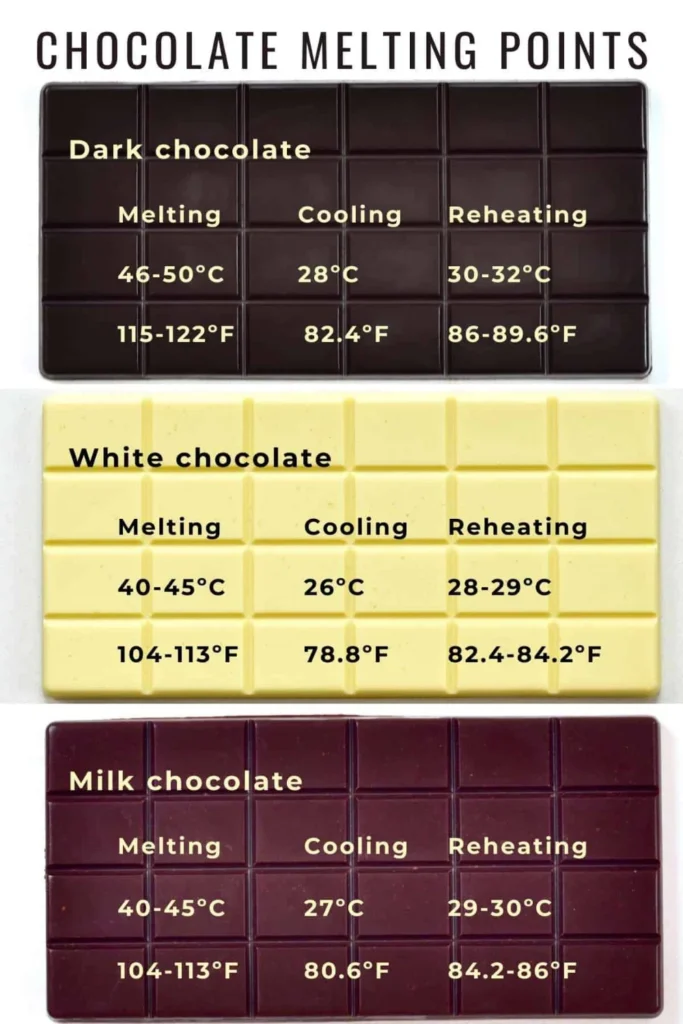
Tempering is the foundation of how to make chocolate decorations at home that sparkle with a professional sheen and snap cleanly when broken. Proper tempering aligns the cocoa butter crystals, giving the chocolate a glossy finish and preventing bloom (the white, powdery coating that can appear when chocolate is stored improperly).
Step‑by‑Step Tempering for Beginners
- Choose quality chocolate: Use couverture or high‑quality baking chocolate with at least 30% cocoa butter.
- Set up a double boiler: Fill a saucepan with a few inches of water, bring to a simmer, and place a heat‑proof bowl on top, ensuring the bowl does not touch the water.
- Melt the chocolate: Stir gently until it reaches 45‑50°C (113‑122°F) for dark chocolate, or 40‑45°C (104‑113°F) for milk and white varieties.
- Cool it down: Transfer two‑thirds of the chocolate to a separate bowl and let it cool to 27‑28°C (80‑82°F) while stirring.
- Re‑heat gently: Return the cooled chocolate to the warm bowl, bringing it up to 31‑32°C (88‑90°F) for dark chocolate, or 29‑30°C (84‑86°F) for milk/white chocolate.
- Test the temper: Dip a spoon into the chocolate; if it firms within a minute and shines, you’re ready to work.
Maintaining the right temperature is crucial—just as you would choose the right capacity for a comfortable home when installing an AC, you need precise control for chocolate tempering. A digital thermometer is a small investment that pays off in flawless results.
Essential Tools and Materials for Chocolate Artistry
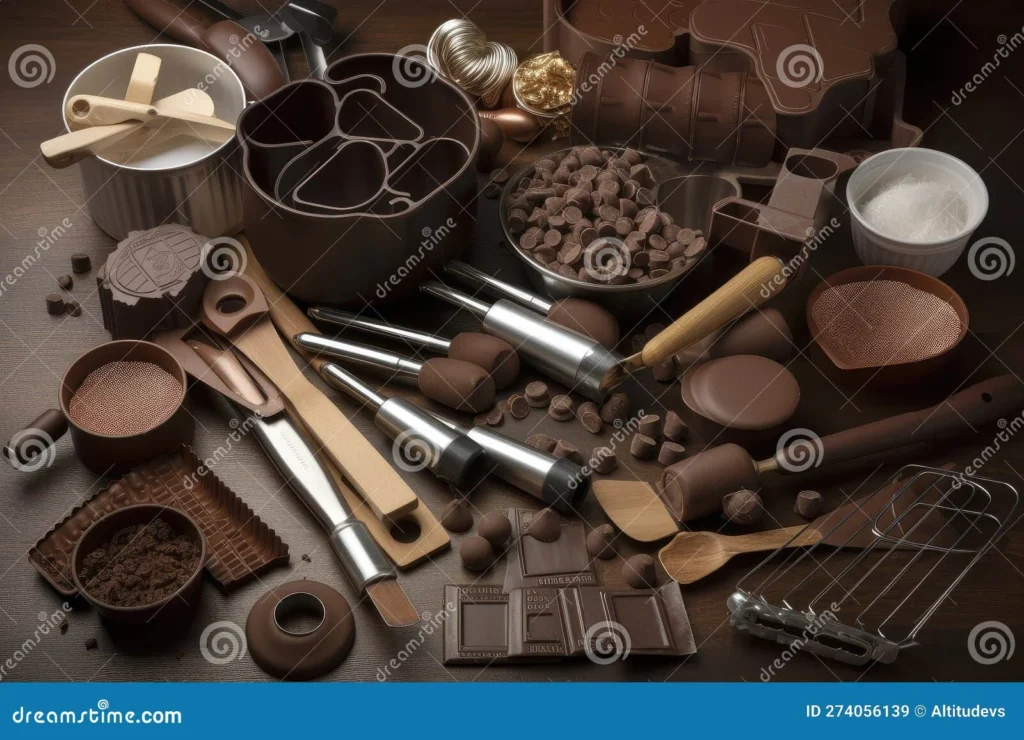
While the core ingredients are simple—chocolate and a heat source—the tools you select can dramatically affect how easy it is to learn how to make chocolate decorations at home. Below is a curated list of must‑have items, ranging from budget‑friendly to professional‑grade options.
- Chocolate molds: Silicone molds are flexible and release easily; polycarbonate molds produce a high‑gloss finish.
- Palette knives and spatulas: For spreading, painting, and shaping chocolate.
- Pastry brush: Ideal for applying thin layers of chocolate or edible paints.
- Thermometer: Digital instant‑read models ensure accurate tempering.
- Microwave or stovetop: Both work; microwaves offer convenience for small batches.
- Airbrush or spray bottle (optional): For fine dusting of cocoa powder, edible glitter, or color accents.
Even if you have limited counter space, these tools can be stored compactly. For instance, a silicone mat doubles as a work surface and a cooling rack, keeping your kitchen tidy while you practice how to make chocolate decorations at home.
Techniques for Creating Different Types of Chocolate Decorations

Now that you understand tempering and have the right tools, let’s explore the various techniques that answer the question of how to make chocolate decorations at home. Each method offers a unique texture and visual impact.
1. Chocolate Shavings and Curls
Shavings are perhaps the simplest way to add texture. Use a vegetable peeler on a solid block of tempered chocolate, then gently twist the peel to create delicate curls. For a more refined look, chill the chocolate block before shaving; the cooler temperature makes the chocolate firmer and easier to handle.
2. Piped Chocolate Designs
Transfer tempered chocolate into a piping bag fitted with a small round tip. Pipe rosettes, swirls, or lace patterns onto parchment paper. Allow each piece to set fully before lifting—this typically takes 15‑20 minutes at room temperature.
3. Molded Shapes and Figures
Pour tempered chocolate into silicone molds of your choice—flowers, hearts, or custom silhouettes. Tap the mold gently to release air bubbles, then let it set. Once solid, unmold carefully and store in a cool, dry place.
4. Chocolate Paint and Airbrushing
For a painterly effect, thin tempered chocolate with a touch of vegetable oil (about 1 % by weight) and use a small brush or airbrush to apply gradients or intricate motifs. This technique is perfect for decorating cake tiers or adding a splash of color to dessert platters.
5. Chocolate Dusting and Stamping
Place a sheet of parchment paper on a flat surface, sprinkle a thin layer of cocoa powder, and gently press a raised chocolate shape onto it. Lift the paper to reveal a crisp, chocolate‑dusted imprint—great for adding subtle accents to macarons or cookies.
When experimenting with these techniques, remember that the key to how to make chocolate decorations at home lies in temperature control and patience. Even a short lapse can cause the chocolate to lose its gloss or develop bloom.
Incorporating Chocolate Decorations into Home Décor
Chocolate art isn’t limited to the plate; it can enhance your overall home décor, especially in kitchen or dining spaces. Here are some ideas that blend edible aesthetics with interior design.
- Chocolate centerpieces: Arrange a collection of chocolate shards, molded shapes, and piped designs on a decorative platter for a striking table setting during holidays.
- Edible wall art: Create a “gallery wall” of chocolate frames using the DIY wall frame arrangement technique—mount chocolate plaques on a wooden board and hang them as an eye‑catching piece.
- Seasonal displays: Use themed chocolate decorations (e.g., snowflakes in winter, pumpkins in fall) to complement seasonal décor in your living room or kitchen island.
These ideas let you showcase your culinary creations as part of your interior design, reinforcing the Homara ethos of integrating style and function.
Quick Tips for Perfect Chocolate Decorations
- Work in a cool, dry environment—humidity can cause chocolate to seize.
- Use a silicone mat to prevent sticking and to keep surfaces clean.
- Always test a small batch before committing to a large project.
- Store finished decorations in an airtight container, layered with parchment to avoid sticking.
- For a glossy finish, give each piece a quick blast of cool air using a small fan.
Common Mistakes and How to Avoid Them
Even seasoned bakers stumble occasionally when learning how to make chocolate decorations at home. Recognizing these pitfalls early can save time and chocolate.
- Overheating chocolate: This causes the cocoa butter to separate, leading to grainy texture. Use a thermometer and remove the bowl from heat as soon as the target temperature is reached.
- Moisture exposure: Water causes chocolate to seize. Keep tools dry and avoid steam.
- Improper storage: Storing chocolate in the refrigerator can cause condensation. Instead, keep it in a cool pantry or a temperature‑controlled drawer.
- Skipping the test temper: Without testing, you won’t know if the chocolate is ready. The spoon test is quick and reliable.
- Using low‑quality chocolate: Inferior chocolate lacks the right cocoa butter content, making tempering difficult and results dull.
By paying attention to these details, your journey of how to make chocolate decorations at home becomes smoother and more rewarding.
Frequently Asked Questions
Can I use a microwave to temper chocolate?
Yes, a microwave can be used for tempering small batches. Heat the chocolate in 20‑second intervals, stirring between each burst, until it reaches the appropriate temperature. Be cautious to avoid overheating, as this is a common mistake when learning how to make chocolate decorations at home.
Do I need a special mold for intricate designs?
While silicone molds are versatile, you can also create custom designs using melted chocolate poured onto a silicone sheet or even a silicone baking mat. Once set, cut the chocolate into shapes using a sharp knife or cookie cutter.
How long do homemade chocolate decorations last?
When stored properly in a cool, dry place, tempered chocolate decorations can last up to three months. For longer storage, keep them in an airtight container with a desiccant packet to control humidity.
Is it safe to eat chocolate decorations that have been painted with edible colors?
Absolutely—edible paints are formulated specifically for food use. Use food‑grade pigments and avoid any non‑edible inks. This ensures your decorative pieces are both beautiful and safe to consume.
Can I incorporate chocolate decorations into non‑dessert décor?
Definitely. Chocolate can be used as a decorative element in centerpieces, wreaths, or even as part of a candle holder display. Just be mindful of temperature—keep the décor away from direct heat sources to prevent melting.
What’s the best way to clean tools after working with chocolate?
Rinse tools with warm water while the chocolate is still warm; the chocolate will melt away easily. For stubborn residue, soak the tools in warm, soapy water, then rinse thoroughly. Dry completely before next use.
Now that you have a thorough understanding of how to make chocolate decorations at home, it’s time to put theory into practice. Gather your tools, temper your chocolate, and let your creativity flow. Whether you’re embellishing a birthday cake, crafting a festive holiday tray, or adding an elegant touch to your kitchen décor, these techniques will help you achieve professional‑grade results with confidence.
Enjoy the process, experiment with flavors and colors, and share your beautiful creations with friends and family. For more inspiration on blending culinary art with interior design, explore our other guides on home décor ideas and small‑space decorating. Happy chocolate crafting!