

Table of Contents
- Understanding gel stain vs poly stain choosing the right finish for your wood projects
- gel stain vs poly stain choosing the right finish for your wood projects: How they work
- Key differences between gel stain and polyurethane stain
- When to select gel stain for your interior woodwork
- When poly stain is the better choice for durability
- Application techniques and tips for flawless results
- Surface preparation
- Applying gel stain
- Applying poly stain
- Choosing the right finish for specific rooms and projects
- Quick Tips for gel stain vs poly stain choosing the right finish for your wood projects
- Common mistakes and how to avoid them
- Frequently Asked Questions
- Conclusion
Gel Stain vs Poly Stain – Choosing the Right Finish for Your Wood Projects
When you set out to enhance a piece of furniture, a deck, or a decorative wall panel, the finish you select can make or break the final look. Two of the most popular options for wood enthusiasts are gel stain and poly stain. Both promise rich color and protection, yet they behave very differently on the grain, in wet environments, and under daily wear. Understanding gel stain vs poly stain choosing the right finish for your wood projects is essential whether you’re a seasoned carpenter or a DIY hobbyist looking to add a professional touch to your home.
In this article we’ll dive deep into the chemistry, aesthetics, and practical considerations of each product type. You’ll learn when to reach for a gel stain, when a poly stain is the smarter investment, and how to apply each finish for a smooth, durable result that complements modern home décor. By the end, you’ll feel confident making an informed decision that aligns with your design vision, budget, and the specific demands of the space you’re styling.
Understanding gel stain vs poly stain choosing the right finish for your wood projects
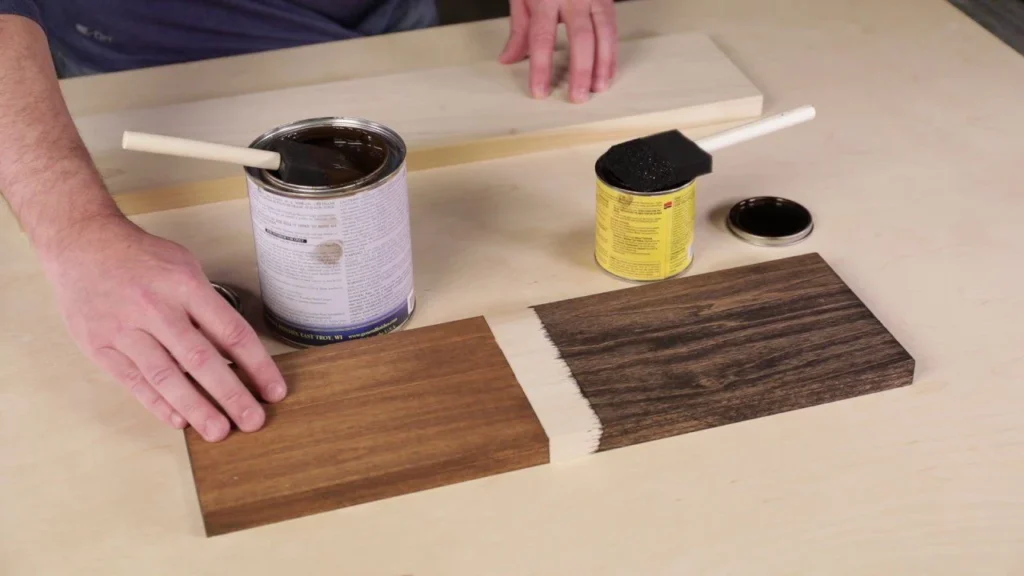
At first glance, gel stain and poly stain may appear to be interchangeable, but they are formulated for distinct purposes. Gel stains are thick, almost toothpaste‑like pigments suspended in a resin base. Their high viscosity lets the color sit on the surface rather than soak deeply, which is perfect for achieving uniform, opaque tones on uneven or reclaimed wood. Poly stains, on the other hand, combine a traditional stain with a clear polyurethane topcoat. This hybrid offers the deep color penetration of a liquid stain while simultaneously sealing the wood with a protective film.
The core of gel stain vs poly stain choosing the right finish for your wood projects lies in how each product interacts with the wood’s pores. Gel stain’s thick consistency prevents it from flowing into the grain, meaning you can control the intensity of the hue with a single coat. Poly stain’s thinner formulation penetrates more readily, allowing the natural grain to show through while still delivering a color overlay. This difference influences everything from the final aesthetic to the level of maintenance required over time.
gel stain vs poly stain choosing the right finish for your wood projects: How they work
Both finishes start with a base of solvents that evaporate during drying, leaving behind pigments and resins. In a gel stain, the pigments are suspended in a high‑solid resin that creates a “gel” that clings to the wood surface. As the solvent evaporates, the resin cures, locking the color in place. Poly stain includes the same pigments but adds a clear polyurethane layer that cures into a hard, scratch‑resistant film. Because the polyurethane cures on top of the stain, it offers superior moisture resistance and can be recoated without stripping the underlying color.
When you compare the two, ask yourself: Do I want a finish that highlights the wood’s texture and can be refreshed easily (gel stain), or do I need a finish that acts as a built‑in protective coating for high‑traffic areas (poly stain)? This simple question often guides the decision‑making process in gel stain vs poly stain choosing the right finish for your wood projects.
Key differences between gel stain and polyurethane stain

- Viscosity: Gel stains are thick, requiring a brush or cloth to spread evenly. Poly stains flow more like traditional liquid stains, making them easier to apply with a sprayer or roller.
- Color depth: Gel stains can achieve a more opaque, uniform color, ideal for covering knots or uneven grain. Poly stains tend to let more of the natural wood grain shine through, offering a more translucent look.
- Durability: Because poly stains contain a clear polyurethane layer, they provide higher resistance to scratches, water, and UV exposure. Gel stains usually need a separate clear topcoat for comparable protection.
- Drying time: Gel stains dry to the touch within 30–45 minutes, but full cure may take 24–48 hours. Poly stains cure faster due to the polyurethane component, often ready for light use within 6–8 hours.
- Re‑application: With gel stains, you can apply a new color layer without stripping the old one, as long as the surface is lightly sanded. Poly stains require careful sanding and cleaning before recoating to ensure adhesion.
These distinctions directly affect how you approach gel stain vs poly stain choosing the right finish for your wood projects. If you’re planning a bedroom headboard that needs a deep, dramatic hue, a gel stain might be your best bet. If you’re finishing a kitchen island that will see daily spills and heat, a poly stain offers the extra shield you need.
When to select gel stain for your interior woodwork

Gel stains shine in environments where visual impact matters more than heavy wear. Here are scenarios where a gel stain is the ideal choice:
- Reclaimed or distressed wood: The thick texture can mask imperfections, knots, and nail holes, delivering a consistent color.
- Furniture pieces with intricate details: Because the stain sits on the surface, you can achieve deep color in carvings and scrollwork without the pigment seeping into hidden crevices.
- Low‑traffic décor accents: Bookshelves, decorative wall panels, and accent tables benefit from the rich, uniform finish that gel stains provide.
- DIY projects with limited tools: You only need a brush, rag, or foam applicator—no sprayer or special ventilation is required.
When applying gel stain, remember to work in thin, even coats, wiping away excess with a clean cloth to avoid lap marks. After the stain has fully cured, protect the surface with a clear water‑based polyurethane for added durability—especially if the piece will encounter occasional moisture.
When poly stain is the better choice for durability
Poly stains excel in high‑use areas where protection is paramount. Consider these applications:
- Outdoor decks and patio furniture: The polyurethane layer resists rain, sunlight, and temperature swings, extending the life of the wood.
- Kitchen countertops and cutting boards: Food‑safe poly stains create a barrier against stains and bacterial growth while preserving the wood’s natural warmth.
- Bathrooms and entryways: Moisture‑prone zones benefit from the water‑resistant qualities of poly stains.
- Commercial spaces: High‑traffic retail or office environments need a finish that can handle frequent cleaning without losing its sheen.
Applying a poly stain is similar to using a regular stain, but you must allow each coat to cure fully before adding the next. Light sanding between coats (220‑grit) ensures proper adhesion and a smooth, glass‑like surface. The final result is a finish that not only looks great but also stands up to the rigors of daily life, making it a top contender in gel stain vs poly stain choosing the right finish for your wood projects.
Application techniques and tips for flawless results
Whether you opt for gel stain or poly stain, mastering the application process is crucial. Below are step‑by‑step guidelines that work for both finishes, with specific adjustments for each product type.
Surface preparation
- Sand the wood with progressively finer grits (150 → 220) to open the pores and remove any previous finishes.
- Remove dust with a vacuum and tack cloth; any leftover particles will cause uneven color.
- For reclaimed wood, consider a wood conditioner to prevent blotching before applying gel stain.
Applying gel stain
- Stir the gel stain thoroughly—do not shake, as this can introduce bubbles.
- Using a high‑density foam brush, work the stain into the grain, pressing gently to ensure even coverage.
- After 5–10 minutes, wipe off excess with a clean, lint‑free cloth moving with the grain.
- Allow the surface to dry for at least 24 hours before adding a clear topcoat.
Applying poly stain
- Mix the poly stain well to distribute pigments evenly.
- Apply with a natural‑bristle brush or a low‑nap roller for smooth surfaces; for large areas, a sprayer can speed up the job.
- Work in sections no larger than 2 sq ft to avoid lap marks.
- Let the first coat dry per the manufacturer’s instructions, then lightly sand with 220‑grit sandpaper before applying the next coat.
- Typically, two to three coats yield the best balance of color depth and protection.
Pro tip: Keep a damp rag nearby when using gel stain to quickly blend any streaks, and always test both finishes on a hidden scrap piece of wood to gauge the final hue before committing to the entire project.
Choosing the right finish for specific rooms and projects
Modern home décor often calls for tailored solutions that complement the function and style of each room. Below is a quick guide that aligns the strengths of gel stain and poly stain with common interior spaces.
- Living Room: For a statement coffee table, a gel stain can deliver a deep, saturated color that contrasts nicely with plush sofas and area rugs. Pair it with a matte polyurethane topcoat for subtle sheen.
- Bedroom: Headboards and nightstands benefit from gel stains that hide imperfections in reclaimed wood, creating a warm, cozy ambience. Add a satin finish for a soft glow.
- Kitchen: Cabinets and island surfaces thrive with poly stains that resist splashes and heat. Choose a semi‑gloss polyurethane for easy cleaning and a contemporary look.
- Bathroom: A vanity made of moisture‑prone wood should receive a poly stain with a marine‑grade polyurethane. This combination protects against steam while preserving the natural wood tone.
- Outdoor patio: Deck boards need a poly stain with UV‑blocking additives to prevent fading. Look for a product specifically labeled for exterior use.
By matching the finish to the room’s demands, you not only enhance the visual appeal but also extend the lifespan of the wood. This strategic approach embodies the essence of gel stain vs poly stain choosing the right finish for your wood projects—making each piece a harmonious part of your overall design narrative.
Quick Tips for gel stain vs poly stain choosing the right finish for your wood projects
- Test colors in natural light; artificial lighting can mislead you about the final shade.
- Use a high‑quality brush—synthetic for gel stain, natural‑bristle for poly stain—to avoid brush‑mark streaks.
- Always work with the grain; going against it can create uneven texture and reduced adhesion.
- For a seamless transition between stained areas, feather the edges with a clean cloth before the finish dries.
- Maintain consistent temperature (65‑75 °F) and low humidity during curing to prevent cloudiness.
Common mistakes and how to avoid them
Even experienced woodworkers can slip up when navigating gel stain vs poly stain choosing the right finish for your wood projects. Here are the most frequent errors and practical solutions:
- Skipping surface prep: Un‑sanded or dusty wood leads to blotchy color. Always sand and clean thoroughly.
- Over‑applying gel stain: Too much product creates a gummy, uneven surface. Apply thin layers and wipe excess promptly.
- Insufficient drying time between poly stain coats: Rushing can trap solvents, causing hazy finishes. Follow the manufacturer’s timing guidelines.
- Using the wrong topcoat: A water‑based topcoat over oil‑based gel stain can cause delamination. Match the base (oil or water) of your topcoat to the stain.
- Neglecting ventilation: Both stains emit fumes; work in a well‑ventilated area or wear a respirator.
Addressing these pitfalls early will save you time, money, and frustration, ensuring that your final result lives up to the vision you set out to achieve.
Frequently Asked Questions
Can I apply a gel stain over an existing polyurethane finish?
Yes, but you must lightly sand the surface (around 220‑grit) to break the glossy seal and clean off dust. This creates a “tooth” for the gel stain to adhere properly. After staining, reapply a fresh polyurethane layer for protection.
Is poly stain suitable for outdoor furniture?
Definitely. Look for a poly stain labeled for exterior use with UV inhibitors and water‑repellent additives. These formulations are designed to withstand weather fluctuations and sunlight, making them ideal for decks, patio chairs, and garden benches.
How many coats of gel stain are recommended?
Typically one to two coats achieve full coverage because the gel’s high pigment load is very opaque. Adding more than two coats rarely deepens the color and may lead to a thick, uneven finish.
Do I need a separate clear coat after applying poly stain?
No. Poly stain already includes a clear polyurethane component, providing both color and protection in a single product. However, for extremely high‑traffic areas, you can add an additional clear polyurethane topcoat for extra wear resistance.
Can I use gel stain on MDF or particleboard?
Gel stain works best on solid wood because it sits on the surface. MDF and particleboard lack the natural grain that gel stain accentuates, often resulting in a blotchy appearance. For these engineered woods, a traditional liquid stain or paint is recommended.
Conclusion
Choosing between gel stain and poly stain is less about which product is “better” and more about aligning the finish with the functional and aesthetic goals of your wood project. Gel stain offers bold, uniform color and easy re‑coloring for decorative pieces, while poly stain delivers a built‑in protective barrier perfect for high‑traffic or moisture‑prone areas. By assessing the room’s demands, the wood’s condition, and your long‑term maintenance preferences, you can make an educated decision that enhances both the beauty and durability of your interiors.
Now that you’re equipped with the knowledge to navigate gel stain vs poly stain choosing the right finish for your wood projects, it’s time to roll up your sleeves and bring your design ideas to life. Explore our guide on small kitchen interior inspiration for more ideas on how finishes can transform compact spaces, or discover timeless styling tips in how to decorate a country home. Happy finishing!