
Table of Contents
- Understanding Light Quality for the Best Light for Miniature Painting
- Choosing the Best Light for Miniature Painting: Key Specifications
- Color Temperature and Its Impact on Miniature Detail
- Brightness, Uniformity, and Eye Comfort
- Practical Lighting Setups for Small Spaces
- Budget‑Friendly Options and DIY Solutions
- Maintaining Your Lighting Environment Over Time
- Quick Tips for Optimizing Miniature Painting Light
- Common Mistakes and How to Avoid Them
- Frequently Asked Questions
Best Light for Miniature Painting: A Home Décor Perspective
Miniature painting may seem like a niche hobby, but the principles behind good lighting are the same as those that make a living room look inviting or a kitchen feel spacious. Whether you’re a hobbyist working on tabletop games, a model‑maker perfecting a diorama, or a DIY enthusiast who loves to display tiny art in the home, the best light for miniature painting can dramatically affect color accuracy, detail visibility, and overall enjoyment. In this guide we’ll explore how lighting choices intersect with interior design, helping you create a functional yet stylish painting nook that blends seamlessly with the rest of your home.
Good lighting isn’t just about brightness; it’s about color fidelity, uniformity, and comfort. A poorly lit workspace can lead to mis‑matched colors, eye strain, and a slower workflow. Conversely, the right illumination can turn a cramped corner into a bright, inviting studio that doubles as an eye‑catching décor element. Below you’ll find practical advice on selecting the best light for miniature painting, arranging it within your living space, and even integrating it with other home décor themes.
Understanding Light Quality for the Best Light for Miniature Painting

Before diving into specific fixtures, it’s essential to grasp the three core qualities that define good illumination: color temperature, color rendering index (CRI), and uniformity. Color temperature, measured in Kelvin (K), tells you whether a light appears warm (yellowish) or cool (bluish). For detailed painting work, a neutral to slightly cool temperature—around 5,000 K to 6,500 K—mirrors natural daylight and reveals true colors without bias.
CRI indicates how accurately a light source reproduces colors compared to natural light. A CRI of 90 or higher is considered excellent for art‑related tasks, ensuring that the hues on your miniatures match the paint tubes. Finally, uniformity means the light spreads evenly across the surface, avoiding hotspots or shadows that could hide fine details. When you combine high CRI, appropriate color temperature, and consistent spread, you’ve essentially found the best light for miniature painting for any space.
Choosing the Best Light for Miniature Painting: Key Specifications
- Color Temperature: 5,000 K–6,500 K (daylight range).
- CRI: 90+ for accurate color representation.
- Lumens: 2,000–3,000 lm for a 2 ft × 2 ft work area.
- Beam Angle: 120°–150° for wide, even coverage.
- Adjustability: Dimmable fixtures let you fine‑tune brightness.
By focusing on these specs, you’ll eliminate guesswork and zero in on the best light for miniature painting that also compliments the aesthetic of your home office or craft corner.
Color Temperature and Its Impact on Miniature Detail
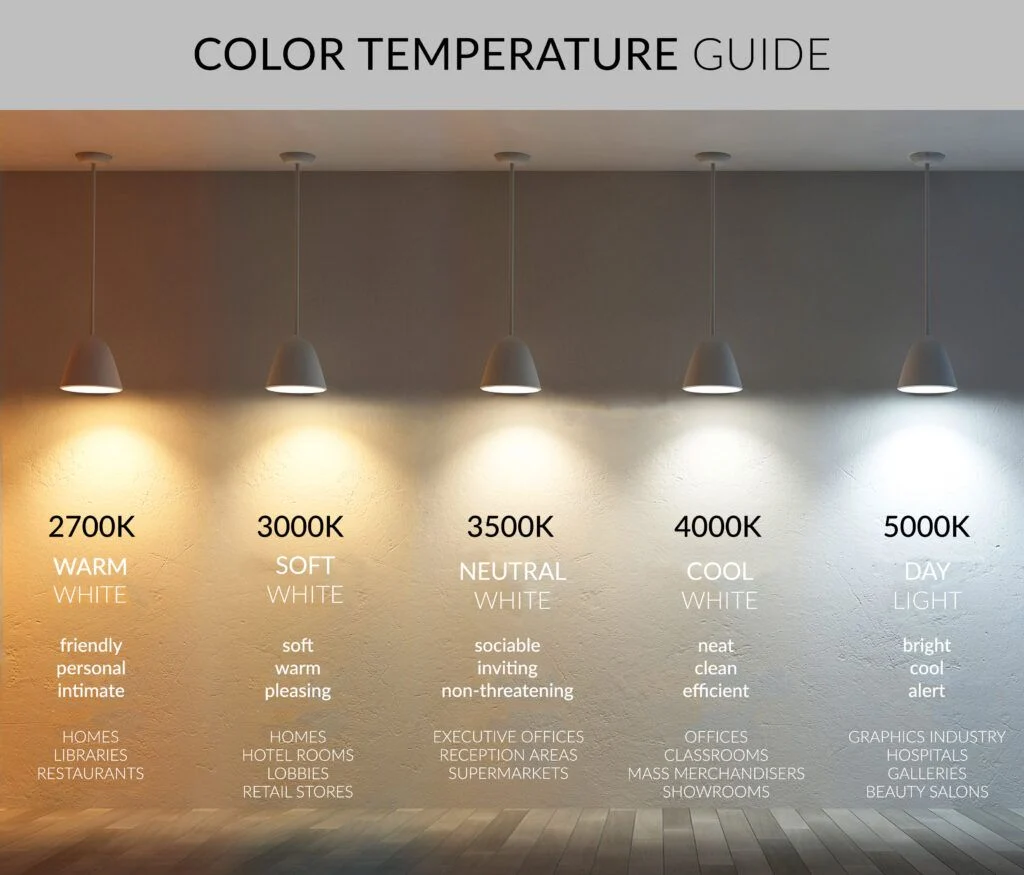
Color temperature is more than a number; it directly influences how you perceive paint pigments. Warm lights (2,700 K–3,500 K) can make reds appear richer but may mute blues and greens, while cool lights (5,000 K–6,500 K) bring out the cooler spectrum with crisp clarity. For miniature painting, where subtle shading and glaze work are common, a cooler daylight range helps you see the true hue of each layer.
If your studio doubles as a living area, consider a light fixture that can switch between warm and cool settings. This flexibility lets you enjoy a cozy ambiance in the evenings and switch to a true daylight mode when it’s time to paint. A dual‑temperature LED panel works well for this purpose, providing both style and function without compromising the best light for miniature painting needs.
Brightness, Uniformity, and Eye Comfort

When you’re staring at tiny details for hours, eye comfort becomes paramount. A brightness level of about 5,000–7,000 lux on the work surface is ideal for most miniature painters. Achieving this level doesn’t require a single massive fixture; a combination of a ceiling‑mounted LED panel and a flexible desk lamp can distribute light evenly and reduce glare.
Uniformity is best achieved with diffusers or soft‑box accessories that scatter light gently across the painting surface. Look for fixtures that claim a uniformity ratio of 0.8 or higher—this means the darkest spot is no less than 80% as bright as the brightest spot, keeping shadows to a minimum. By ensuring consistent illumination, you protect your eyes and maintain color accuracy, both essential components of the best light for miniature painting experience.
Practical Lighting Setups for Small Spaces
Many hobbyists work in apartments or spare rooms where floor space is limited. The good news is that a well‑planned lighting layout can make a small nook feel larger and more functional. Below are three layout ideas that balance the best light for miniature painting with interior design aesthetics:
- Ceiling‑Mounted LED Panel + Adjustable Arm: Mount a slim LED panel directly above the workbench for ambient illumination, then add an adjustable arm lamp with a high CRI bulb for task lighting.
- Wall‑Mounted Light Bar with Diffuser: A sleek light bar installed at eye level provides even coverage without taking up desk space. Pair it with a small, dimmable LED strip under shelves for accent lighting.
- Portable Light Box on a Rolling Cart: For ultimate flexibility, place a light box on a rolling cart. You can move it between rooms, use it as a decorative piece, and store paints underneath.
These setups not only meet the technical requirements of the best light for miniature painting but also add a modern touch to your interior, making the painting area a seamless part of your home décor.
Budget‑Friendly Options and DIY Solutions
You don’t need a $300 studio light to achieve professional results. Many affordable LED desk lamps now offer CRI 95+, adjustable color temperature, and dimming capabilities—all the features you need for the best light for miniature painting. Look for models with a flexible gooseneck, allowing you to direct light precisely where you need it.
If you enjoy DIY projects, consider building a light box using a shallow wooden frame, frosted acrylic sheet, and LED strips. This setup provides diffused, even light and can be customized to match your room’s color palette. A simple LED strip kit paired with a power supply costs under $30 and delivers a CRI of 92+, satisfying both performance and budget constraints.
Maintaining Your Lighting Environment Over Time
Even the best lighting solutions lose efficiency over time. LEDs can dim slightly after a few years, and dust buildup on diffusers reduces brightness. Regular maintenance—cleaning the lenses with a microfiber cloth and checking the color temperature with a handheld meter—keeps your workspace consistent.
For those who integrate lighting into a larger décor scheme, replace bulbs with the same specifications to avoid color shifts that could affect your miniature work. Keeping a small spare of high‑CRI, daylight‑balanced LEDs on hand ensures you won’t be caught off‑guard by a sudden failure.
Quick Tips for Optimizing Miniature Painting Light
- Choose LED bulbs with CRI ≥ 90 and a color temperature of 5,000 K–6,500 K.
- Use diffusers or soft‑boxes to eliminate harsh shadows.
- Position lights at a 45° angle to reduce glare on glossy miniatures.
- Incorporate dimmable fixtures for eye‑comfort during long sessions.
- Regularly clean lenses and replace aging LEDs to maintain consistency.
Common Mistakes and How to Avoid Them
Even experienced painters sometimes overlook lighting basics. The most frequent errors include:
- Relying on Warm Ambient Light: Overhead bulbs at 2,700 K can distort colors. Add a dedicated task lamp with daylight balance.
- Insufficient Brightness: Working under < 3,000 lux makes fine detail hard to see. Increase lumens or add a supplemental lamp.
- Ignoring Uniformity: Spotlights create hotspots that hide imperfections. Use diffusers or a broader beam angle.
- Forgetting Eye Health: Continuous exposure to bright LEDs without breaks can cause fatigue. Follow the 20‑20‑20 rule: every 20 minutes, look 20 feet away for 20 seconds.
By addressing these pitfalls, you’ll preserve both the quality of your miniatures and the health of your eyes, ensuring that your lighting setup remains the best light for miniature painting for years to come.
Frequently Asked Questions
What color temperature is ideal for miniature painting?
A daylight range of 5,000 K to 6,500 K provides the most accurate color representation, making it the preferred choice for the best light for miniature painting.
Do I need a high CRI rating?
Yes. A CRI of 90 or higher ensures that colors appear true to life, which is crucial when matching paint shades on tiny models.
Can I use a regular desk lamp?
You can, but only if the lamp offers adjustable color temperature, a high CRI bulb, and enough lumens to illuminate the work surface evenly. Otherwise, consider upgrading to a dedicated LED panel.
How many lumens are sufficient for a 2 ft × 2 ft painting area?
Aim for 2,000–3,000 lumens total, distributed across the surface to achieve 5,000–7,000 lux for comfortable, detailed work.
Is it safe to place the light directly over the paint?
Yes, as long as the fixture is diffused and the heat output is low. LEDs produce minimal heat, making them safe for prolonged use without drying out the paints.
By answering these common queries, we hope you feel more confident in selecting and using the best light for miniature painting within your home.
Choosing the right illumination transforms a simple hobby table into a polished creative studio that fits beautifully into your living space. With the guidelines above, you can enjoy accurate colors, reduced eye strain, and a workspace that complements your home’s décor. Remember to revisit your lighting setup periodically, keep it clean, and adjust as needed—your miniatures (and your eyes) will thank you.