
Table of Contents
- Understanding the Basics: What Is Tile Offset 1 3 vs 1 2?
- Tile Offset 1 3 vs 1 2 Striking the Right Balance in Small Spaces
- When to Choose Tile Offset 1 3: Creating Flow and Subtlety
- When to Choose Tile Offset 1 2: Structure and Classic Appeal
- Design Tips for Mixing Offsets with Colour and Texture
- Quick Tips for Installing Tile Offset 1 3 vs 1 2
- Common Mistakes and How to Avoid Them
- Frequently Asked Questions
- What is the visual difference between tile offset 1 3 and tile offset 1 2?
- Can I mix both offsets in the same home?
- Which offset works best for small bedrooms?
- Do I need a professional installer for a 1‑3 offset?
- How does grout colour affect the perception of tile offset patterns?
- Is tile offset important for outdoor patio tiles?
- Real‑World Applications: Case Studies
- Choosing the Right Tile and Offset for Your Project
Tile Offset 1 3 vs 1 2: Striking the Right Balance for Modern Home Design
When it comes to laying tile, the offset pattern can dramatically influence the visual rhythm of a room. Two of the most popular choices are the 1‑3 offset and the 1‑2 offset, each offering a distinct feel while still maintaining a sense of order. Understanding how these patterns work helps homeowners and designers create spaces that feel both dynamic and cohesive.
This article breaks down the subtle differences between tile offset 1 3 vs 1 2, explains when each works best, and provides practical tips for achieving a harmonious look. Whether you’re renovating a bathroom, updating a kitchen backsplash, or adding texture to a living‑room floor, mastering these offsets can make your design decisions more confident and effective.
Read on to learn how to strike the right balance, avoid common pitfalls, and apply these insights to real‑world projects.
Understanding the Basics: What Is Tile Offset 1 3 vs 1 2?

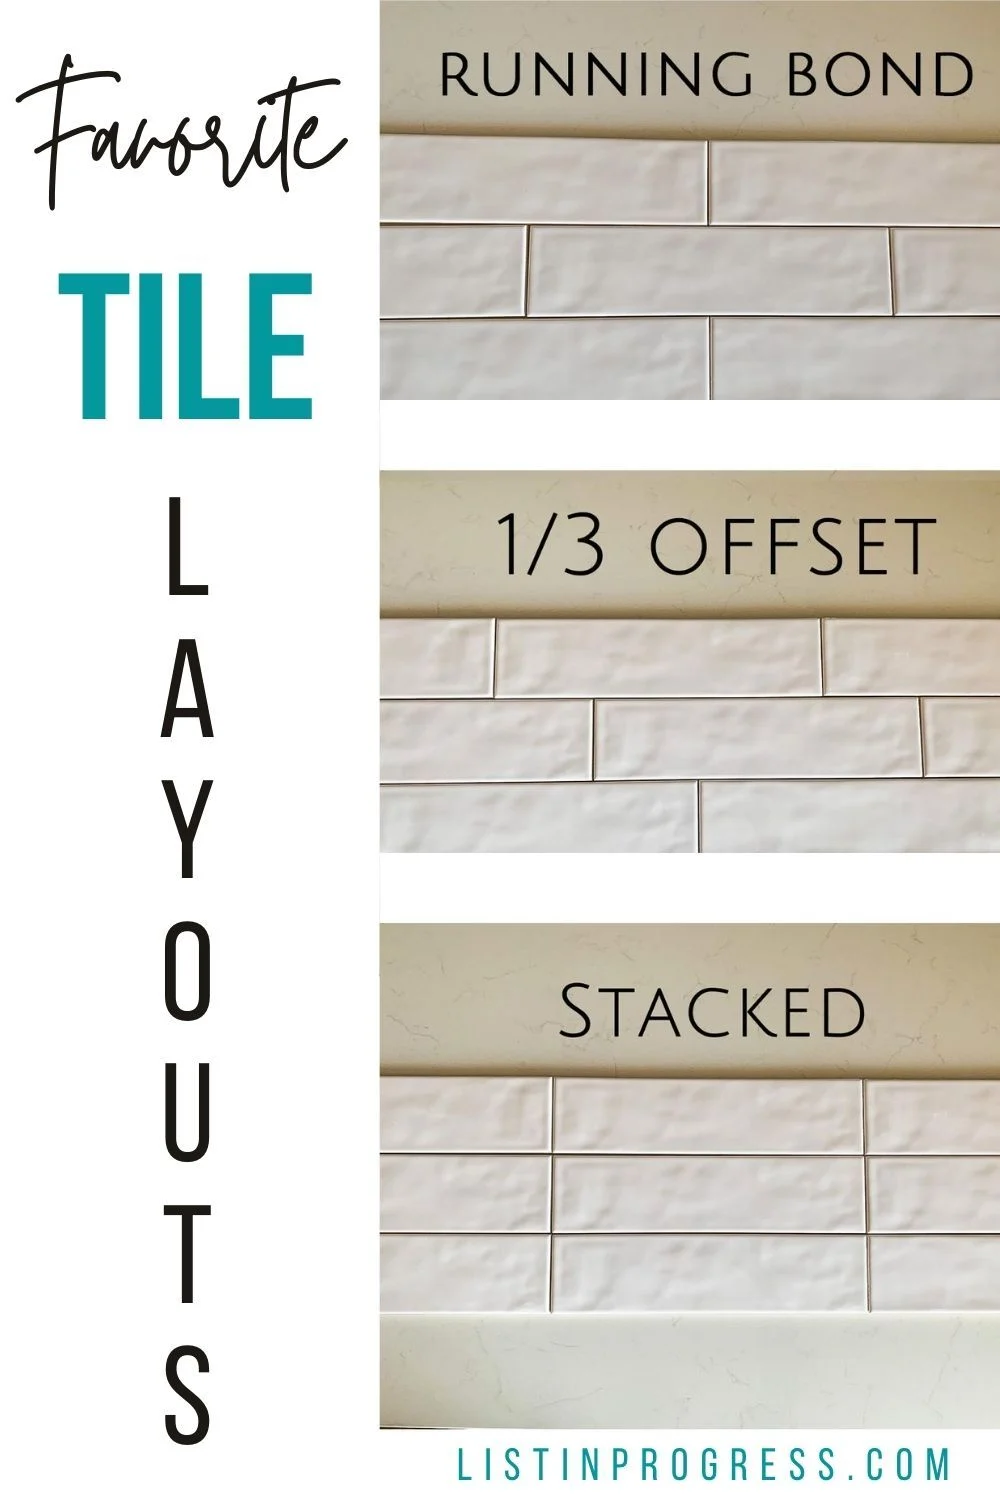
Tile offset refers to the horizontal shift of each successive row of tiles. In a 1‑3 offset, each row is shifted by one‑third of the tile’s length, creating a staggered effect that repeats every three rows. Conversely, a 1‑2 offset shifts each row by half the tile’s length, resulting in a classic brick‑like pattern that repeats every two rows.
Both offsets prevent long, uninterrupted grout lines that can make a space feel static. The key difference lies in the visual tempo: 1‑3 offset produces a slower, more subtle rhythm, while 1‑2 offset offers a tighter, more structured feel. Choosing the right one depends on the room’s size, lighting, and the overall aesthetic you aim to achieve.
Tile Offset 1 3 vs 1 2 Striking the Right Balance in Small Spaces
In compact rooms, a 1‑2 offset can create the illusion of more floor area because the frequent stagger breaks up the visual weight of each tile. However, if the tiles are very small or the grout lines are bold, the 1‑3 offset may soften the look, preventing the space from feeling overly busy. For example, a small bathroom with 12‑inch subway tiles often benefits from a 1‑2 offset, whereas a larger walk‑in shower can handle the elegance of a 1‑3 offset without overwhelming the eye.
When to Choose Tile Offset 1 3: Creating Flow and Subtlety
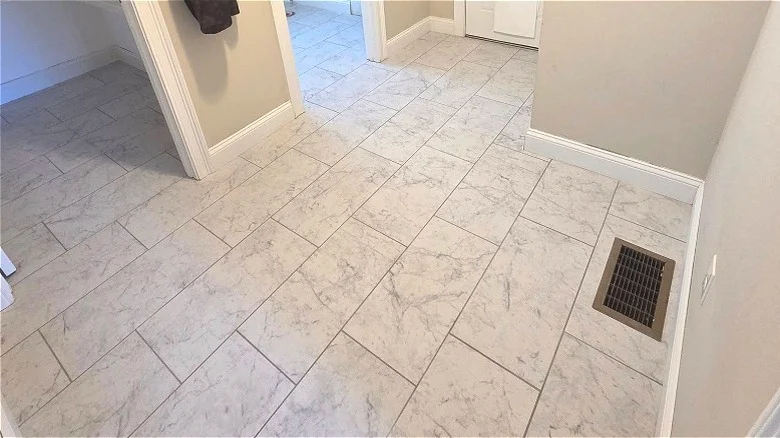
The 1‑3 offset works beautifully in rooms where you want a gentle, flowing movement. Because the pattern repeats only after three rows, the eye travels farther before encountering the same alignment, which can make long corridors appear less monotonous. This offset is especially effective with larger format tiles, such as 24‑inch porcelain slabs, where the stagger adds visual interest without creating a chaotic feel.
Consider these scenarios:
- Open‑plan living areas: The 1‑3 offset helps unify separate zones (kitchen, dining, lounge) while maintaining a subtle visual connection.
- Outdoor patios: Larger stone tiles with a 1‑3 offset mimic natural rock formations, reinforcing an organic, relaxed vibe.
- Feature walls: Using a 1‑3 offset for a backsplash or accent wall can add depth without competing with countertops or cabinets.
When paired with a neutral grout color, the 1‑3 offset can make the floor appear to stretch, perfect for rooms that need a sense of spaciousness.
When to Choose Tile Offset 1 2: Structure and Classic Appeal
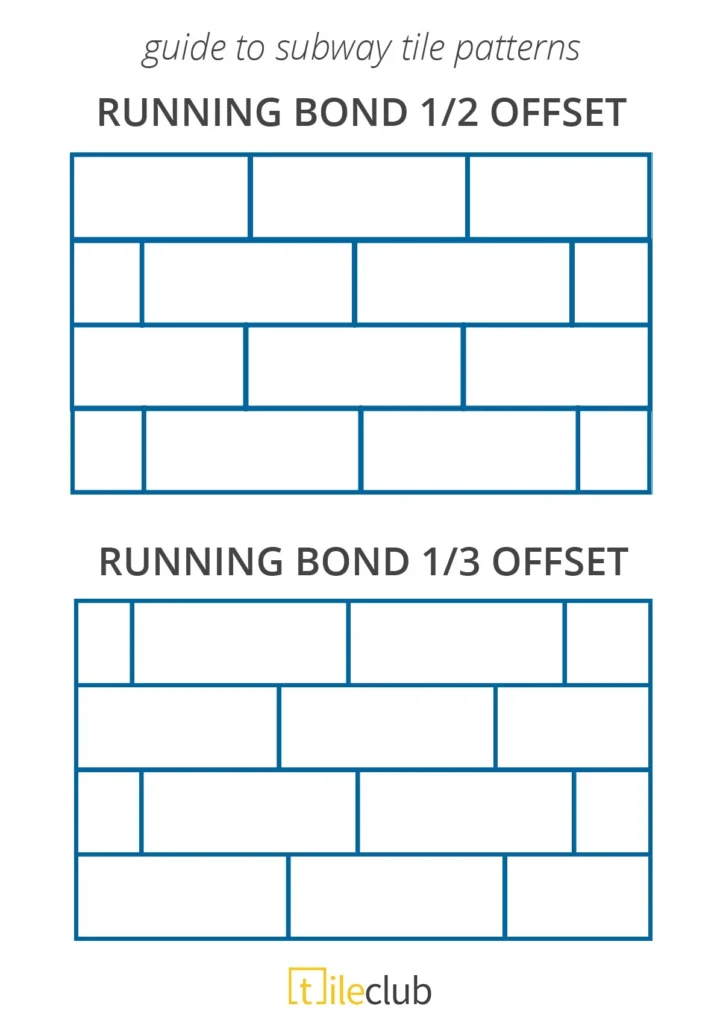
The 1‑2 offset, also known as the brick pattern, is timeless for a reason. Its regularity conveys order and stability, making it ideal for high‑traffic areas where a clean, durable appearance is prized. Because the pattern repeats every two rows, it creates a predictable rhythm that works well with geometric décor, modern furniture, and bold colour palettes.
Key applications include:
- Entryways and hallways: The 1‑2 offset provides a sturdy, grounded look that can handle heavy foot traffic.
- Kitchens: A classic 1‑2 offset for a backsplash can complement stainless‑steel appliances and streamline the visual flow.
- Traditional bathrooms: When paired with subway tiles, a 1‑2 offset evokes a timeless, clean aesthetic that never feels dated.
For homeowners seeking a straightforward, easy‑to‑maintain design, the 1‑2 offset often feels more forgiving, especially if the grout lines are wider or the tiles are smaller.
Design Tips for Mixing Offsets with Colour and Texture
While the offset pattern itself is a powerful design tool, integrating colour and texture elevates the overall effect. Here are some practical ideas:
- Contrast the grout: Light grout with dark tiles (or vice versa) can emphasize the offset pattern, making the 1‑3 or 1‑2 layout a focal point.
- Introduce subtle colour variations: Using tiles that vary slightly in shade creates a muted mosaic effect, especially effective with a 1‑3 offset.
- Layer with patterned rugs: In living rooms, a rug that echoes the tile’s offset can tie the floor and furnishings together, reinforcing cohesion.
- Pair with natural materials: Combining a 1‑3 offset of stone tiles with wooden trim adds warmth, while a 1‑2 offset with polished porcelain adds sleekness.
For inspiration on how to blend textures, check out our guide on natural home styling ideas – bring the outdoors inside.
Quick Tips for Installing Tile Offset 1 3 vs 1 2
Implementing the right offset doesn’t have to be daunting. Keep these quick actions in mind during the planning and installation phases:
- Measure twice, plan the layout on paper, and use a dry‑fit method before committing to adhesive.
- Start the first row at the centre of the room to ensure symmetrical cuts on both ends.
- Maintain consistent grout width; variations can distort the intended pattern.
- Use spacers that correspond to your desired grout line (¼‑inches works well for most offsets).
- Consider using a laser level to keep rows perfectly straight, especially for 1‑3 offsets where misalignment is more noticeable.
Common Mistakes and How to Avoid Them
Even seasoned DIYers can slip up when working with tile offsets. Recognising these pitfalls early can save time, money, and frustration:
- Ignoring the room’s dimensions: A 1‑3 offset on a very narrow hallway can lead to excessive cutting and visual clutter.
- Uneven grout lines: Inconsistent spacing disrupts the pattern, making the offset look sloppy. Invest in quality spacers.
- Choosing the wrong tile size: Small tiles with a 1‑3 offset can create a busy, overwhelming surface. Pair larger tiles with the 1‑3 offset for balance.
- Forgetting to account for fixtures: Cutting around cabinets, tubs, or built‑in appliances should be planned early to avoid mismatched rows.
- Skipping a dry‑run: Laying tiles without adhesive first reveals potential layout issues, especially with complex offsets.
Frequently Asked Questions
What is the visual difference between tile offset 1 3 and tile offset 1 2?
The 1‑3 offset creates a slower, more flowing visual rhythm that repeats every three rows, while the 1‑2 offset produces a tighter, brick‑like pattern that repeats every two rows. The former feels more spacious; the latter feels more structured.
Can I mix both offsets in the same home?
Yes, mixing offsets can add interest when done intentionally. Use 1‑3 in larger, open areas for a subtle flow, and 1‑2 in high‑traffic zones where a classic look is desired. Ensure colour and grout consistency to maintain cohesion.
Which offset works best for small bedrooms?
For small bedrooms, a 1‑2 offset often works better because the frequent stagger can make the floor appear larger. Pair it with light‑coloured tiles and narrow grout lines for maximum visual expansion.
Do I need a professional installer for a 1‑3 offset?
While a skilled DIYer can manage a 1‑3 offset with careful planning, professional installation guarantees precise alignment and uniform grout lines, especially on large‑format tiles where misalignment is more visible.
How does grout colour affect the perception of tile offset patterns?
Light grout on dark tiles highlights the offset, making the pattern stand out, whereas dark grout on light tiles can mute the offset for a softer look. Choose based on whether you want the pattern to be a focal point or a subtle backdrop.
Is tile offset important for outdoor patio tiles?
Absolutely. Outdoor tiles face weathering and foot traffic, so an offset—particularly 1‑3—helps hide minor imperfections and creates a more natural, stone‑like appearance that blends with landscaping.
Real‑World Applications: Case Studies
Case Study 1 – Modern Loft Living Room: A 30‑by‑40‑foot loft used 24‑inch porcelain tiles with a 1‑3 offset, light gray grout, and a subtle colour gradient in the tiles. The offset elongated the space, while the muted palette kept the room calm. The design team paired the floor with a best craft cabinet in a contrasting dark finish to anchor the seating area.
Case Study 2 – Cozy Bathroom Retreat: A 6×8‑foot bathroom featured classic white subway tiles laid in a 1‑2 offset with charcoal grout. The strong contrast emphasized clean lines and created a spa‑like ambiance. A small accent wall behind the vanity displayed a DIY simple wall collage, adding personality without disrupting the cohesive tile pattern.
Case Study 3 – Small Bedroom Headboard: Using 8‑inch square tiles in a 1‑2 offset, the bedroom designer added a patterned headboard that echoed the tile’s rhythm. The result was a harmonious visual flow that made the modest space feel intentionally designed. For more inspiration, see our small bedroom headboard décor ideas.
Choosing the Right Tile and Offset for Your Project
Begin with these three decision points:
- Tile size: Larger tiles favor a 1‑3 offset; smaller tiles often look cleaner with a 1‑2 offset.
- Room function: High‑traffic areas benefit from the durability and order of a 1‑2 offset, while living spaces that aim for a sense of flow may opt for 1‑3.
- Design language: Modern, minimalist interiors lean toward the subtlety of 1‑3, whereas traditional or industrial styles usually embrace the classic 1‑2.
Once you’ve identified these factors, sketch the layout, test with sample tiles, and visualise the final look using design software or a simple paper mock‑up. This process ensures the chosen offset truly strikes the right balance for your space.
By thoughtfully selecting between tile offset 1 3 vs 1 2, you can shape how a room feels—whether it’s expansive, orderly, or subtly dynamic. The key is to align the offset with the room’s purpose, size, and aesthetic goals.
Ready to transform your home with the perfect tile pattern? Experiment with both offsets, keep the tips above in mind, and watch your spaces evolve into balanced, beautiful environments that reflect your personal style.