
Table of Contents
- Understanding Steam Bath vs Water Bath Baking
- What Is Steam Bath Baking?
- What Is Water Bath Baking?
- Benefits of Steam Bath Baking for Home Breads and Pastries
- Crust Development and Moisture Retention in Steam Bath Baking
- Advantages of Water Bath Baking in Delicate Desserts
- Even Heat Distribution for Custards and Cheesecakes
- Practical Kitchen Set‑ups: How to Create a Steam Bath at Home
- Steam Bath vs Water Bath Baking: Choosing the Right Tool
- Creating a Water Bath (Bain‑Marie) for Baking
- Proper Pan Selection and Temperature Control for Water Bath Baking
- Quick Tips for Mastering Both Techniques
- Common Mistakes and How to Avoid Them
- Frequently Asked Questions
- Can I use a microwave to generate steam for steam bath baking?
- Do I need to cover my baking dish when using a water bath?
- How long should the water bath stay in the oven?
- Is steam bath baking suitable for gluten‑free breads?
- Can I combine both techniques in one recipe?
- What safety precautions should I observe?
Steam Bath vs Water Bath Baking: A Complete Guide
Whether you’re perfecting a crusty sourdough loaf or aiming for a silky cheesecake, the method you choose to control moisture and heat can make a dramatic difference. Two classic techniques—steam bath and water bath—offer distinct ways to influence texture, rise, and evenness of bake. Understanding how each works, when to apply them, and the practical steps to set them up in a typical kitchen empowers home bakers to achieve professional‑grade results without expensive equipment. In this article, we’ll explore the science behind steam bath vs water bath baking, compare their advantages, and provide actionable tips that fit into modern home décor and kitchen design.
Beyond the culinary benefits, these methods also intersect with interior design considerations. A well‑organized kitchen that accommodates a Dutch oven or a bain‑marie can enhance workflow, reduce clutter, and maintain the sleek aesthetic many homeowners desire. Let’s dive into the details, so you can confidently choose the right technique for every recipe, whether you’re baking in a compact apartment or a spacious modern home.
Understanding Steam Bath vs Water Bath Baking
The phrase steam bath vs water bath baking often appears in professional baking circles, yet many home cooks are unsure what each term truly means. A steam bath involves introducing a burst of moisture into the oven environment, typically during the initial stage of baking. This moisture creates a humid atmosphere that delays crust formation, allowing dough to expand fully before the crust sets. In contrast, a water bath—also known as a bain‑marie—places the baking vessel in a larger pan filled with hot water, delivering gentle, uniform heat around delicate preparations such as custards, flans, or cheesecakes.
Both techniques hinge on precise temperature control, but they serve opposite goals. Steam encourages oven spring and a glossy crust, while water bath provides a protective buffer against direct oven heat, preventing cracks and over‑browning. Recognizing these core differences is the first step in mastering steam bath vs water bath baking for a variety of recipes.
What Is Steam Bath Baking?
Steam bath baking creates a humid micro‑climate inside the oven. Professional bakeries often inject steam through built‑in generators, but home bakers can achieve similar results with simple tools: a preheated metal pan filled with boiling water, a spray bottle, or even a cast‑iron Dutch oven with a tight lid. The key is to introduce steam at the right moment—usually the first 10–15 minutes—so the dough can expand without forming a hard crust too early.
When you compare steam bath vs water bath baking, the steam side excels in bread-making, baguettes, and pastries where an open crumb and caramelized crust are prized. The moisture also helps develop a shiny, golden surface that is difficult to replicate with dry heat alone.
What Is Water Bath Baking?
In a water bath, the food sits in a smaller pan that is then placed inside a larger, water‑filled pan. The water conducts heat evenly, surrounding the food with gentle, consistent temperature. This method is indispensable for custard‑based desserts, soufflés, and delicate cakes that can crack or curdle under direct oven heat. By using a water bath, you essentially create a “thermal cushion” that reduces temperature spikes and promotes smooth, even set.
For those weighing steam bath vs water bath baking, the water bath side shines when the goal is a flawless, crack‑free finish—especially in recipes that demand precise temperature stability.
Benefits of Steam Bath Baking for Home Breads and Pastries
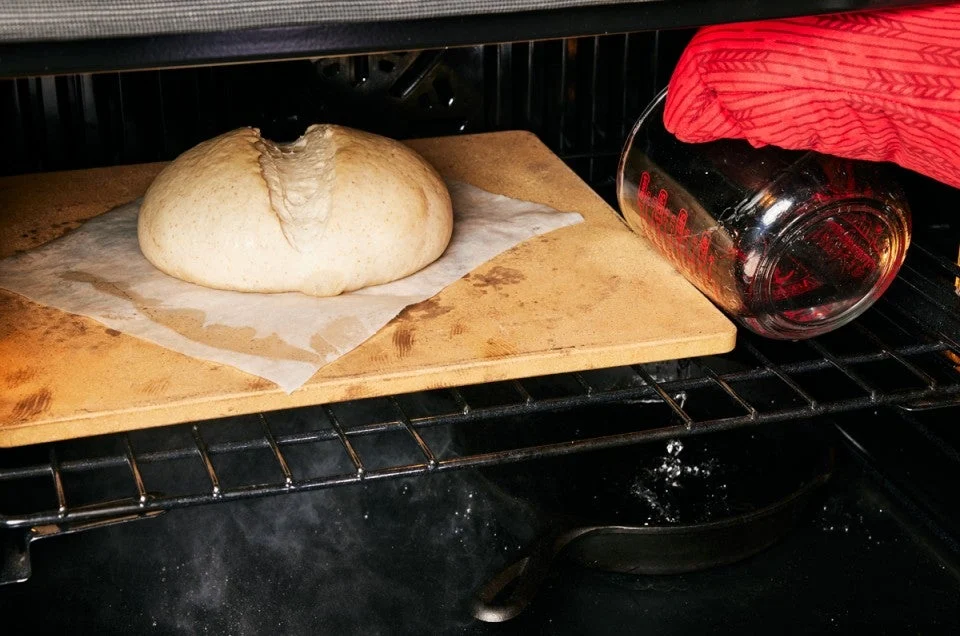
When you employ a steam bath, the immediate benefit is a dramatic improvement in oven spring. The humid environment keeps the outer layer of dough pliable, allowing gases produced by yeast to expand fully. This results in a higher, lighter loaf with an open crumb structure. Additionally, the steam delays crust formation, giving the Maillard reaction a longer window to develop a deep, caramelized color and a crisp, crackly crust.
Beyond texture, steam also contributes to flavor development. The moisture helps dissolve sugars on the dough surface, which caramelize more evenly, enhancing the nutty, toasty notes that define artisan breads. For pastry lovers, steam can produce delicate puff pastry layers that rise evenly without becoming soggy—a balance that many home bakers struggle to achieve.
- Improved oven spring and rise
- Glossier, deeper crust coloration
- Enhanced flavor through better caramelization
- Suitable for sourdough, baguettes, and croissants
Crust Development and Moisture Retention in Steam Bath Baking
One of the most noticeable outcomes of steam bath vs water bath baking is the crust quality. The steam acts like a protective veil, keeping the outer dough moist while the interior continues to bake. As the steam evaporates, it leaves behind a thin layer of gelatinized starch that hardens into a crisp crust. This process also helps retain interior moisture, preventing the crumb from drying out—especially important for longer‑fermented breads.
For interior designers who value clean, organized kitchens, the simplicity of a steam bath—just a tray of hot water—means you won’t need bulky equipment that disrupts your aesthetic. A sleek stainless‑steel pan fits neatly on the oven rack without compromising style.
Advantages of Water Bath Baking in Delicate Desserts
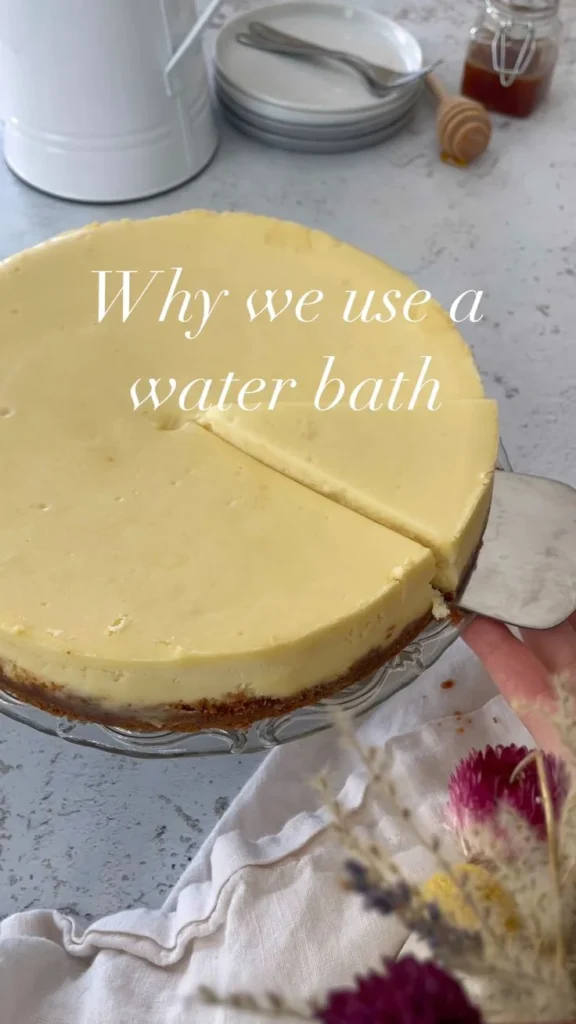
Water bath baking shines when precision is paramount. The gentle, uniform heat prevents the sudden temperature changes that can cause cracks in custards or cause a cheesecake to puff and then collapse. By immersing the baking dish in hot water, you create a stable thermal environment that reduces the risk of over‑cooking the edges while the center remains under‑set.
Many modern kitchens feature elegant glass or ceramic bakeware that benefits from a water bath. The slow, even heat protects the aesthetic finish of these pieces, preventing discoloration or warping. When you compare steam bath vs water bath baking, the latter offers superior control for desserts that demand a silky, crack‑free surface.
- Even heat distribution reduces hot spots
- Prevents cracking and over‑browning
- Ideal for custards, cheesecakes, terrines
- Maintains the visual appeal of delicate bakeware
Even Heat Distribution for Custards and Cheesecakes
A classic example of water bath superiority is the New York‑style cheesecake. Baking it directly on a rack often leads to a dry top or a cracked surface. Placing the springform pan in a bain‑marie ensures the heat reaches the edges at the same rate as the center, allowing the protein structure to set uniformly. The result is a smooth, velvety texture that’s difficult to replicate without a water bath.
In the realm of steam bath vs water bath baking, this even distribution is the defining advantage of the water bath approach for delicate desserts.
Practical Kitchen Set‑ups: How to Create a Steam Bath at Home
Creating a steam environment in a typical home oven doesn’t require a professional steam injector. Here are three common, design‑friendly ways to achieve a reliable steam bath:
- Preheated Metal Tray: Place a rimmed baking sheet on the lower rack, fill it with boiling water, and let it heat as the oven preheats. When you slide your bread onto the middle rack, the water will immediately begin to steam.
- Cast‑Iron Dutch Oven: Preheat the Dutch oven with its lid on. After placing the dough inside, the trapped steam from the dough’s own moisture, combined with a splash of water on the lid, creates a mini‑steam chamber.
- Spray Bottle Method: Keep a clean spray bottle filled with water near the oven. Quickly mist the oven walls just after loading the dough, then close the door to trap the vapor.
Each method respects the clean lines of modern kitchen design—no bulky gadgets, just everyday cookware you likely already own. For additional organization tips, check out our guide on keeping carpet fresh to maintain a tidy cooking space.
Steam Bath vs Water Bath Baking: Choosing the Right Tool
When deciding between the two, consider the recipe’s moisture needs and the visual impact on your kitchen. Steam bath setups are quick, require minimal cleanup, and work well for breads that benefit from a burst of humidity. Water bath setups need a larger pan and more careful monitoring of water levels but deliver the gentle heat essential for flawless desserts.
Creating a Water Bath (Bain‑Marie) for Baking
A water bath, or bain‑marie, is simple to assemble with the right tools. Follow these steps for a reliable setup:
- Select the Right Pan: Use a sturdy, rimmed roasting pan or a deep baking dish that can hold at least an inch of water around the inner vessel.
- Preheat the Oven: Bring the oven to the desired temperature before adding water to avoid temperature shock.
- Boil Water First: Fill the outer pan with boiling water—this reduces the time it takes for the water bath to reach the target temperature.
- Position the Inner Dish: Place your cheesecake or custard dish on a rack inside the outer pan, ensuring it’s centered.
- Monitor Water Level: Check halfway through baking; add hot water if the level drops below half an inch.
Using a water bath also aligns with modern kitchen aesthetics: a sleek glass baking dish nestled in a stainless‑steel pan looks polished and organized. For inspiration on arranging kitchen tools, explore our comparison of Blue Star vs Wolf ranges, which highlights appliances that complement both steam and water bath techniques.
Proper Pan Selection and Temperature Control for Water Bath Baking
The best pans for a water bath are heavy‑bottomed and non‑reactive, such as enameled cast iron or high‑quality stainless steel. These materials conduct heat evenly, preventing hot spots that could over‑cook the edges of your dessert. Maintaining a consistent water temperature—usually around 90–95°C (194–203°F)—ensures the gentle heat needed for a smooth set. Using a kitchen thermometer can help you stay within the optimal range.
Quick Tips for Mastering Both Techniques
- Preheat the water or tray before the oven reaches temperature to avoid delays.
- Use a kitchen timer to add steam within the first 10–15 minutes for breads.
- Check water levels in a water bath halfway through baking to prevent drying.
- For small apartments, a silicone oven liner can contain spills from both steam and water baths.
- Keep a dedicated spray bottle labeled “Steam” for quick misting without cross‑contamination.
Common Mistakes and How to Avoid Them
Even seasoned bakers stumble over the nuances of steam bath vs water bath baking. Here are typical errors and corrective actions:
- Adding Cold Water: Dropping cold water into a hot pan can lower oven temperature dramatically. Always use boiling water.
- Overfilling the Water Bath: Too much water can splash onto the food, diluting flavors or causing soggy edges. Keep the water level just below the rim of the inner dish.
- Opening the Oven Door Too Often: Each opening releases heat and steam, compromising crust development in steam baking and temperature stability in water baths.
- Neglecting Pan Material: Thin, cheap pans can warp under prolonged steam or water exposure, leading to uneven baking.
- Skipping Pre‑Sear or Proofing Steps: For steam bath breads, a proper final proof ensures the dough has built enough tension to rise when steam is introduced.
Addressing these pitfalls ensures your steam bath vs water bath baking experiences are consistently successful, no matter the recipe.
Frequently Asked Questions
Can I use a microwave to generate steam for steam bath baking?
While a microwave can produce steam, it does not distribute it evenly throughout an oven. For reliable results, it’s best to use a preheated pan or a spray bottle directly inside the oven.
Do I need to cover my baking dish when using a water bath?
Covering is optional. Some bakers foil the top to prevent a skin from forming, especially with custards. However, uncovered dishes allow a slight browning on top, which many prefer for cheesecakes.
How long should the water bath stay in the oven?
Maintain the water bath for the entire baking time unless the recipe specifies otherwise. For most custards and cheesecakes, this means 45–60 minutes, checking water level halfway through.
Is steam bath baking suitable for gluten‑free breads?
Yes. The steam environment helps gluten‑free doughs achieve better oven spring and a more appealing crust, compensating for the lack of gluten elasticity.
Can I combine both techniques in one recipe?
In rare cases, a baker might start with a steam bath to achieve a crust, then finish with a water bath for a delicate topping. However, most recipes benefit from choosing one method based on the desired outcome.
What safety precautions should I observe?
Always use oven‑safe cookware, handle hot water with mitts, and keep the oven door closed when adding steam to avoid burns from sudden steam release.
Understanding the nuanced differences between steam bath vs water bath baking equips you to select the perfect technique for every bake. By integrating these methods thoughtfully into your kitchen workflow, you not only enhance the quality of your breads and desserts but also maintain the clean, modern aesthetic that defines contemporary home décor. Experiment with the tips and setups shared here, and watch your culinary creations reach new heights of flavor and presentation.