Table of Contents
- Why Small Wall Décor Using Picture Ledges Works So Well
- Choosing the Right Picture Ledge for Small Spaces
- Styling Techniques for Small Wall Décor Using Picture Ledges
- 1. Start with a Focal Piece
- 2. Add Layers of Varying Heights
- 3. Use a Cohesive Color Palette
- 4. Mix Media Thoughtfully
- 5. Rotate Seasonally
- Room‑by‑Room Applications of Small Wall Décor Using Picture Ledges
- Living Room: Create a Mini Gallery
- Bedroom: Soft and Serene
- Kitchen Nook: Functional Yet Pretty
- Home Office: Organized Inspiration
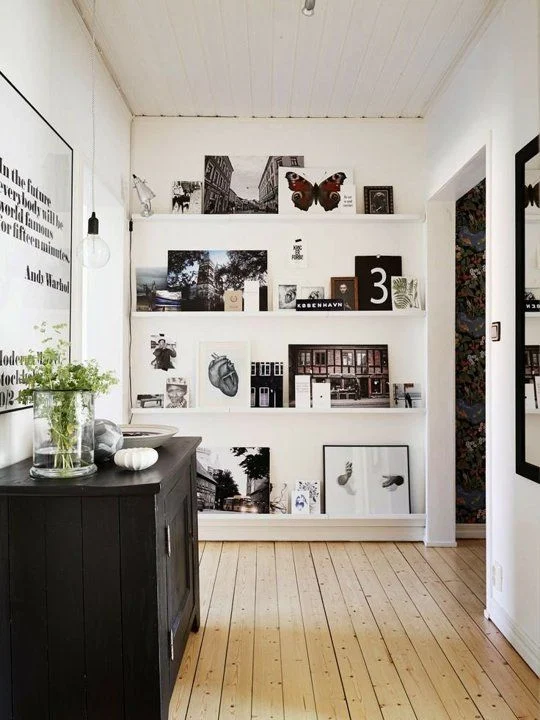
- Hallway: A Visual Pathway
- Quick Tips for Maximizing Small Wall Décor Using Picture Ledges
- Common Mistakes to Avoid
- Frequently Asked Questions
- Bringing It All Together
Small Wall Décor Using Picture Ledges – Creative Ideas for Tiny Spaces
Living in a compact apartment or a cozy cottage often means you have to be clever with every square inch of wall space. One of the most versatile, budget‑friendly tools at your disposal is the picture ledge. Unlike traditional hanging methods that demand precise placement and often leave large empty patches, picture ledges allow you to layer art, photographs, and decorative objects in a way that feels both curated and adaptable. This flexibility makes them perfect for small wall décor using picture ledges, especially when you need to switch styles seasonally or showcase a growing collection.
In this guide we’ll explore why picture ledges are a game‑changer for compact interiors, walk you through selecting the right hardware, and share room‑by‑room styling strategies that keep your walls lively without overwhelming the space. Whether you’re decorating a narrow hallway, a modest bedroom, or a petite living area, you’ll leave with a toolbox of ideas that turn modest walls into personal galleries.
Ready to transform those blank stretches? Let’s dive into the world of small wall décor using picture ledges and discover how a simple shelf can become the centerpiece of your design.
Why Small Wall Décor Using Picture Ledges Works So Well
The magic of small wall décor using picture ledges lies in its inherent flexibility. A ledge is essentially a shallow shelf that sits flush against the wall, giving you a platform to display a mix of framed art, canvases, and three‑dimensional objects. Because you’re not drilling multiple holes for each piece, you can rearrange the composition whenever inspiration strikes—ideal for renters who want to avoid permanent marks.
- Layering capability: Place a large canvas at the back and lean smaller frames in front for depth.
- Scale management: By arranging items at different heights, you can make a short wall appear taller.
- Cost efficiency: One ledge can replace several individual picture hooks, reducing both material costs and installation time.
Because the ledge itself acts as a unifying element, you can mix styles—modern abstracts with vintage prints—without the arrangement feeling chaotic. This harmony is especially valuable in small wall décor using picture ledges, where visual balance is key to preventing a cramped look.
Choosing the Right Picture Ledge for Small Spaces
Not every ledge is created equal. When you’re planning small wall décor using picture ledges, consider the following criteria to ensure the shelf complements rather than competes with the room’s proportions:
- Length: Aim for a ledge that spans roughly 2/3 to 3/4 of the wall’s width. A shorter shelf can look intentional, while a wall‑to‑wall ledge may overwhelm a petite room.
- Depth: A depth of 2–3 inches is enough to support most frames without protruding too far into the living area.
- Material & finish: Light woods or painted MDF blend well in bright spaces; darker finishes add drama to neutral walls.
- Mounting system: Look for hidden brackets that keep the hardware invisible, preserving the clean aesthetic that makes small wall décor using picture ledges look polished.
Once you’ve selected a ledge, measure the vertical space above and below it. Leaving at least 6–8 inches of breathing room between the ledge and ceiling or floor helps the arrangement feel airy, a crucial factor when working with small wall décor using picture ledges.
Styling Techniques for Small Wall Décor Using Picture Ledges
After installing your ledge, the fun part begins: arranging the pieces. Below are proven styling techniques that keep the composition fresh and balanced, perfect for compact walls.
1. Start with a Focal Piece
Choose one larger artwork or a bold photograph as the anchor. Place it at the back of the ledge, centered or slightly offset depending on your overall layout. This anchor gives the eye a point of reference, allowing the surrounding items to complement rather than compete.
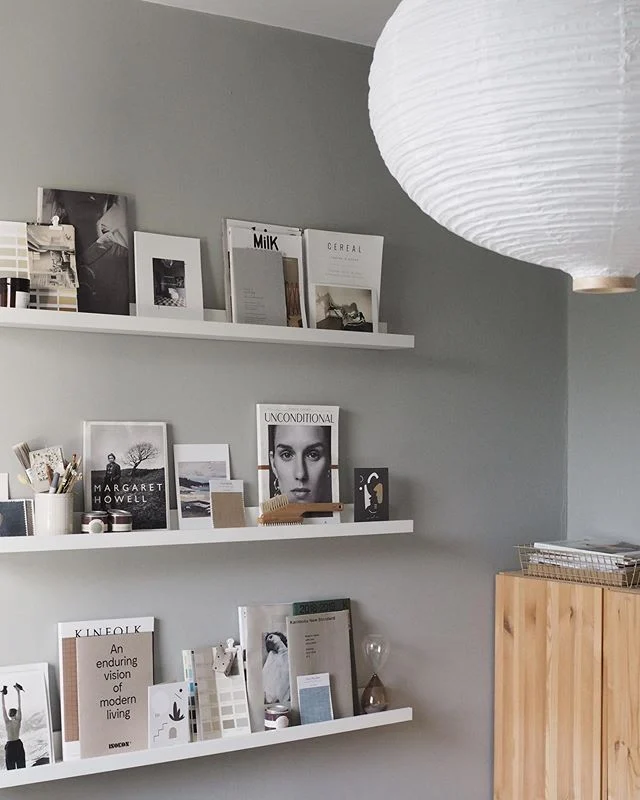
2. Add Layers of Varying Heights
Lean smaller frames in front of the anchor, angling them slightly for a dynamic look. You can also incorporate decorative objects—ceramic vases, small plants, or sculptural pieces—to add three‑dimensional interest. The key is to keep the tallest items no more than 1–2 inches higher than the ledge to maintain a streamlined silhouette.
3. Use a Cohesive Color Palette
When dealing with small wall décor using picture ledges, a unified color story prevents visual clutter. Pick frames that share a common metal finish (e.g., brushed gold) or choose artwork that echoes the room’s accent colors. This subtle continuity makes the wall appear larger and more intentional.
4. Mix Media Thoughtfully
Combine photographs, prints, and small textiles like woven baskets or fabric panels. For instance, a black‑and‑white photograph paired with a pastel abstract can create contrast without feeling jarring. This mix works especially well in a hallway, where you can treat the ledge as a mini‑gallery.
5. Rotate Seasonally
One of the biggest advantages of small wall décor using picture ledges is easy rotation. Swap a summer landscape for a cozy autumn scene, or replace a set of travel photos with holiday-themed artwork. The ledge’s flexibility makes it simple to keep your décor fresh year after year.
Room‑by‑Room Applications of Small Wall Décor Using Picture Ledges
Below are practical ideas for integrating picture ledges into various rooms without overwhelming the limited square footage.
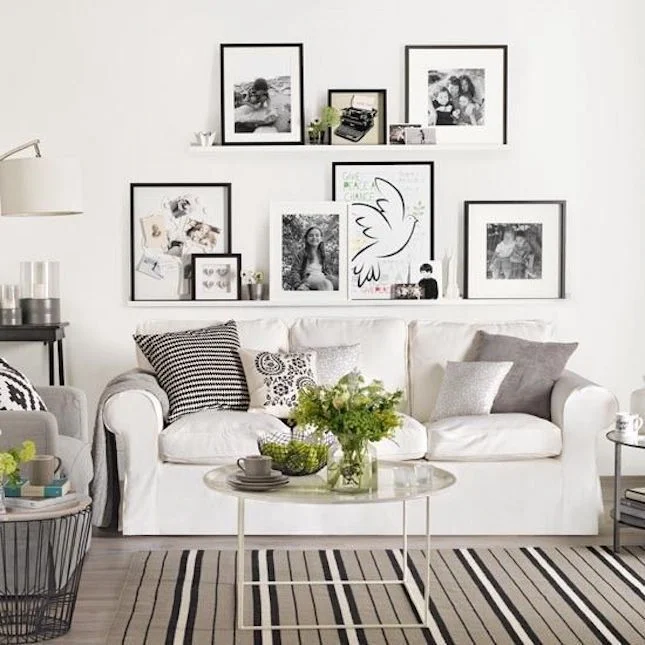
Living Room: Create a Mini Gallery
In a compact living area, a single 48‑inch ledge above the sofa can serve as a focal wall. Pair a large abstract canvas with a series of 8×10 framed prints that echo the room’s color scheme. Add a small succulent in a white pot to bring a touch of nature without taking up floor space.
For more inspiration on gallery styling, check out our guide on gallery wall ideas for small spaces.
Bedroom: Soft and Serene
Place a narrow ledge above the headboard, using soft pastel frames and a single decorative mirror to reflect light. A small stack of books or a scented candle can add personality without cluttering the nightstand. The result is a serene backdrop that enhances the room’s calming vibe.
Kitchen Nook: Functional Yet Pretty
In a galley kitchen, a short ledge can hold a few framed food‑related prints alongside a tiny herb planter. This doubles as a decorative element and a functional space for fresh herbs, making the most of limited wall real estate.
Home Office: Organized Inspiration
Even a modest home office can benefit from small wall décor using picture ledges. Mount a ledge above your desk to display motivational quotes, a small globe, and a compact desk organizer. Pairing this with wooden organizers creates a cohesive, productive environment.
Hallway: A Visual Pathway
Hallways often feel like afterthoughts, but a well‑placed ledge can turn them into a visual journey. Arrange a series of monochrome photographs that tell a story as you walk down the corridor. Keep the spacing even to maintain rhythm and avoid a cramped feel.
Quick Tips for Maximizing Small Wall Décor Using Picture Ledges
- Keep the ledge level with eye height for the most natural viewing experience.
- Use lightweight frames to prevent the ledge from sagging over time.
- In rooms with limited natural light, choose reflective frames or metallic finishes to bounce light and create the illusion of more space.
- Incorporate a single, slim LED strip behind the ledge for subtle backlighting that adds depth without bulk.
Common Mistakes to Avoid
Even seasoned decorators can slip up when working with small wall décor using picture ledges. Here are a few pitfalls and how to steer clear of them:
- Overcrowding the ledge: Packing too many items defeats the purpose of a clean, airy look. Stick to 3–5 pieces per shelf.
- Ignoring wall color: Dark walls can make a ledge feel heavy. Lighten the surrounding area with neutral paint or wallpaper.
- Choosing the wrong height: Mounting the ledge too low can make the ceiling appear lower; too high and it becomes hard to appreciate the artwork.
- Neglecting scale: Pairing a massive frame with tiny decorative objects can look mismatched. Aim for a balanced visual weight.
Frequently Asked Questions
Can picture ledges support heavy artwork?
Yes, most picture ledges are rated to hold items up to 15–20 pounds. For heavier pieces, choose a sturdier metal‑bracket system and verify the wall studs can support the load.
How far apart should I space multiple ledges on one wall?
A good rule of thumb is to leave at least 12 inches between ledges. This spacing prevents visual congestion and allows each shelf to breathe.
Are picture ledges suitable for renters?
Absolutely. Many ledges come with removable mounting hardware that leaves minimal holes. You can also opt for adhesive strips designed for picture hanging if drilling isn’t permitted.
What style of frames works best with small wall décor using picture ledges?
Uniform frames (same color, material, or shape) create a cohesive look, while a curated mix of frames can add personality. Choose based on the overall aesthetic you want to achieve.
How do I incorporate lighting with picture ledges?
LED strip lights installed behind the ledge or small clip‑on spotlights can highlight artwork and add ambiance without taking up extra wall space.
Bringing It All Together
When you think about small wall décor using picture ledges, imagine a versatile canvas that evolves with your taste, lifestyle, and seasonal changes. By selecting the right size, material, and mounting system, you set a solid foundation. From there, thoughtful layering, consistent color palettes, and strategic placement transform even the tiniest wall into a personal gallery that feels intentional and spacious.
Experiment with the ideas presented—whether you’re creating a mini gallery in the living room, a calming backdrop in the bedroom, or a functional yet decorative nook in the kitchen. The beauty of picture ledges is that they invite you to play, rearrange, and grow your collection without committing to permanent changes. So grab a ledge, curate your favorite pieces, and let your walls tell the story of your home.
For more design inspiration, explore our article on small bedroom lighting inspiration and discover how light and ledges can work together to brighten compact spaces.