Table of Contents
- Understanding Backstabbed Wires – Why They Matter in Modern Homes
- Safety First – Preparing Your Workspace Before You Begin
- Tools You’ll Need – Building a Complete Kit
- Step‑by‑Step Process – How to Remove Backstabbed Wires a Comprehensive Guide
- Step 1 – Turn Off Power and Verify
- Step 2 – Access the Outlet Box
- Step 3 – Identify the Backstabbed Connections
- Step 4 – Release the Wires Safely
- Step 5 – Clean and Prepare for New Connections
- Converting Backstabbed Connections to Screw Terminals – An Optional Upgrade
- Common Mistakes to Avoid When Removing Backstabbed Wires
- Quick Tips for Efficient Wire Removal
- Frequently Asked Questions
- Can I reuse the same outlet after removing backstabbed wires?
- Is it necessary to replace a backstabbed outlet with a new one?
- What if the wire won’t release from the backstab slot?
- Do I need a licensed electrician for this task?
- How do I test the outlet after reinstalling it?
- Are backstabbed connections allowed by code?
- Final Thoughts – Mastering the Art of Wire Removal
How to Remove Backstabbed Wires – A Comprehensive Guide
When you’re updating a room, swapping out an old outlet, or simply trying to tidy up the wiring behind your walls, you’ll eventually encounter the dreaded backstabbed wire. Unlike traditional screw‑terminal connections, backstabbed wires are pushed into tiny holes on the side of a receptacle and can be surprisingly tricky to extract without causing damage. Knowing how to remove backstabbed wires a comprehensive guide not only saves you time but also ensures the safety of your home’s electrical system.
In this article we’ll walk you through every stage of the process—from preparing your workspace and gathering the right tools, to the precise steps for releasing those stubborn wires. Whether you’re a seasoned DIY enthusiast or a first‑time homeowner, the methods outlined here will help you tackle backstabbed connections with confidence, keep your project on schedule, and avoid costly mistakes.
Let’s dive in and explore the practical techniques, safety precautions, and useful tips that make removing backstabbed wires a straightforward part of any home improvement plan.
Understanding Backstabbed Wires – Why They Matter in Modern Homes

Backstabbed wires were introduced as a convenient way to attach conductors to outlets without the need for a screwdriver. The wire is simply inserted into a small slot on the side of the device, where spring‑loaded clamps grip it. While this method speeds up installation, it also creates a few challenges that become apparent when you need to remove or replace the outlet.
First, the connection is less secure than a screw terminal, which means the wire can loosen over time, leading to arcing or overheating. Second, the design makes it difficult to pull the wire out without applying excessive force that could rip the insulation or damage the outlet housing. Understanding how to remove backstabbed wires a comprehensive guide helps you address these issues safely and replace the wiring with a more reliable connection when necessary.
Safety First – Preparing Your Workspace Before You Begin
Electrical work always starts with safety. Before you attempt how to remove backstabbed wires a comprehensive guide, follow these essential steps to protect yourself and your home:
- Turn off the circuit. Locate the breaker that controls the outlet and switch it to the OFF position. Verify the power is truly off using a non‑contact voltage tester.
- Gather protective gear. Wear insulated gloves, safety glasses, and a dust mask, especially if you’ll be cutting into drywall.
- Clear the area. Remove any furniture or décor that could be in the way, and place a drop cloth to catch debris.
- Label the wires. If you plan to reuse any conductors, label them with colored tape before disconnecting.
Taking these precautions sets a solid foundation for the rest of the guide and ensures that each step of how to remove backstabbed wires a comprehensive guide is performed responsibly.
Tools You’ll Need – Building a Complete Kit

A well‑stocked toolbox makes the process of removing backstabbed wires smoother and reduces the likelihood of improvisation that could lead to damage. Below is a checklist of the essential tools for this comprehensive guide:
- Flat‑head and Phillips screwdrivers (various sizes)
- Needle‑nose pliers – ideal for gripping the stripped ends of the wire
- Wire stripper/cutter – for trimming damaged sections
- Non‑contact voltage tester – to confirm power is off
- Electrical tape and wire nuts – for temporary protection
- Flashlight or headlamp – to see inside dark junction boxes
Having the right tools at hand means you can focus on the technique of how to remove backstabbed wires a comprehensive guide rather than hunting for a missing piece mid‑project. For more ideas on modern home styling while you work, check out our Cozy Apartment Decorating Ideas guide.
Step‑by‑Step Process – How to Remove Backstabbed Wires a Comprehensive Guide
Step 1 – Turn Off Power and Verify
The first rule of any electrical project is to ensure the circuit is dead. Flip the breaker to OFF, then use a voltage tester on each terminal of the outlet. Only when the tester shows no voltage should you proceed. This verification step is a cornerstone of how to remove backstabbed wires a comprehensive guide and protects you from accidental shock.
Step 2 – Access the Outlet Box
Remove the outlet cover plate with a flat‑head screwdriver. Next, unscrew the mounting brackets that hold the receptacle to the electrical box. Gently pull the outlet out, giving you a clear view of the backstabbed connections. Take this moment to observe how the wires are inserted, as it will inform your removal technique later.
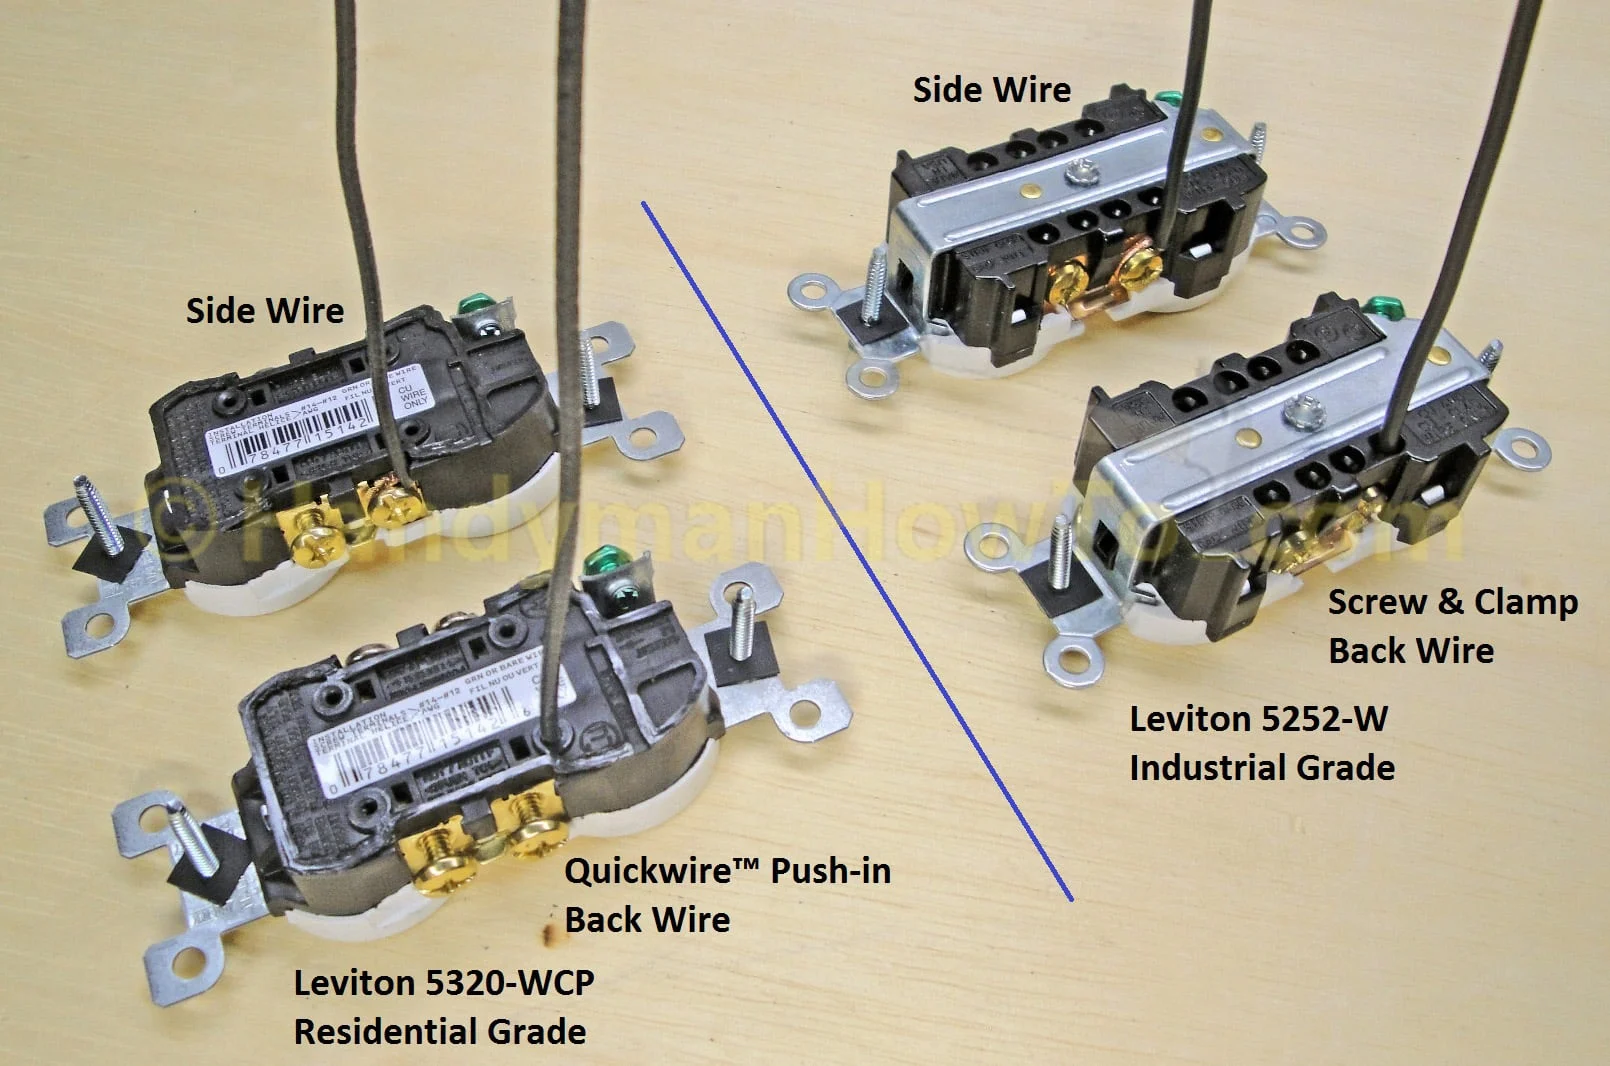
Step 3 – Identify the Backstabbed Connections
Backstabbed wires are usually inserted into small circular ports on the side of the outlet. You’ll notice that the metal clamps inside those ports are spring‑loaded. If the wires have been in place for years, the clamps may have corroded, making them harder to release. Recognizing these details is essential when you follow how to remove backstabbed wires a comprehensive guide.
Step 4 – Release the Wires Safely
Using a pair of needle‑nose pliers, grasp the stripped end of the wire just outside the backstab slot. Gently wiggle the wire back and forth while pulling it outward. If resistance is strong, press the small metal tab inside the port with a flat‑head screwdriver to release the spring clamp before pulling. Avoid yanking the wire abruptly; slow, steady pressure reduces the chance of tearing the insulation.
Step 5 – Clean and Prepare for New Connections
Once the wires are free, inspect them for any damage. Trim any frayed or nicked sections with a wire cutter, then strip about ½ inch of fresh insulation. If you plan to reuse the same outlet, consider converting the backstabbed connections to screw terminals for a more secure hold. This final step completes the core of how to remove backstabbed wires a comprehensive guide and sets the stage for either a replacement outlet or a new wiring layout.
Converting Backstabbed Connections to Screw Terminals – An Optional Upgrade
Many professionals recommend swapping backstabbed connections for screw terminals whenever possible. Screw terminals provide a tighter grip and are less prone to loosening over time. To convert:
- Loop the stripped end of the wire clockwise around the screw.
- Tighten the screw until the wire is firmly held—do not overtighten, as this can damage the conductor.
- Double‑check that the wire is snug and there’s no exposed copper outside the terminal.
This upgrade aligns with the broader theme of how to remove backstabbed wires a comprehensive guide while also enhancing the longevity of your electrical system.
Common Mistakes to Avoid When Removing Backstabbed Wires
Even experienced DIYers can slip up. Below are frequent errors and how to sidestep them:
- Skipping the breaker check. Always verify power is off; a live circuit defeats the purpose of how to remove backstabbed wires a comprehensive guide.
- Yanking the wire. Pulling too fast can rip insulation, exposing live conductors.
- Using the wrong tool. A regular screwdriver won’t release the spring clamp effectively—use a flat‑head with a thin tip.
- Neglecting to label wires. Unlabeled wires can lead to confusion during re‑installation.
- Leaving damaged wires in place. Replace any frayed sections before re‑wiring to avoid future faults.
Being aware of these pitfalls ensures that your execution of how to remove backstabbed wires a comprehensive guide stays smooth and safe.
Quick Tips for Efficient Wire Removal
- Apply a small amount of silicone‑based lubricant to the backstab port to ease wire extraction.
- Use a flashlight with a magnetic base to keep your hands free while you work inside the outlet box.
- Keep a spare outlet on hand; if the original is damaged during removal, you can swap it out instantly.
- Document the wiring layout with a quick photo before disassembly—helpful for future reference.
- When working in a bathroom or kitchen, double‑check for GFCI protection before starting.
Frequently Asked Questions
Can I reuse the same outlet after removing backstabbed wires?
Yes, as long as the outlet is in good condition and the internal clamps are not damaged. Many electricians recommend converting to screw terminals for a more reliable connection, which you can easily do after following how to remove backstabbed wires a comprehensive guide.
Is it necessary to replace a backstabbed outlet with a new one?
While not always required, replacing older backstabbed outlets with newer models that feature both screw terminals and backstab options can improve safety and flexibility in future projects.
What if the wire won’t release from the backstab slot?
Press the small metal tab inside the slot with a flat‑head screwdriver to disengage the spring clamp. If the wire still resists, apply gentle rocking motions with needle‑nose pliers while maintaining steady pressure.
Do I need a licensed electrician for this task?
For most residential scenarios where you are comfortable turning off the breaker and handling basic wiring, how to remove backstabbed wires a comprehensive guide can be performed safely by a knowledgeable DIYer. However, if you encounter damaged wiring, unknown circuit configurations, or feel uncertain, it’s best to consult a licensed professional.
How do I test the outlet after reinstalling it?
After reconnecting the wires and securing the outlet, turn the breaker back on. Use a receptacle tester to verify proper polarity, grounding, and functionality. The tester will indicate if the outlet is wired correctly or if any issues remain.
Are backstabbed connections allowed by code?
Most modern electrical codes permit backstab connections in residential settings, but they are often discouraged for high‑current circuits. Converting to screw terminals, as suggested in how to remove backstabbed wires a comprehensive guide, aligns better with best practices and future‑proofs your installation.
With these answers, you should feel more confident tackling backstabbed wires in any room of your home.
Final Thoughts – Mastering the Art of Wire Removal
Removing backstabbed wires doesn’t have to be an intimidating chore. By following how to remove backstabbed wires a comprehensive guide, you’ll have a clear roadmap: verify power, access the outlet, gently release the wires, and finish with a solid, long‑lasting connection. Incorporating safety checks, the right tools, and a few pro tips will keep your project on track and prevent unnecessary rework.
Once the wires are out, you can move on to the next phase of your remodel—whether that’s installing new lighting, updating wall décor, or simply tidying up your living space. Remember, a clean, well‑wired wall is the foundation for any stylish interior design project.
Enjoy the satisfaction of a job well done, and feel free to explore more home‑improvement inspiration on The Homara. Happy renovating!
[ CATEGORY ]: Home Organization