
Table of Contents
- Step‑by‑Step Guide on How to Pour a Concrete Retaining Wall
- 1. Planning and Design – Laying the Foundation for How to Pour a Concrete Retaining Wall
- 2. Site Preparation and Excavation
- 3. Building Formwork and Installing Reinforcement
- 4. Mixing and Pouring Concrete – The Core of How to Pour a Concrete Retaining Wall
- 5. Backfilling and Drainage Installation
- 6. Finishing Touches and Aesthetic Integration
- Quick Tips for a Successful Concrete Retaining Wall
- Common Mistakes When Learning How to Pour a Concrete Retaining Wall
- Frequently Asked Questions
- What is the ideal height for a DIY concrete retaining wall?
- Can I use regular concrete mix for a retaining wall?
- How long does it take for a concrete retaining wall to cure?
- Do I need to install reinforcement for a short wall?
- What maintenance does a concrete retaining wall require?
- Can I incorporate lighting into the retaining wall design?
How to Pour a Concrete Retaining Wall – A Complete DIY Guide
Retaining walls are more than just functional structures; they can become the backbone of a beautifully landscaped yard, creating terraces, defining garden beds, and preventing soil erosion. For many homeowners, the idea of building a concrete retaining wall feels daunting, yet with the right knowledge it becomes an achievable DIY project that adds both safety and visual appeal to the property.
This guide walks you through every phase of how to pour a concrete retaining wall, from initial planning and excavation to mixing, placing, and finishing the concrete. You’ll discover practical tips, common pitfalls to avoid, and design ideas that blend seamlessly with modern home décor. By the end, you’ll feel confident enough to start the project yourself, saving money while achieving a professional‑grade result.
Step‑by‑Step Guide on How to Pour a Concrete Retaining Wall

The process of how to pour a concrete retaining wall can be broken down into clear, manageable steps. Proper preparation, accurate measurement, and disciplined execution are the pillars of a successful wall that will stand for years.
1. Planning and Design – Laying the Foundation for How to Pour a Concrete Retaining Wall
Before any concrete is mixed, spend time on design. Determine the wall’s purpose (soil retention, aesthetic break, or both), height, length, and the type of backfill you’ll use. Consult local building codes; many jurisdictions require permits for walls over a certain height, typically four feet. A simple sketch showing dimensions, slope, and drainage locations will serve as your roadmap.
- Choose the right concrete mix. A mix with a compressive strength of 3,000–4,000 psi works well for most residential retaining walls.
- Incorporate drainage. Install a perforated pipe (French drain) at the base and use gravel backfill to prevent hydrostatic pressure.
- Calculate reinforcement. Steel rebar or mesh provides tensile strength; spacing depends on wall height.
When you have a clear plan, the actual act of how to pour a concrete retaining wall becomes far less intimidating. For inspiration on how a well‑designed wall can complement outdoor décor, check out our article on Balcony décor with woven baskets: Transform Your Outdoor Space.
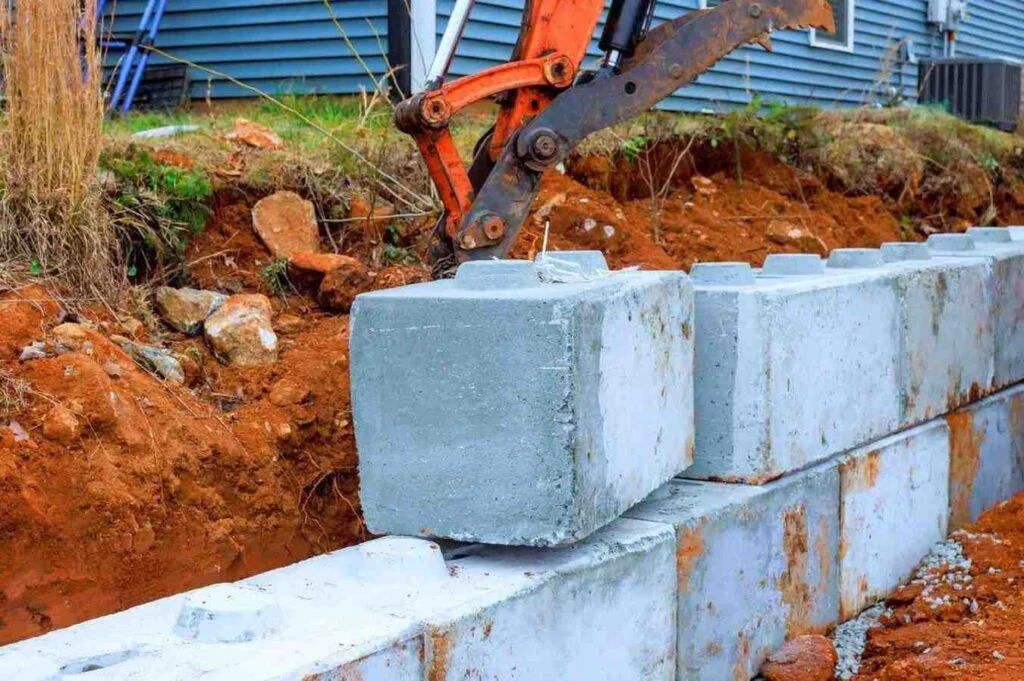
2. Site Preparation and Excavation
The first physical step in how to pour a concrete retaining wall is preparing the site. Clear vegetation, remove topsoil, and excavate a trench that’s at least 8–12 inches deeper than the wall’s footing depth. The trench width should be twice the width of the wall block or formwork.
- Compact the sub‑grade using a plate compactor to create a stable base.
- Lay a 4‑inch layer of crushed stone as a footing, then compact again.
- Install a vapor barrier (polyethylene sheeting) if you expect moisture from the ground.
Accurate excavation ensures the wall remains level and reduces the risk of settlement later on.
3. Building Formwork and Installing Reinforcement
Formwork defines the shape of each concrete pour. For a concrete retaining wall, wooden or metal forms are secured with stakes and bracing. Position the forms to match the designed slope, usually a 1‑in‑6‑in (≈5%) back slope for proper drainage.
Once forms are in place, insert reinforcement. Rebar should extend from the footing into the first course of the wall, tied with wire. For walls taller than 4 feet, add horizontal rebar every 12–18 inches, encased within the concrete.
4. Mixing and Pouring Concrete – The Core of How to Pour a Concrete Retaining Wall
When it comes to how to pour a concrete retaining wall, the mixing stage is crucial. Use a high‑quality ready‑mix delivered in a concrete mixer truck, or mix on‑site with a portable mixer. Aim for a slump of 4–5 inches—wet enough to flow into the forms but stiff enough to hold shape.
- Start the pour at the lowest point of the wall and work upward.
- Use a shovel and a concrete rake to distribute the mix evenly.
- Vibrate the forms with a rubber mallet or a concrete vibrator to eliminate air pockets.
- Level the surface with a screed board, then finish with a trowel for a smooth appearance.
While the concrete sets, keep the wall moist for at least 48 hours using a curing compound or wet burlap to prevent cracking.
5. Backfilling and Drainage Installation
After the concrete has cured, remove the formwork and begin backfilling. Place a 2‑inch layer of clean gravel directly behind the wall, then install the previously laid perforated drain pipe, ensuring it slopes away from the wall at a minimum of 1%.
- Cover the pipe with geotextile fabric to keep soil out.
- Continue backfilling with gravel in 6‑inch layers, compacting each layer.
- Finish with native soil or topsoil for planting.
Effective drainage is a critical component of how to pour a concrete retaining wall; without it, water pressure can cause bulging or failure over time.
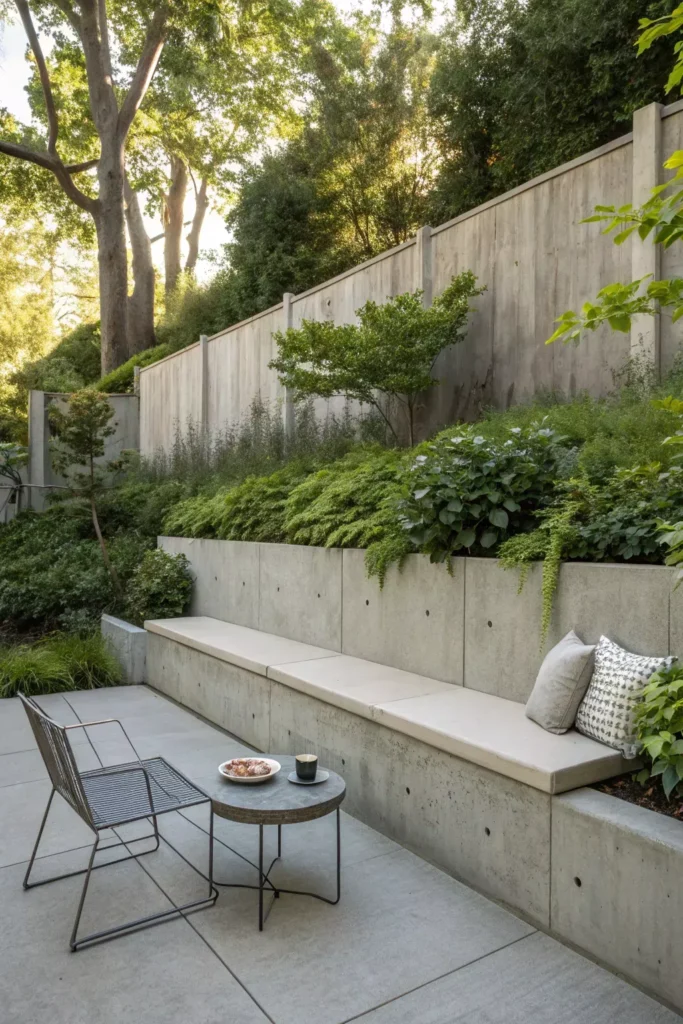
6. Finishing Touches and Aesthetic Integration
The final stage of how to pour a concrete retaining wall involves cosmetic enhancements that tie the structure into the overall home design. Consider staining, stamping, or applying a decorative overlay to match nearby patio pavers or stone pathways. Plant low‑maintenance shrubs, groundcover, or ornamental grasses at the base to soften the wall’s appearance.
For a cohesive look, align the wall’s color palette with your outdoor décor themes. If you’re interested in creating a stylish garden backdrop, explore our guide on Elegant Home Styling Ideas: Timeless Tips for Every Space for additional inspiration.
Quick Tips for a Successful Concrete Retaining Wall
- Always check local regulations before you begin; a permit may be required.
- Use a laser level to keep each course perfectly level.
- Seal the concrete after curing to protect against freeze‑thaw cycles.
- Incorporate weep holes every 4–6 feet to aid drainage.
- Plan for expansion joints if the wall exceeds 30 feet in length.
Common Mistakes When Learning How to Pour a Concrete Retaining Wall
Even seasoned DIYers can stumble when learning how to pour a concrete retaining wall. Below are frequent errors and how to avoid them:
- Insufficient Base Preparation: Skipping compacted gravel leads to uneven settling. Always compact the sub‑grade and use a solid footing.
- Ignoring Drainage: A wall without proper drainage will retain water, causing bulging. Install a French drain and use free‑draining backfill.
- Over‑mixing Concrete: Too much water weakens the mix. Stick to the recommended water‑cement ratio for a strong wall.
- Improper Reinforcement Placement: Rebar must be fully embedded in concrete; exposed steel rusts and compromises strength.
- Rushing the Curing Process: Concrete needs moisture to cure properly. Cover the wall and keep it damp for at least 48 hours.
Frequently Asked Questions
What is the ideal height for a DIY concrete retaining wall?
Most homeowners successfully build walls up to 4 feet without professional engineering. For walls taller than that, consult a structural engineer to ensure safety and compliance with local codes.
Can I use regular concrete mix for a retaining wall?
Yes, a standard 3,000–4,000 psi mix works well, but adding a concrete admixture for water resistance can extend the wall’s lifespan, especially in climates with freeze‑thaw cycles.
How long does it take for a concrete retaining wall to cure?
While concrete reaches initial set in a few hours, full strength develops over 28 days. Keep the wall moist for at least the first 48 hours and avoid heavy loads for at least a week.
Do I need to install reinforcement for a short wall?
Even for walls under 3 feet, reinforcement such as horizontal rebar or welded wire mesh adds tensile strength and reduces cracking, making it a recommended practice.
What maintenance does a concrete retaining wall require?
Inspect the wall annually for cracks, vegetation growth, and drainage blockages. Re‑seal the surface every 3–5 years and clear any debris from the drainage pipe to maintain performance.
Can I incorporate lighting into the retaining wall design?
Yes, recessed LED strip lights or low‑voltage uplighting can be installed in the wall’s coping or behind a decorative cap, adding ambiance while highlighting the wall’s texture.
Building a concrete retaining wall is a rewarding project that blends engineering precision with design creativity. By following this comprehensive guide on how to pour a concrete retaining wall, you’ll create a sturdy, attractive feature that enhances both the functionality and aesthetics of your outdoor space. Take the time to plan, prepare, and execute each step carefully, and you’ll enjoy a lasting structure that complements your modern home décor for years to come.