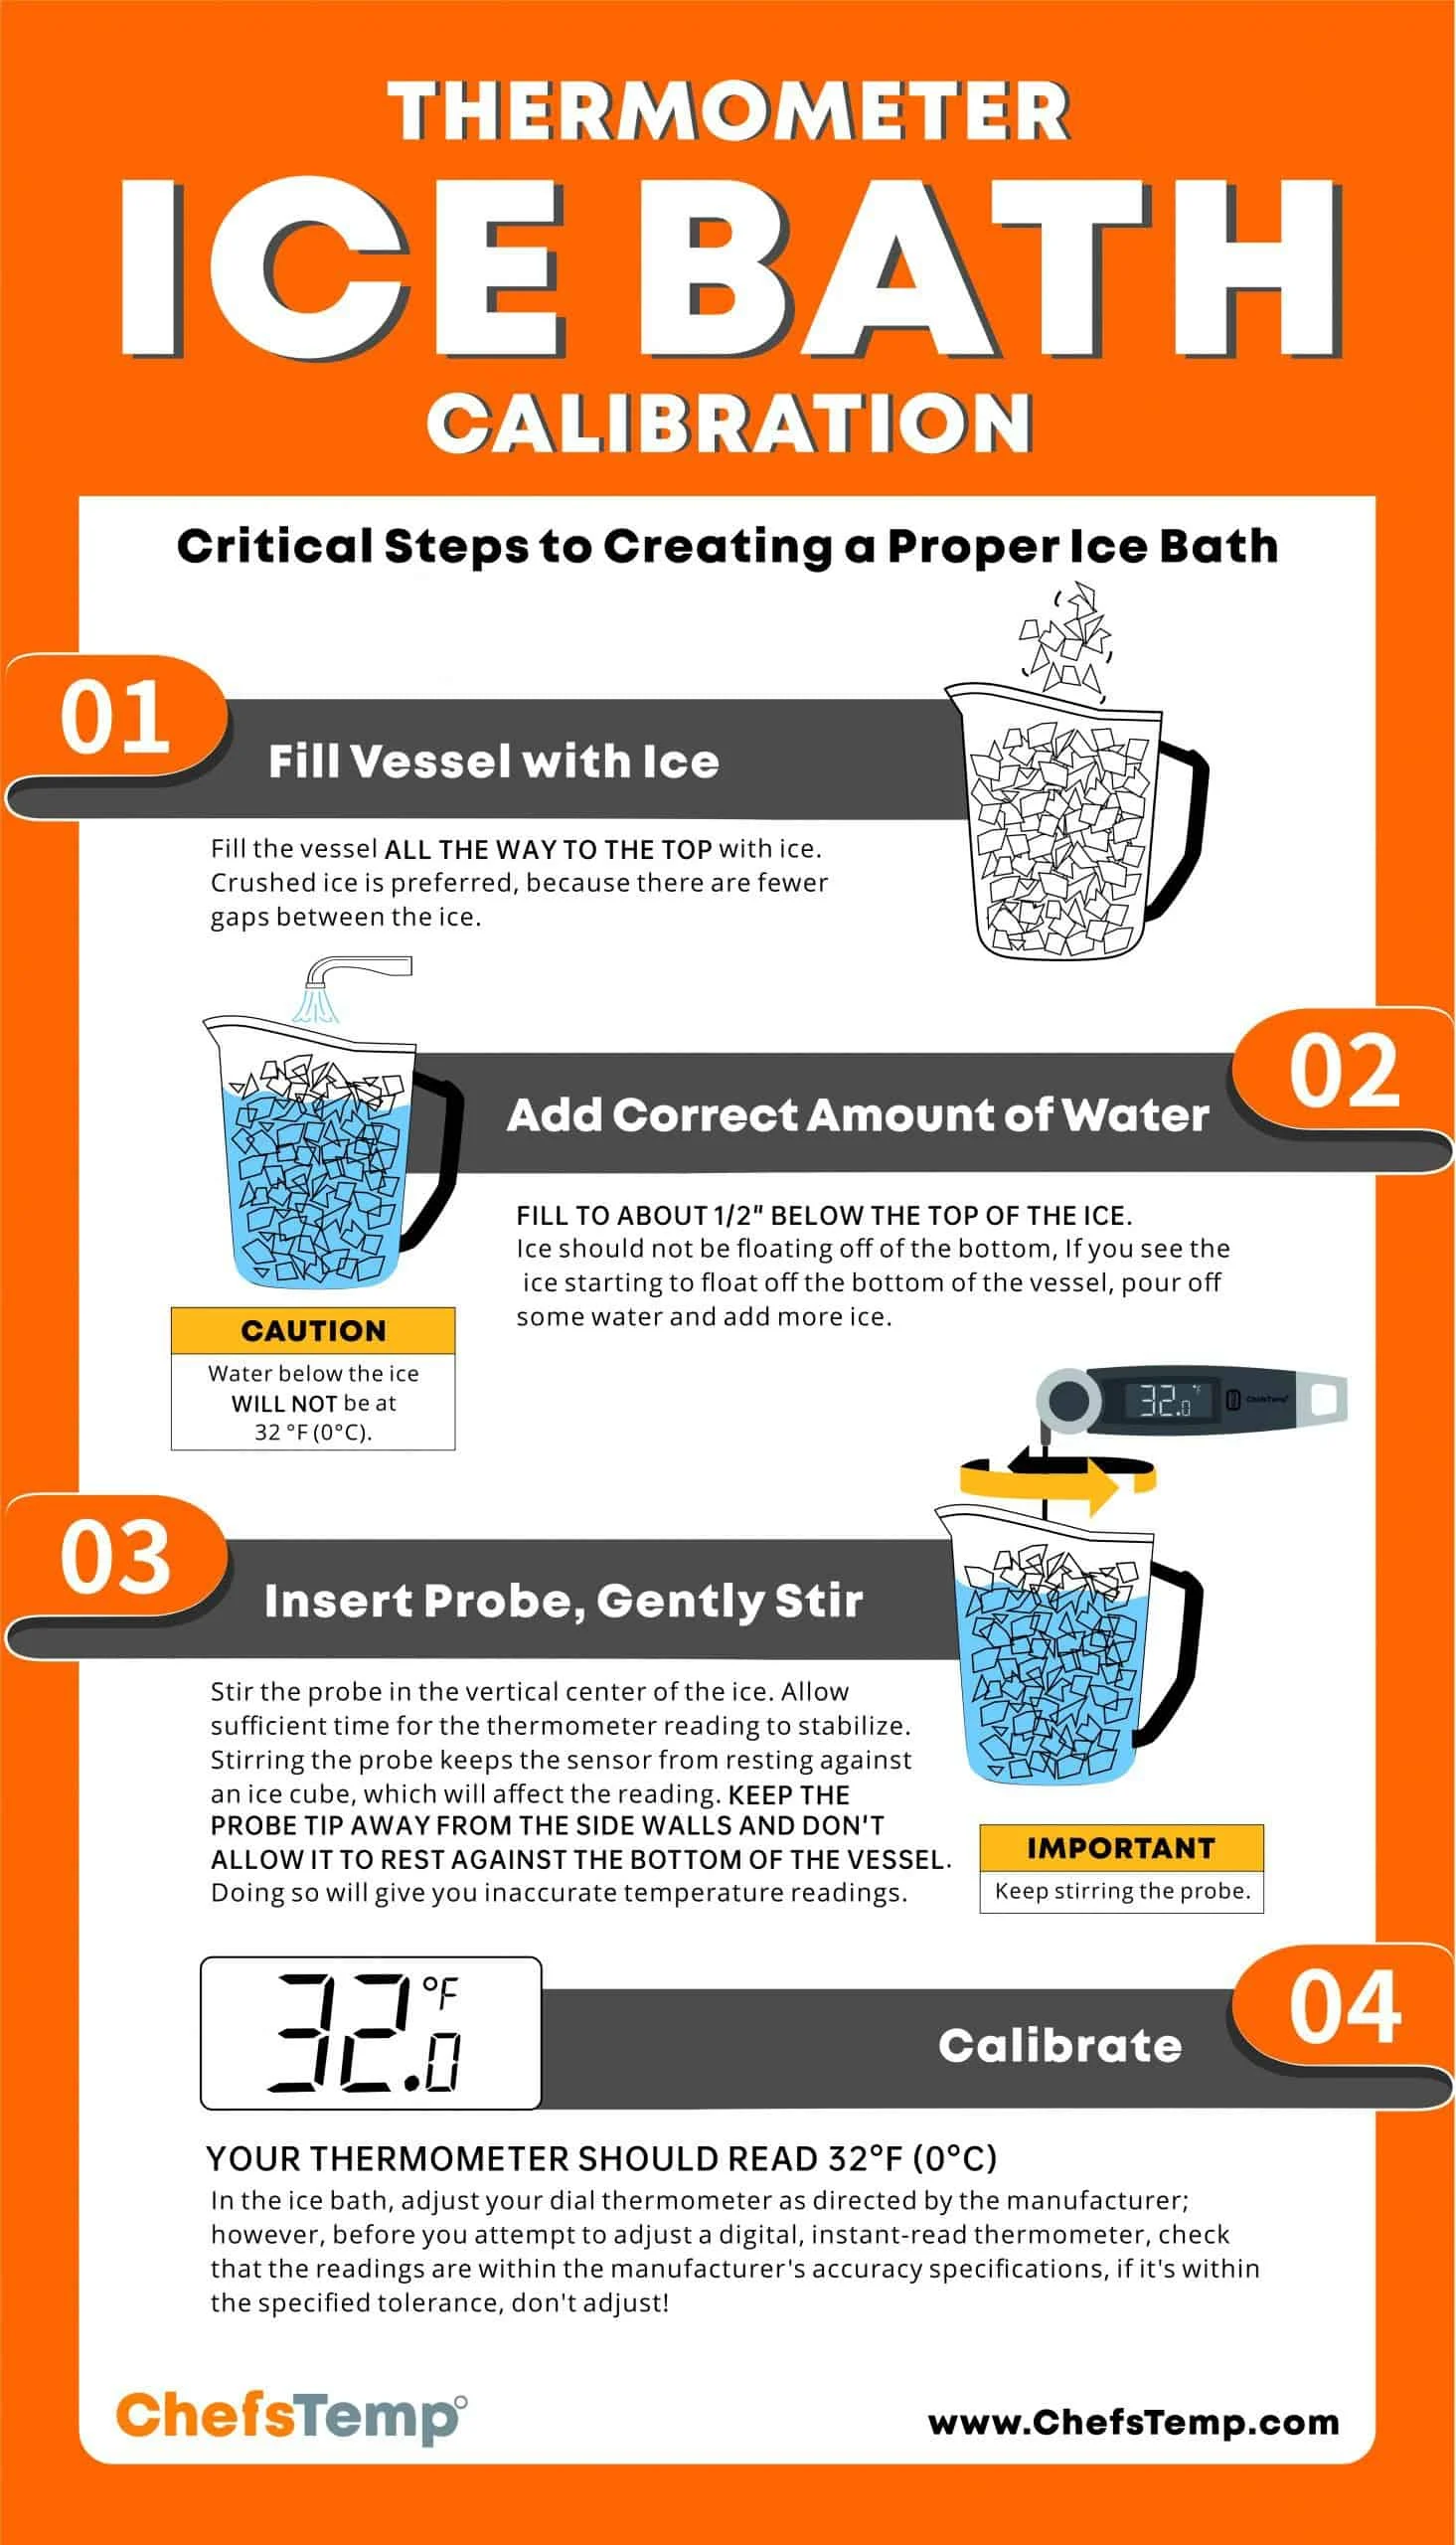
Table of Contents
- How to Make Plenty of Ice for an Ice Bath: Choosing the Right Ice Production Method
- Commercial Ice Makers vs. DIY Freezer Batches
- Portable Ice Makers for Small Apartments
- How to Make Plenty of Ice for an Ice Bath: Efficient Storage Solutions
- Insulated Ice Bins and Coolers
- Freezer‑Grade Plastic Bins
- How to Make Plenty of Ice for an Ice Bath: Preparing the Bath Space
- Choosing the Right Tub or Container
- Non‑Slip Surfaces and Temperature Monitoring
- How to Make Plenty of Ice for an Ice Bath: Step‑by‑Step Ice Production Workflow
- How to Make Plenty of Ice for an Ice Bath: Cost‑Effective Tips and Tricks
- Reuse Ice Water for Plants
- Leverage Seasonal Sales
- DIY Ice Cube Molds from Food‑Grade Silicone
- Quick Tips for Ice Bath Success
- Common Mistakes When Preparing an Ice Bath and How to Avoid Them
- Frequently Asked Questions
Ice baths have surged in popularity among athletes, wellness enthusiasts, and anyone looking for a quick, invigorating reset. While a commercial ice tub can be pricey, creating a functional ice bath at home is both affordable and surprisingly simple—provided you know how to make plenty of ice for an ice bath. In this guide, we’ll walk you through the logistics of producing large quantities of ice, the best containers for storage, and how to integrate the setup into a modern bathroom or small space without compromising style.
Understanding the science behind cold water immersion helps you appreciate why volume matters. A larger ice mass keeps the water temperature steady for longer, allowing you to stay in the bath for the therapeutic 5‑10 minutes recommended by most sports‑medicine experts. Whether you’re a seasoned competitor or a busy professional seeking a post‑work cooldown, mastering the art of ice production will make your routine reliable, efficient, and even a little luxurious.
In the sections that follow, you’ll discover step‑by‑step strategies, equipment recommendations, and design tricks that keep your ice bath both functional and aesthetically pleasing. By the end, you’ll feel confident about how to make plenty of ice for an ice bath while maintaining a clean, modern look that fits seamlessly into your home décor.
How to Make Plenty of Ice for an Ice Bath: Choosing the Right Ice Production Method
The first decision when learning how to make plenty of ice for an ice bath is selecting a production method that matches your space, budget, and timeline. Below are the three most common approaches, each with its own set of advantages.
Commercial Ice Makers vs. DIY Freezer Batches
Commercial countertop ice makers can produce up to 30 pounds of ice per day, delivering crystal‑clear cubes in under 15 minutes. They’re ideal for households that need a steady supply without manual labor. However, they come with a higher upfront cost and require a dedicated electrical outlet.
For many homeowners, the simplest solution is to use existing kitchen freezers in batches. By filling multiple silicone molds, reusable ice trays, or even large Tupperware containers, you can generate 20–30 pounds of ice overnight. This method is budget‑friendly and leverages equipment you already own, though it demands planning ahead.
Portable Ice Makers for Small Apartments
If space is at a premium, a compact portable ice maker (often marketed for RVs) can be a game‑changer. These units typically sit on a countertop, use a small water reservoir, and produce a pound of ice every 5–8 minutes. While the output isn’t as massive as a commercial machine, the flexibility to produce ice on demand is valuable for urban dwellers.
Regardless of the method you choose, the goal remains the same: create enough frozen water to maintain a consistent 50‑59°F (10‑15°C) bath temperature for at least ten minutes. The following sections will show you how to store, transport, and efficiently use that ice.
How to Make Plenty of Ice for an Ice Bath: Efficient Storage Solutions
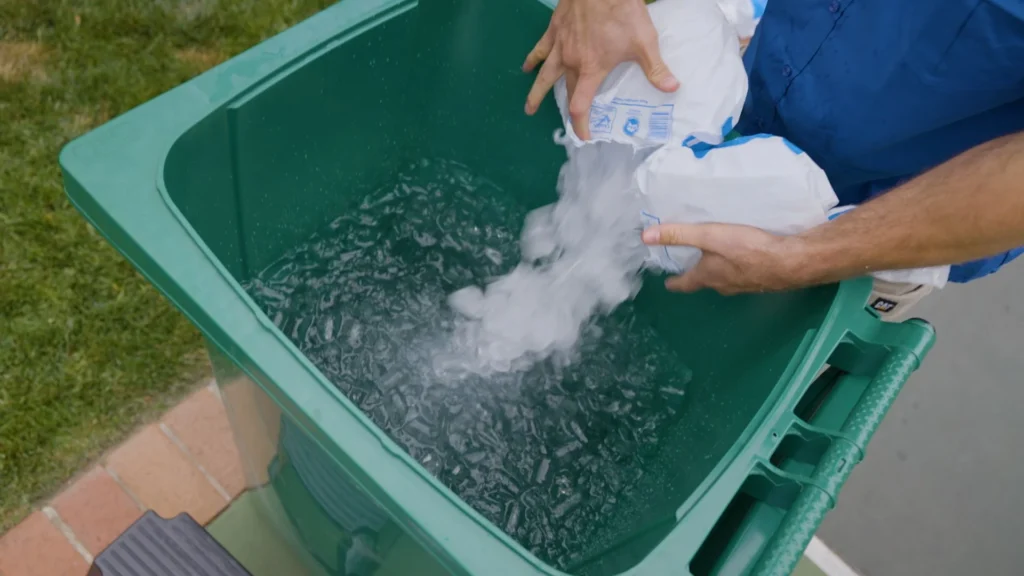
Generating ice is only half the battle; keeping it frozen until use is equally important. Proper storage prevents premature melt‑down and saves you from a frantic race to the freezer.
Insulated Ice Bins and Coolers
Heavy‑duty insulated coolers (often used for camping) are perfect for holding large quantities of ice. Look for models with a thick foam wall, a tight‑sealing lid, and a drainage plug. Fill the cooler with a layer of ice, add a thin sheet of plastic or a tray, and top off with more ice to create a “sandwich” that slows heat transfer.
For a sleek aesthetic that matches a modern bathroom, consider a stainless‑steel cooler with a brushed finish. It doubles as a decorative piece when not in use, blending seamlessly with contemporary hardware.
Freezer‑Grade Plastic Bins
Large, reusable plastic bins with built‑in handles can be stored directly in the freezer. By stacking these bins, you can amass several dozen pounds of ice without taking up extra floor space. When it’s time for the bath, simply lift the bin with a sturdy hand truck to the bathroom.
Label each bin with the production date to ensure you’re using the freshest ice. This simple practice helps you maintain water quality and prevents any off‑flavors that can develop in older ice.
How to Make Plenty of Ice for an Ice Bath: Preparing the Bath Space

The environment where you take your ice bath influences both comfort and safety. A well‑planned space reduces slip hazards, improves temperature control, and contributes to the overall visual appeal of your home.
Choosing the Right Tub or Container
While a dedicated bathtub works, many homeowners repurpose a deep utility sink, a large stockpot, or even a portable folding tub. The key is to select a container that holds at least 60‑80 gallons of water, providing enough depth to submerge the torso and thighs.
For a cohesive look, opt for a neutral‑toned bathroom décor scheme that complements the tub’s material—think matte black fixtures, brushed brass accents, and soft, warm lighting to offset the cold atmosphere.
Non‑Slip Surfaces and Temperature Monitoring
Place anti‑slip mats or textured vinyl around the tub’s perimeter. A waterproof digital thermometer with a floating probe lets you monitor water temperature in real time, ensuring you stay within the optimal therapeutic range.
Additionally, installing a small vent or dehumidifier helps manage excess moisture, keeping the bathroom fresh and preventing mold growth—a common concern for households that frequently use ice baths.
How to Make Plenty of Ice for an Ice Bath: Step‑by‑Step Ice Production Workflow
Now that you have the tools, let’s outline a reliable workflow that guarantees you’ll never run out of ice on a training day.
- Plan Ahead: Determine the amount of ice needed based on bath volume. A general rule is 1 pound of ice per gallon of water for a 50°F target.
- Batch Freeze: Fill silicone trays, large Tupperware, or freezer‑grade bins the night before. Use a thin layer of water to avoid waste.
- Store Efficiently: Transfer frozen trays into an insulated cooler early in the morning. Keep the cooler in a shaded area to maintain low temperature.
- Transport Safely: Use a hand truck or sturdy dolly to move the cooler to the bathroom. Avoid shaking the cooler to prevent ice from breaking into small shards that melt quickly.
- Combine and Chill: Add the ice to the tub, then pour in pre‑chilled water (store a gallon in the fridge). Stir gently to achieve an even temperature.
- Maintain Temperature: If the bath starts warming before you’re ready, add extra ice or replace a partially melted bin.
By following this systematic approach, you’ll master how to make plenty of ice for an ice bath without stress, turning a potentially labor‑intensive task into a smooth, repeatable routine.
How to Make Plenty of Ice for an Ice Bath: Cost‑Effective Tips and Tricks
Budget‑conscious readers often wonder if creating a high‑volume ice bath will break the bank. The answer is no—provided you apply a few clever cost‑saving strategies.
Reuse Ice Water for Plants
After your bath, the slightly chilled water can be repurposed to water indoor plants. This not only reduces waste but also offers a gentle, cool soak for foliage that thrives in lower temperatures, such as ferns or orchids.
Leverage Seasonal Sales
Purchase ice trays, silicone molds, and even portable ice makers during end‑of‑year clearance events. Many retailers discount kitchen gadgets by up to 40%, allowing you to build a comprehensive ice‑making arsenal at a fraction of the cost.
DIY Ice Cube Molds from Food‑Grade Silicone
Instead of buying specialty molds, cut a sheet of food‑grade silicone into a grid and place it in a shallow tray. The result is a flexible, reusable surface that yields large, uniform cubes—perfect for rapid cooling.
These budget tips help you sustain a regular ice bath routine without sacrificing quality or aesthetics.
Quick Tips for Ice Bath Success
- Pre‑chill your bath water in the refrigerator to reduce the amount of ice needed.
- Use a waterproof Bluetooth speaker for calming music; it makes the experience more enjoyable.
- Keep a towel and a warm robe within arm’s reach for a quick post‑bath transition.
Common Mistakes When Preparing an Ice Bath and How to Avoid Them
Even seasoned athletes can fall into pitfalls that diminish the benefits of an ice bath. Recognizing these errors early ensures you get the most out of each session.
- Insufficient Ice Quantity: Under‑estimating the ice‑to‑water ratio leads to rapid warming. Follow the 1‑pound‑per‑gallon guideline.
- Using Tap Water Directly: Hard water can leave mineral deposits in the tub. Opt for filtered or distilled water for a cleaner soak.
- Neglecting Slip Prevention: Wet floors are dangerous. Always place anti‑slip mats and dry the floor after each use.
- Skipping Temperature Checks: Without a thermometer, you risk staying too long in water that’s colder than intended, which can cause hypothermia.
Frequently Asked Questions
How long does it take to produce enough ice for a full‑size tub?
Typically, 20‑30 pounds of ice can be generated in one night using standard freezer trays. If you need more, start a second batch early in the morning and store it in an insulated cooler.
Can I use regular ice cube trays?
Yes, but they produce small cubes that melt quickly. Larger molds or reusable silicone trays create bigger blocks that retain cold longer, reducing the total amount of ice needed.
Is it safe to stay in an ice bath for more than 15 minutes?
Most experts recommend 5‑10 minutes for therapeutic benefits. Extending beyond 15 minutes increases the risk of hypothermia and can be counterproductive.
Do I need a special tub for an ice bath?
No. Any waterproof container that holds enough water to submerge the torso works. However, a tub with a smooth, non‑porous surface is easier to clean and maintain.
How often should I replace the water in my ice bath?
Change the water after every 3‑4 uses, or sooner if it becomes cloudy. Fresh water ensures optimal hygiene and prevents bacterial growth.
Implementing these practices will help you master how to make plenty of ice for an ice bath while keeping your home environment stylish and functional.
By integrating efficient ice‑making methods, thoughtful storage, and design‑forward bathroom accessories, you can enjoy the restorative power of cold immersion without the hassle of commercial facilities. Whether you’re a dedicated athlete or simply looking for a refreshing way to unwind, the steps outlined here empower you to create a reliable, cost‑effective ice bath that complements your modern home décor.
Explore more home‑style inspiration on The Homara, from bathroom upgrades to sleek bedroom makeovers, and keep your space as invigorating as your ice bath routine.