
Table of Contents
- How to End Shoe Molding at Door Frame: Preparation and Planning
- Measure Twice, Cut Once
- Select the Right Material
- Tools and Materials Needed to End Shoe Molding at Door Frame
- Step‑by‑Step Guide on How to End Shoe Molding at Door Frame
- 1. Cut the Molding to Length
- 2. Coping the Inside Corner
- 3. Test Fit Before Nailing
- 4. Secure the Molding
- 5. Fill Gaps and Nail Holes
- 6. Paint or Stain
- Design Considerations: Blending Shoe Molding with Modern Home Décor
- Monochrome Minimalism
- Contrasting Accents
- Layered Trim
- Quick Tips for How to End Shoe Molding at Door Frame
- Common Mistakes When Ending Shoe Molding at Door Frame and How to Avoid Them
- Frequently Asked Questions
- Conclusion
Shoe molding, also known as base shoe or quarter round, is a subtle yet essential trim that hides the gap between flooring and the wall. When it meets a door frame, the transition can become a visual focal point—either a polished detail or an unsightly mishap. Knowing how to end shoe molding at door frame not only improves the aesthetic flow of a room but also protects the edges from wear and moisture.
This article walks you through the entire process, from selecting the right material to executing a flawless finish. Whether you’re a seasoned DIYer or a first‑time homeowner, the techniques shared here will give you confidence to tackle the job with precision and style. By the end, you’ll understand the tools you need, the steps to follow, and the design choices that complement modern home décor.
How to End Shoe Molding at Door Frame: Preparation and Planning
The success of any trim project begins long before the saw is turned on. Proper preparation ensures that the shoe molding aligns perfectly with the door frame, creating a clean line that appears professionally installed.
Measure Twice, Cut Once
- Use a steel measuring tape to record the exact length of the wall where the molding will run.
- Measure the distance from the base of the door jamb to the point where the flooring meets the wall. This will determine the length of the molding segment that needs to be cut.
- Take into account any irregularities, such as uneven subfloors or slight wall bows, by adding a small allowance (about ¼ inch) for adjustments.
Accurate measurements reduce waste and prevent the frustration of having to recut a piece that’s already been nailed into place.
Select the Right Material
Shoe molding comes in several materials, each with its own benefits:
- Wood – Classic appearance, easily stained or painted, but can expand or contract with humidity.
- MDF – Smooth surface for painting, less prone to warping, but not suitable for high‑moisture areas.
- PVC or Vinyl – Water‑resistant and ideal for bathrooms or basements, though it may look less authentic in traditional interiors.
Choose a material that matches your existing flooring and interior style. For a modern look, many homeowners pair painted MDF shoe molding with sleek door frames, creating a seamless, monochrome transition.
Tools and Materials Needed to End Shoe Molding at Door Frame
Having the right tools on hand makes the process smoother and reduces the likelihood of mistakes. Below is a checklist of essential items:
- Measuring tape and pencil
- Fine‑tooth miter saw or a handsaw with a miter box
- Coping saw (for coping the inside corner)
- Brad nails and a pneumatic nail gun or a hammer
- Wood filler or caulk
- Sandpaper (120‑ and 220‑grit)
- Paint or stain matching your existing trim
- Protective eyewear and ear plugs
- Level and carpenter’s square
While a nail gun speeds up installation, a hammer and finishing nails work just as well for smaller projects. The key is consistency—ensure every nail sits just below the surface to avoid visible heads.
Step‑by‑Step Guide on How to End Shoe Molding at Door Frame

Follow these detailed steps to achieve a clean, professional finish:
1. Cut the Molding to Length
Start by marking the exact length on the shoe molding using a pencil. Place the molding on a stable workbench and cut with a fine‑tooth miter saw set at a 45° angle if the door frame is at a corner. For a straight run, a 0° cut is sufficient.
2. Coping the Inside Corner
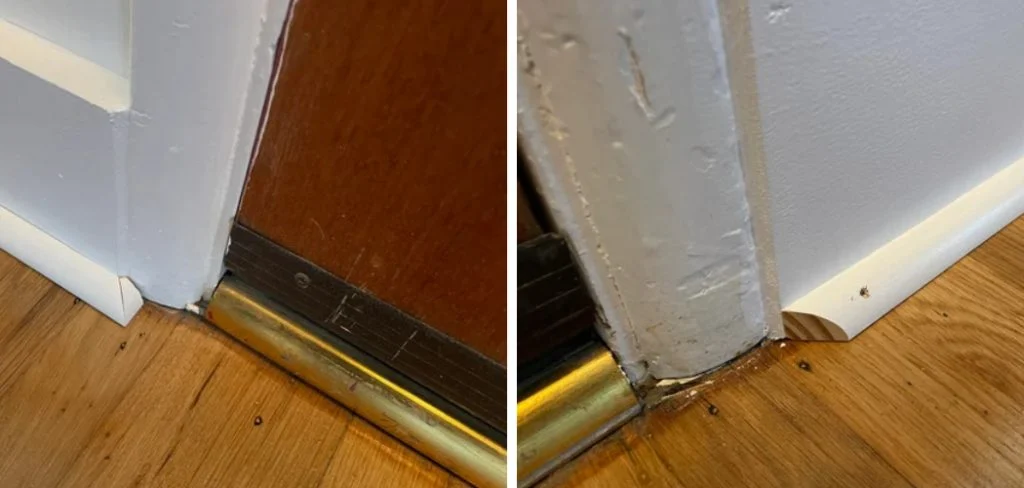
When the shoe molding meets the door jamb, a tight fit is crucial. Use a coping saw to trim the back side of the molding so it follows the profile of the jamb. This technique—known as coping—creates a seamless joint that looks better than a simple miter, especially on irregular frames.
3. Test Fit Before Nailing
Place the cut piece against the door frame and floor. Check for gaps and ensure the molding sits flush against both surfaces. If any gaps appear, sand the edge lightly or trim a little more with the saw.
4. Secure the Molding
Using a nail gun or hammer, drive brad nails every 12–16 inches into the molding, angled slightly downward toward the wall. This prevents the nails from protruding through the surface. For added stability near the door jamb, add an extra nail at the joint.
5. Fill Gaps and Nail Holes
Apply wood filler or paint‑matched caulk to any small gaps between the molding and the door frame. Use a putty knife to smooth the filler, then let it dry according to the manufacturer’s instructions. Once dry, sand the area smooth with 220‑grit sandpaper.
6. Paint or Stain
Finish the shoe molding with a coat of paint or stain that matches the rest of your trim. For a uniform look, consider using a spray gun for even coverage. Allow the finish to dry completely before walking on the floor or reinstalling furniture.
These steps, when executed carefully, ensure that you know how to end shoe molding at door frame with a result that looks as if a professional carpenter installed it.
Design Considerations: Blending Shoe Molding with Modern Home Décor
Beyond the technical aspects, the visual integration of shoe molding with your overall décor can elevate the space. Here are a few design ideas that pair well with a cleanly finished shoe molding.
Monochrome Minimalism
Painting both the shoe molding and door frame the same shade of white, gray, or a muted pastel creates a seamless, uninterrupted line that enhances a minimalist aesthetic. Pair this with minimalist décor with plants to add subtle texture without breaking the visual flow.
Contrasting Accents
If you prefer a bit of drama, choose a slightly darker hue for the shoe molding than the wall. This subtle contrast emphasizes architectural details and works especially well in cozy neutral home styling environments.
Layered Trim
Combine shoe molding with a small baseboard or a decorative picture rail. The layered look adds depth and can be highlighted with a soft LED strip hidden behind the baseboard for a modern touch.
Quick Tips for How to End Shoe Molding at Door Frame
- Use a coping saw for inside corners; it provides a tighter fit than a miter.
- Apply painter’s tape along the floor edge to protect flooring from nail marks.
- Sand the cut edges lightly before installing to avoid splintering.
- Test fit each piece before nailing—small adjustments save time later.
- Match the paint finish (matte, satin, or gloss) to the rest of your trim for consistency.
Common Mistakes When Ending Shoe Molding at Door Frame and How to Avoid Them
Even experienced DIYers can stumble over a few pitfalls. Recognizing these errors early helps you stay on track.
- Skipping the Coping Step – A simple miter joint often leaves a visible gap. Coping creates a seamless seam that looks custom‑crafted.
- Over‑nailing – Driving nails too deep can split the molding, especially in hardwood. Use a nail set to sink the head just below the surface.
- Ignoring Expansion Gaps – Wood expands with humidity. Leave a tiny (<2 mm) gap where the molding meets the floor to prevent buckling.
- Poor Paint Matching – Paint that’s a shade lighter or darker than surrounding trim draws unwanted attention. Test paint samples in natural light before committing.
- Not Using a Level – An unlevel molding looks sloppy. Check the piece with a level before securing it.
Frequently Asked Questions
Can I install shoe molding over existing baseboards?
Yes, you can layer shoe molding over baseboards to add an extra visual detail. Ensure the baseboard is securely attached first, then follow the same steps for cutting and coping the shoe molding.
Do I need to remove the door frame to install shoe molding?
No. Shoe molding is designed to be installed directly against the door jamb without removal. Just make precise cuts and use coping for a tight fit.
What type of nail is best for shoe molding?
Brad nails (18‑gauge) are ideal because they are thin enough to conceal easily and provide enough holding power for light trim.
How long does the caulk need to dry before painting?
Typically, caulk dries in 24 hours, but check the manufacturer’s label. Faster‑drying silicone caulks may be ready in as little as 30 minutes.
Is shoe molding necessary for tile floors?
While not required, shoe molding can protect the edge of tile floors from chipping and provide a finished look, especially in transition areas like doorways.
Conclusion
Mastering how to end shoe molding at door frame combines practical carpentry skills with thoughtful design decisions. By measuring accurately, using the right tools, and employing coping techniques, you can achieve a crisp, professional finish that enhances both function and aesthetics. Remember to consider color schemes, layering options, and the subtle details that tie your trim work into the broader décor narrative.
Now that you have a clear roadmap, gather your tools, take those precise measurements, and start transforming those doorway transitions into polished statements of style. For more inspiration on integrating trim work with modern interiors, explore other guides on The Homara and keep experimenting with fresh design ideas.