Table of Contents
- Understanding the Basics of How to Decorate a Mug at Home
- Why Learning How to Decorate a Mug at Home Matters
- Choosing the Right Materials and Tools for How to Decorate a Mug at Home
- Essential Supplies When Learning How to Decorate a Mug at Home
- Step‑by‑Step Techniques for How to Decorate a Mug at Home
- Basic Hand‑Painting Method – Core to How to Decorate a Mug at Home
- Using Paint‑On‑The‑Spot Markers – A Quick Alternative for How to Decorate a Mug at Home
- Decoupage Technique – Adding Texture While Learning How to Decorate a Mug at Home
- Styling Ideas that Connect Your Mug to Overall Home Décor
- Coordinated Kitchen Color Schemes
- Seasonal and Holiday Themes
- Mini Gallery Shelf
- Matching Bathroom or Bedroom Accents
- Caring for Your Hand‑Painted Mug and Maintaining Its Look
- Cleaning Guidelines for How to Decorate a Mug at Home Successfully
- Storing and Display Tips
- Quick Tips for How to Decorate a Mug at Home
- Common Mistakes When Learning How to Decorate a Mug at Home and How to Avoid Them
- Frequently Asked Questions
- Can I use regular acrylic paint to decorate a mug at home?
- How long does the baking process take when learning how to decorate a mug at home?
- Is it safe to put a hand‑painted mug in the dishwasher?
- What are the best design themes for a small apartment kitchen?
- Can I sell mugs that I decorate at home?
- How do I prevent my designs from fading over time?
How to Decorate a Mug at Home: A Complete DIY Guide
Personalizing everyday objects can turn a simple coffee break into a moment of artistic expression. One of the most accessible canvas for home décor enthusiasts is the humble ceramic mug. Whether you are looking to create a unique gift, add a splash of color to your kitchen shelf, or simply enjoy a relaxing crafting session, learning how to decorate a mug at home opens endless possibilities.
This guide walks you through everything you need to know—from selecting the right materials, mastering core techniques, to integrating your custom mug into broader interior design schemes. By the end, you’ll feel confident tackling projects that reflect your style while keeping functionality intact.
Understanding the Basics of How to Decorate a Mug at Home
Before diving into tools and techniques, it helps to grasp why decorating a mug at home is more than a hobby. A hand‑designed mug becomes a statement piece that ties into plant corner décor ideas, kitchen color palettes, or even a themed bedroom shelf. The process also encourages creativity, reduces waste by repurposing plain mugs, and can be a low‑cost way to experiment with trends without committing to large furniture pieces.
Why Learning How to Decorate a Mug at Home Matters
- Personal expression: Each design reflects your taste, making everyday rituals feel special.
- Gift potential: Hand‑painted mugs are heartfelt presents for birthdays, holidays, or housewarmings.
- Design cohesion: A custom mug can echo colors or motifs already present in your kitchen or living area.
Choosing the Right Materials and Tools for How to Decorate a Mug at Home

Success starts with the right supplies. While you can buy specialty kits, most of the items are everyday household products. Below is a checklist that balances quality with affordability, ensuring your mug withstands daily use.
Essential Supplies When Learning How to Decorate a Mug at Home
- Ceramic or porcelain mugs: Prefer white or light‑colored surfaces for vibrant colors.
- Porcelain paint or oil‑based paint markers: These adhere after baking and are dishwasher safe.
- Baking sheet and oven: Needed to set the paint according to the manufacturer’s temperature (usually 300°F–350°F).
- Pencil and eraser: Sketch your design lightly before committing.
- Fine‑point brushes: For intricate line work and lettering.
- Masking tape or stencils: Helps create clean edges and repeatable patterns.
- Sealant (clear glaze or acrylic spray): Provides extra protection for hand‑painted areas.
When you are comfortable with the basics, consider expanding your toolkit with metallic paints, glitter inks, or even decoupage paper for layered effects. For inspiration on coordinating your mug with other décor, explore our article on workspace décor with simple desk trays, which showcases how small accessories can harmonize a room.
Step‑by‑Step Techniques for How to Decorate a Mug at Home

Now that you have the materials, let’s walk through the most reliable methods. Each technique can be adapted to match your skill level and design ambition.
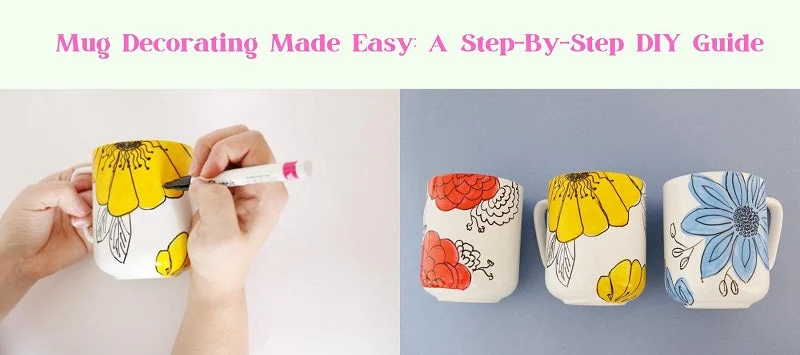
Basic Hand‑Painting Method – Core to How to Decorate a Mug at Home
- Prepare the surface: Wash the mug with mild soap, rinse, and dry thoroughly. A clean surface ensures paint adhesion.
- Sketch your design: Lightly draw with a pencil. Simple motifs such as leaves, geometric shapes, or monograms work well for beginners.
- Apply paint: Use a fine‑point brush for outlines and a broader brush for fill‑ins. Keep strokes smooth and avoid over‑loading the brush.
- Let it dry: Allow the paint to air‑dry for at least 30 minutes before moving to the next step.
- Bake the mug: Place the mug on a baking sheet, and bake at 350°F for 30 minutes. This cures the paint, making it dishwasher safe.
- Seal (optional): After cooling, spray a thin layer of clear sealant if you anticipate heavy use.
Using Paint‑On‑The‑Spot Markers – A Quick Alternative for How to Decorate a Mug at Home
Paint markers eliminate the need for brushes and drying time. Simply shake the marker, press the tip against the mug, and draw. After the design dries, bake as instructed. This method is perfect for busy households that want a fast yet professional finish.
Decoupage Technique – Adding Texture While Learning How to Decorate a Mug at Home
For a layered look, cut decorative paper (like napkin prints) to fit the mug’s curvature. Apply a thin coat of decoupage glue, place the paper, smooth out bubbles, and let dry. Finish with a clear glaze to protect the surface. Decoupage offers a vintage vibe that pairs beautifully with rustic kitchen décor.
Styling Ideas that Connect Your Mug to Overall Home Décor
Your custom mug can become a visual anchor in several rooms. Below are themed suggestions that demonstrate how to decorate a mug at home while reinforcing broader interior design goals.
Coordinated Kitchen Color Schemes
Choose colors that echo your backsplash, countertop, or cabinet finishes. For instance, a teal‑blue mug pairs nicely with navy cabinets and brass hardware, creating a cohesive look without overwhelming the space.
Seasonal and Holiday Themes
Swap designs according to the season—snowflakes for winter, floral motifs for spring, or warm orange‑red patterns for autumn. Rotating mugs on a countertop display keeps your kitchen feeling fresh.
Mini Gallery Shelf
Dedicate a small floating shelf near the coffee station to showcase a rotation of hand‑decorated mugs. This approach mirrors the DIY décor with handmade décor trays concept, turning functional items into decorative art.
Matching Bathroom or Bedroom Accents
Although mugs belong in the kitchen, a matching design can appear on a bathroom soap dispenser or a bedroom nightstand tray, reinforcing a unified aesthetic across the home.
Caring for Your Hand‑Painted Mug and Maintaining Its Look
Even the most expertly decorated mug needs proper care to retain its brilliance. Follow these guidelines to ensure longevity.
Cleaning Guidelines for How to Decorate a Mug at Home Successfully
- Hand‑wash with mild detergent and a soft sponge. Avoid abrasive scrubbers that can chip the paint.
- Place the mug upside down on a drying rack to prevent water spots on the design.
- If you used a sealant, you can safely run the mug through a dishwasher on the top rack, but hand‑washing is still recommended for the first few washes.
Storing and Display Tips
Store mugs on a sturdy shelf away from direct sunlight, which can fade colors over time. Consider using a protective coaster beneath each mug to avoid accidental bumps.
Quick Tips for How to Decorate a Mug at Home
- Test colors on a scrap piece of ceramic before applying them to the mug.
- Use a hairdryer on low heat to speed up drying between layers.
- Plan symmetrical designs using masking tape for clean lines.
- Mix metallic paint with a tiny amount of clear glaze for a subtle shimmer.
- Keep a small sketchbook of design ideas for future mug projects.
Common Mistakes When Learning How to Decorate a Mug at Home and How to Avoid Them
Even experienced crafters stumble occasionally. Recognizing pitfalls early saves time and materials.
- Skipping the cleaning step: Residual oils prevent paint adhesion, leading to peeling.
- Over‑baking: Exceeding the recommended temperature can cause the glaze to crack.
- Using non‑food‑safe paints: Always verify that the paint is labeled safe for mugs that will hold beverages.
- Applying thick paint layers: Thick coats may not cure evenly, resulting in uneven texture.
- Neglecting sealing: Without a final seal, designs fade faster, especially with frequent washing.
Frequently Asked Questions
Can I use regular acrylic paint to decorate a mug at home?
Regular acrylic paint can be used, but it must be a brand formulated for ceramics or marked as food‑safe. After painting, the mug should be baked according to the paint’s instructions to ensure durability.
How long does the baking process take when learning how to decorate a mug at home?
Typically, a 30‑minute bake at 350°F is sufficient. Always let the mug cool inside the oven to prevent thermal shock, which can crack the glaze.
Is it safe to put a hand‑painted mug in the dishwasher?
Most sealed, baked designs are dishwasher safe on the top rack, but hand‑washing extends the life of the artwork. Avoid harsh detergents and high‑heat drying cycles.
What are the best design themes for a small apartment kitchen?
Minimalist geometric patterns, monochrome palettes, or nature‑inspired silhouettes work well in compact spaces. They add visual interest without overwhelming the room.
Can I sell mugs that I decorate at home?
Yes, as long as you use food‑grade paints and comply with local regulations regarding kitchenware. Many crafters turn their hobby into a small business on platforms like Etsy.
How do I prevent my designs from fading over time?
Use a high‑quality clear sealant after baking and store the mug away from direct sunlight. Regular gentle cleaning also helps maintain color vibrancy.
Decorating a mug at home is a rewarding blend of creativity and practicality. By mastering the core steps, selecting the right supplies, and integrating your custom pieces into your overall interior narrative, you’ll enjoy both functional art and a more personalized living environment. Experiment with colors, patterns, and themes—each mug becomes a tiny canvas that tells your story.
Ready to start your next project? Grab a plain mug, set up your workspace, and let the transformation begin. For more ideas on coordinating small decorative items, check out our guide on everyday living room styling ideas for modern homes. Happy crafting!