
Table of Contents
- DIY home décor with simple frames: Transforming Blank Walls
- Choosing the right frames for DIY home décor with simple frames
- Creative Layouts for DIY home décor with simple frames
- Grid vs. salon style for DIY home décor with simple frames
- Materials and Finishes: Budget‑Friendly Options
- Integrating Frames into Different Rooms
- Seasonal Swaps and Personal Touches
- Quick DIY Home Décor Tips with Frames
- Common Mistakes in Frame‑Based DIY Décor
- Frequently Asked Questions
- Conclusion
DIY Home Décor with Simple Frames: Creative Ideas for Every Room
Frames are often seen as mere holders for artwork, but they can become the backbone of an entire design scheme. By treating each frame as a decorative element, you unlock a versatile, budget‑friendly way to refresh walls, shelves, and even unexpected surfaces. Whether you live in a compact studio or a spacious family home, the right framing strategy can add depth, personality, and a cohesive look without the need for costly renovations.
This article walks you through practical steps for using DIY home décor with simple frames to elevate any space. You’ll learn how to select materials, arrange compositions, adapt ideas to different rooms, and avoid common pitfalls. By the end, you’ll have a toolbox of design principles that turn ordinary frames into statement pieces, all while staying within a modest budget.
DIY home décor with simple frames: Transforming Blank Walls

Blank walls are the perfect canvas for experimentation. Instead of hanging a single oversized painting, consider grouping a collection of modestly sized frames. This approach creates visual interest and allows you to showcase personal photos, travel souvenirs, or abstract prints. Start by choosing a unifying element—such as a consistent mat colour, frame colour, or material—to keep the display cohesive.
Choosing the right frames for DIY home décor with simple frames
When selecting frames, think beyond the traditional wood finish. Metal frames add an industrial edge, while painted MDF offers endless colour possibilities. For a budget‑friendly option, repurpose old picture frames by sanding, priming, and repainting them in a hue that complements your room’s palette. Adding a thin white or cream mat can give each piece breathing room, making even modest artwork appear gallery‑ready.
- Measure the wall space first; a 2‑by‑2‑foot grid works well in most living rooms.
- Mix frame styles sparingly; keep at most two different profiles for harmony.
- Use inexpensive hardware like picture‑hanging strips for easy adjustments.
For a deeper dive into selecting the perfect accessories, see our guide on Best Coin Magnifier with Light – A Home‑Stylist’s Guide, which offers useful tips on matching lighting to framed displays.
Creative Layouts for DIY home décor with simple frames
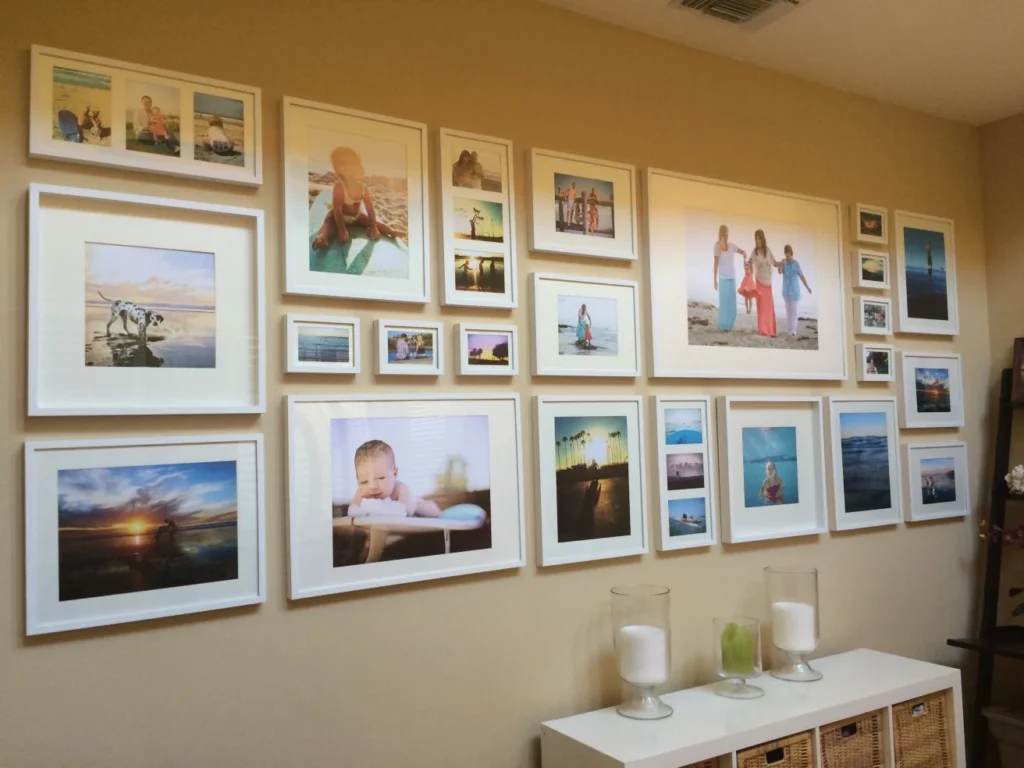
The arrangement of frames can dramatically affect the perception of space. Two popular layouts are the “grid” and the “salon” style. A grid provides a clean, modern look—ideal for minimalistic interiors—while a salon arrangement feels eclectic and lived‑in, perfect for boho‑inspired rooms.
Grid vs. salon style for DIY home décor with simple frames
To achieve a grid, measure the distance between frames and use a level to keep lines straight. A common rule is to leave 2–3 inches between each frame. For a salon style, start with a focal piece in the centre, then add surrounding frames at varying heights, allowing some overlap for a relaxed feel. This method works well in bedrooms where personal photographs can tell a visual story.
Try pairing the salon layout with a Bedroom Décor with Linen Pillow Styling guide to coordinate colours and textures across the room.
- Use painter’s tape on the wall to outline the layout before hanging.
- Keep the centre of gravity in mind; heavy frames should be placed lower.
- Consider the eye level—generally 57–60 inches from the floor for the centre of the arrangement.
Materials and Finishes: Budget‑Friendly Options

Choosing the right material is essential for both aesthetics and durability. If you enjoy a sleek, contemporary vibe, opt for matte black metal frames that contrast nicely with light walls. For a softer, more traditional look, white‑painted wood frames create a subtle backdrop that lets the artwork shine.
Reclaimed wood frames add warmth and sustainability, especially when you’re aiming for a rustic charm. Simply sand the wood, apply a clear sealant, and you have a unique piece that tells a story. When you need extra protection for high‑traffic areas, consider a thin acrylic front instead of glass; it’s lighter and less prone to breakage.
Integrating Frames into Different Rooms
Each room has its own functional and aesthetic demands, and frames can adapt accordingly.
- Living Room: Create a focal point above the sofa with a large horizontal arrangement. Mix artwork with abstract prints to balance colour and form.
- Kitchen: Use small, moisture‑resistant frames to display vintage recipe cards or food photography. A stainless‑steel frame can complement stainless appliances.
- Bedroom: Install a series of framed inspirational quotes near the bedside for a personal touch.
- Home Office: Hang a motivational poster alongside a few framed certificates to keep the space professional yet inviting.
If you’re interested in material comparisons for other projects, read Platinum Glass vs Stainless Steel – Choosing the Right Material for Your Needs for insights that also apply to framing choices.
Seasonal Swaps and Personal Touches
One of the biggest advantages of DIY home décor with simple frames is the ability to change the look of a room with minimal effort. Swap out seasonal prints—think autumn leaves in October, snow‑capped mountains in December—to keep the décor fresh. Use interchangeable mats in different colours to instantly shift the mood without buying new frames.
Personalization goes beyond photos. Consider framing fabric swatches, pressed flowers, or even small handwritten notes. These items add texture and intimacy, making the space truly yours.
Quick DIY Home Décor Tips with Frames
- Use double‑sided tape for lightweight frames; it leaves no holes and is easy to reposition.
- Paint the back of a frame a contrasting colour to add a pop when the frame is viewed from an angle.
- Incorporate LED strip lighting behind a row of frames for a modern, illuminated gallery effect.
Common Mistakes in Frame‑Based DIY Décor
Even seasoned decorators can slip up when working with frames. Here are a few pitfalls and how to avoid them:
- Overcrowding: Packing too many frames into a small area creates visual clutter. Stick to a maximum of 6–8 pieces for a modest wall.
- Inconsistent spacing: Uneven gaps break the flow. Use a ruler or a template to keep gaps uniform.
- Ignoring wall colour: Dark frames on dark walls can disappear. Choose a frame colour that contrasts enough to stand out.
- Improper hanging hardware: Heavy frames need anchors; otherwise, they may fall and damage both the wall and the artwork.
Frequently Asked Questions
Can I use frames without glass?
Yes. Acrylic or a simple matte backing works well for photos and lightweight prints, especially in humid areas like kitchens. Acrylic is lighter and less prone to breakage than traditional glass.
How do I keep frames looking fresh over time?
Dust regularly with a microfiber cloth and avoid harsh chemicals. For wooden frames, a light coat of furniture polish once a year maintains the finish and prevents drying.
Is it okay to mix portrait and landscape frames?
Mixing orientations adds visual interest, but keep the overall balance. Anchor the arrangement with a larger landscape piece, then surround it with smaller portrait frames.
What height should I hang frames in a hallway?
In narrow corridors, position frames at eye level—about 57 inches from the floor—to ensure they are easily viewable without forcing people to look up or down.
Can frames be used outside?
For outdoor use, select frames made from weather‑resistant materials like powder‑coated metal or treated wood, and use UV‑protective glass or acrylic to protect the artwork.
Conclusion
When you think about home styling, frames are often overlooked, yet they hold the power to transform entire spaces with minimal cost and effort. By mastering the principles of DIY home décor with simple frames—from material selection and layout planning to seasonal updates—you can continuously refresh your home’s look without major renovations. Experiment, enjoy the process, and let each frame tell a part of your story. For more inspiration, explore other design ideas on The Homara and keep experimenting with creative, affordable décor solutions.