
Table of Contents
- DIY decorative mirror using rope – Materials and Tools
- Essential Materials
- Preparing the Mirror Frame for a DIY decorative mirror using rope
- Step‑by‑Step Frame Preparation
- Crafting the Rope Design for a DIY decorative mirror using rope
- DIY decorative mirror using rope – Step‑by‑Step Guide
- Installing the Rope Mirror in Different Rooms
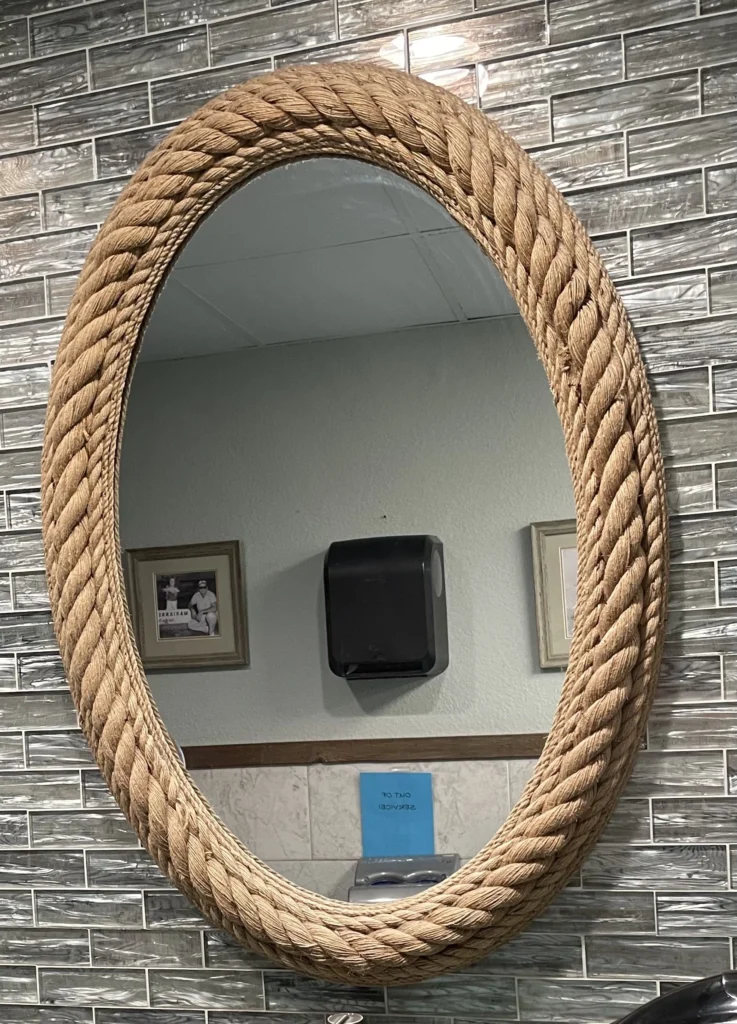
- Bathroom Boost
- Bedroom Serenity
- Living‑Room Statement
- Caring for Your Rope‑Adorned Mirror
- Maintenance Checklist
- Quick Tips for Rope Mirror Success
- Common Mistakes to Avoid
- Frequently Asked Questions
Mirrors have always been a cornerstone of interior design, amplifying light, creating the illusion of space, and adding a reflective sparkle to any room. Yet a plain glass pane can feel generic, especially when you’re striving for a personalized aesthetic. This is where a DIY decorative mirror using rope steps in—offering a handcrafted, rustic‑yet‑modern statement piece that can be tailored to any style, from coastal cottage to industrial loft.
Whether you’re a seasoned maker or a beginner looking for a weekend project, this guide will walk you through every stage of creating a rope‑wrapped mirror that feels both bespoke and budget‑friendly. You’ll discover which materials work best, how to prepare the frame, the art of wrapping rope evenly, and practical ideas for displaying your new creation in the bathroom, bedroom, or living area. By the end, you’ll have a functional work of art that elevates your space and showcases your own design sensibility.
DIY decorative mirror using rope – Materials and Tools
Before you dive into the hands‑on portion, gather a concise list of supplies. Choosing the right rope and mirror size will influence both the visual impact and the ease of construction.
Essential Materials
- Plain rectangular or circular mirror (12‑24 inches is ideal for beginners)
- Natural fiber rope (jute, sisal, or cotton) – 1/4‑inch thickness works well for a subtle look; 1/2‑inch for a bolder statement
- Wooden backing board or thin plywood (½‑inch thick) – provides a sturdy base for the rope
- Wood glue or strong craft adhesive
- Hot‑glue gun with extra glue sticks
- Scissors or utility knife
- Measuring tape and pencil
- Sandpaper (fine grit)
- Optional: spray paint or stain for the backing board
Choosing a rope that matches your existing décor is key. For a coastal vibe, opt for a light‑colored hemp; for a more industrial feel, dark sisal adds texture without overwhelming the mirror’s reflective surface. Remember, the primary keyword DIY decorative mirror using rope appears naturally as you read through the steps, reinforcing the focus without sounding forced.
Preparing the Mirror Frame for a DIY decorative mirror using rope

The backbone of any successful rope mirror is a well‑prepared frame. Start by sanding the edges of the backing board to remove splinters and create a smooth surface for the rope to adhere.
Step‑by‑Step Frame Preparation
- Measure and cut the plywood to match the exact dimensions of your mirror. A snug fit ensures the rope stays taut.
- Attach the mirror to the board using a strong adhesive. Press firmly and allow the glue to cure for at least 30 minutes.
- Seal the edges with a thin line of wood glue to prevent moisture from seeping into the wood—especially important for bathroom installations.
- If you want a pop of color, spray‑paint or stain the board now; let it dry completely before moving on.
Having a clean, sturdy base not only improves the durability of your DIY decorative mirror using rope but also makes the wrapping process smoother, reducing the risk of uneven tension that could cause sagging later on.
Crafting the Rope Design for a DIY decorative mirror using rope

Now comes the most creative part—wrapping the rope around the frame. Patience and consistency are your allies here. Follow this method to achieve a professional finish without expensive tools.
DIY decorative mirror using rope – Step‑by‑Step Guide
- Mark the start point: Use a pencil to indicate where the rope will begin on the back of the board. This helps keep the pattern symmetrical.
- Apply a thin line of hot glue at the marked spot. Press the rope’s end into the glue and hold for a few seconds.
- Begin wrapping tightly, pulling the rope snugly as you go. Keep the tension even; if the rope loosens, pause to re‑glue the current spot.
- Maintain spacing: For a uniform look, aim for ¼‑inch gaps between each coil. Use a ruler or a piece of cardboard as a guide.
- Finish securely: When you reach the starting point, apply a generous dab of hot glue and press the rope’s tail into it. Trim excess rope with scissors.
Experiment with patterns—spiral, radial, or even a loose, woven style. The flexibility of a DIY decorative mirror using rope allows you to tailor the aesthetic to your specific room’s vibe. For inspiration on how rope textures blend with modern interiors, check out our article on modern cozy apartment styling.
Installing the Rope Mirror in Different Rooms
Once your DIY decorative mirror using rope is complete, think about placement. The mirror can become a focal point in the bathroom, a decorative accent in the bedroom, or a functional piece in a living‑room gallery wall.
Bathroom Boost
- Hang the mirror above the vanity to reflect natural light and make the space feel larger.
- Choose a rope color that complements towel hooks or soap dispensers for a cohesive look.
- Secure with corrosion‑resistant wall anchors; moisture‑resistant glue ensures the rope stays attached.
Bedroom Serenity
- Place the mirror on a dresser to add depth and a touch of rustic charm.
- Pair with soft bedding and a plush rug for a balanced, layered aesthetic.
- Consider a dimmer‑compatible LED backlight behind the mirror for a gentle night‑time glow.
Living‑Room Statement
- Create a gallery wall featuring multiple rope‑wrapped mirrors of varying sizes.
- Mix materials—metal frames, reclaimed wood, and rope—to achieve an eclectic vibe.
- Use the mirror to reflect artwork or a statement light fixture, amplifying visual interest.
For more storage‑friendly bathroom ideas, see our guide on simple bathroom storage décor ideas. The flexibility of a DIY decorative mirror using rope makes it an ideal solution for small apartments where every decorative element must serve a dual purpose.
Caring for Your Rope‑Adorned Mirror
Rope, especially natural fibers, can attract dust and moisture over time. Proper maintenance keeps your DIY decorative mirror using rope looking fresh for years.
Maintenance Checklist
- Dust regularly with a soft microfiber cloth; avoid abrasive cleaners that could fray the rope.
- In humid environments, apply a light coat of clear sealant to the rope to repel moisture.
- Check the adhesive points every six months; re‑apply hot glue if you notice any loosening.
- If the rope becomes discolored, gently hand‑wash with mild soap and let it air dry completely before rehanging.
These simple steps ensure the longevity of your handcrafted piece while preserving the natural texture that makes a rope‑wrapped mirror so distinctive.
Quick Tips for Rope Mirror Success
- Start with a short practice piece of rope to perfect your tension before tackling the full frame.
- Use a small piece of painter’s tape along the back edge of the board as a “stop line” to keep the rope from sliding off.
- Combine two rope colors for a subtle striped effect; alternate every few coils for visual rhythm.
- For a floating look, leave a narrow gap (about ¼ inch) between the rope and the mirror’s edge.
- When hanging, locate studs in the wall for maximum support, especially for larger mirrors.
Common Mistakes to Avoid
Even experienced crafters can stumble on a few pitfalls when creating a rope‑wrapped mirror. Recognizing these common errors helps you stay on track.
- Uneven tension: If the rope is pulled too tightly in one spot and loosely in another, the pattern will appear warped. Pause frequently to check tension.
- Insufficient glue: Skipping a glue spot may cause the rope to slip over time. Apply a thin line of hot glue at every 2‑inch interval for added security.
- Ignoring moisture: In bathrooms, untreated natural rope can absorb humidity and develop mildew. Seal the rope or choose a synthetic alternative.
- Overloading the frame: Using a mirror that’s too large for the backing board can cause sagging. Keep the mirror size proportional to the board’s thickness.
- Clashing colors: A rope hue that competes with wall paint or décor can look chaotic. Stick to complementary or analogous shades for harmony.
Frequently Asked Questions
Can I use synthetic rope for a DIY decorative mirror using rope?
Yes, synthetic fibers like nylon or polypropylene are more resistant to moisture and fading, making them ideal for high‑humidity areas such as bathrooms.
How do I attach the rope mirror securely to plaster walls?
Use wall anchors designed for plaster and a sturdy picture‑hanging wire on the back of the frame. Distribute the weight evenly to prevent the mirror from pulling away.
Is it safe to place a rope‑wrapped mirror near a heat source?
While natural rope can scorch if exposed to direct heat, keeping the mirror at least 2 feet away from radiators or fireplaces mitigates any risk.
What size rope works best for a small apartment?
A ¼‑inch rope offers a delicate texture without overwhelming limited space, while still providing enough visual interest.
Can I paint the rope to match my décor?
Yes, you can lightly spray‑paint the rope with a fabric‑friendly acrylic paint. Test a small section first to ensure the color adheres evenly.
For additional inspiration on small‑space styling, explore our article on apartment home office décor, where we discuss ways to integrate functional art pieces like rope mirrors into work‑from‑home environments.
Creating a DIY decorative mirror using rope is more than a craft—it’s an opportunity to infuse personality into your home while exercising practical design skills. From gathering materials to mastering the wrap technique, each step adds a layer of authenticity that mass‑produced décor simply cannot replicate. As you hang your finished piece, take a moment to appreciate how the mirror not only reflects light but also reflects your own creativity.
Feel inspired to try other rope‑based projects? The possibilities are endless—think rope‑styled wall hangings, lamp shades, or even a woven rug. Keep experimenting, share your results with fellow décor enthusiasts, and let your home tell a story that’s uniquely yours.