Table of Contents
- DIY decorative jars with rope: Materials, Tools, and Preparation
- Essential Materials for DIY decorative jars with rope
- Tools that streamline the process
- Step‑by‑Step Guide to Crafting Your Rope‑Wrapped Jar
- 1. Measure and Cut the Rope
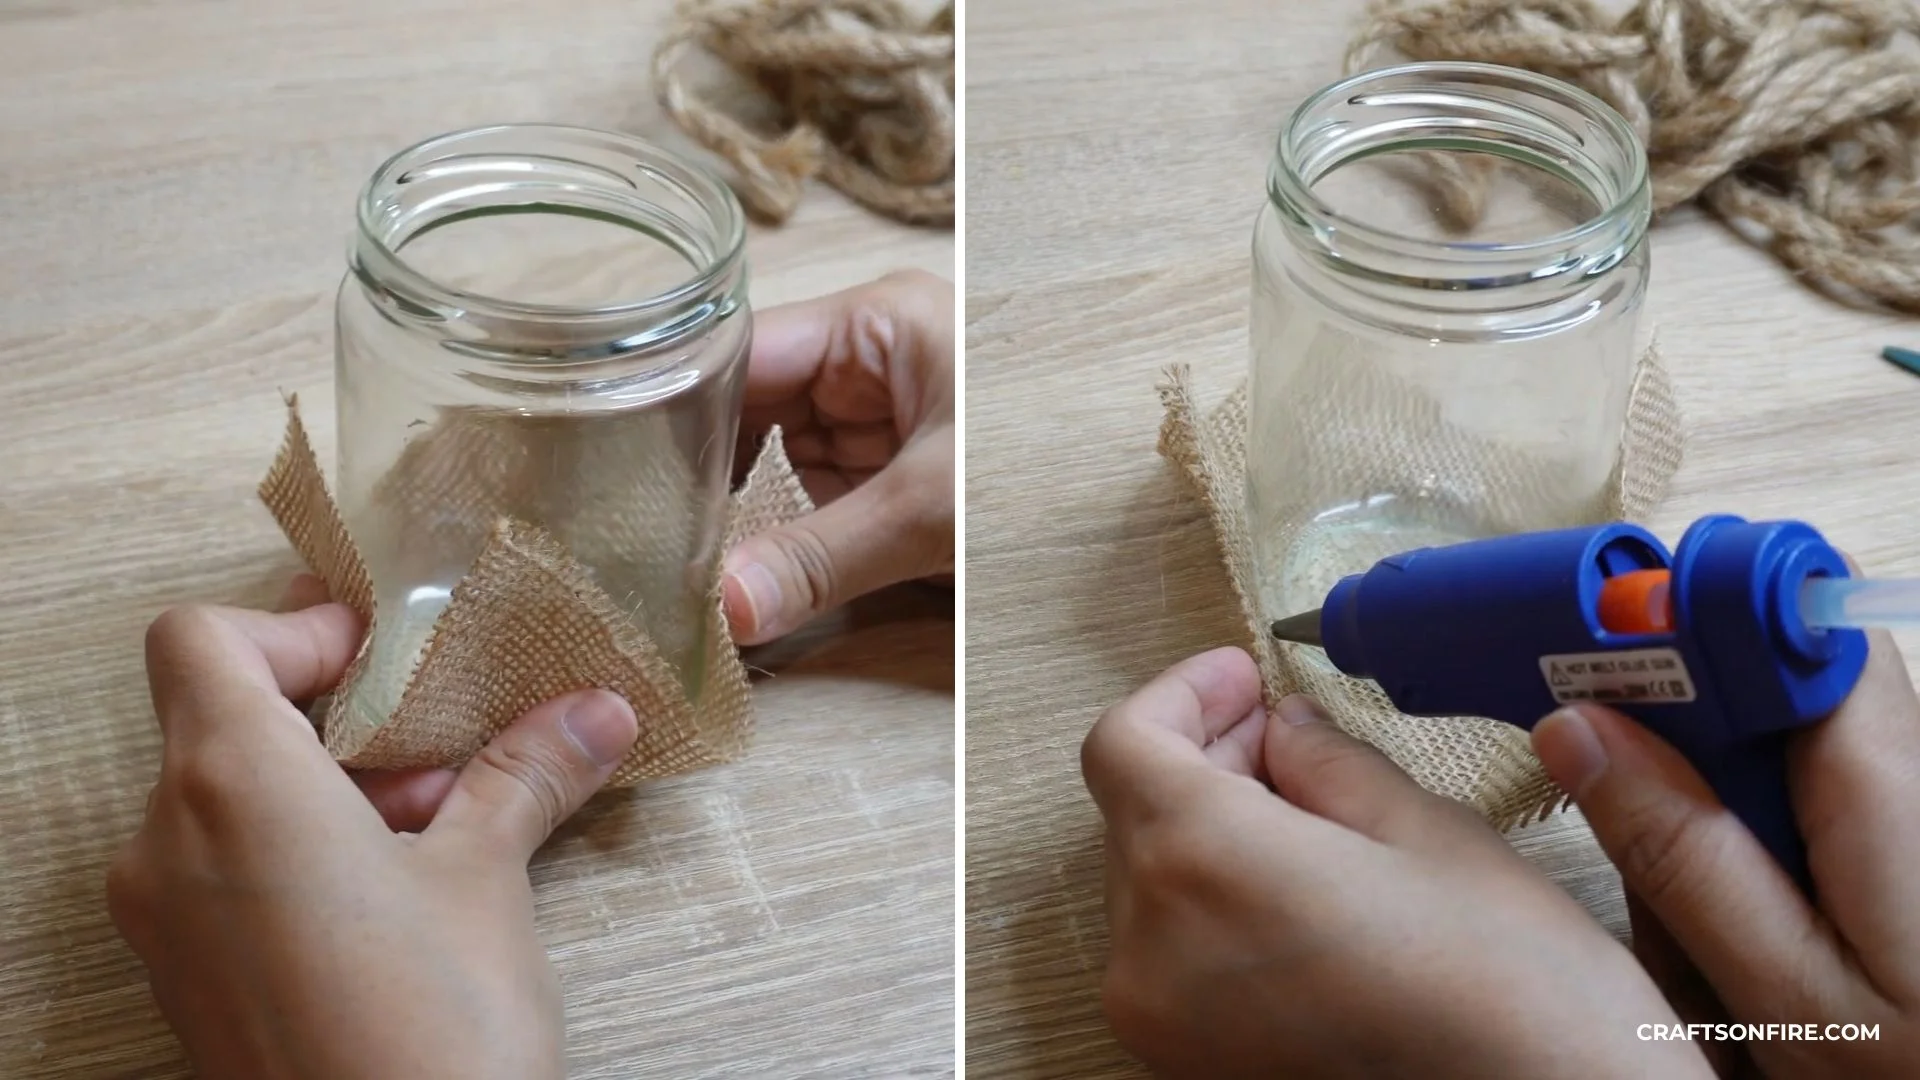
- 2. Prepare the Jar Surface
- 3. Apply Adhesive
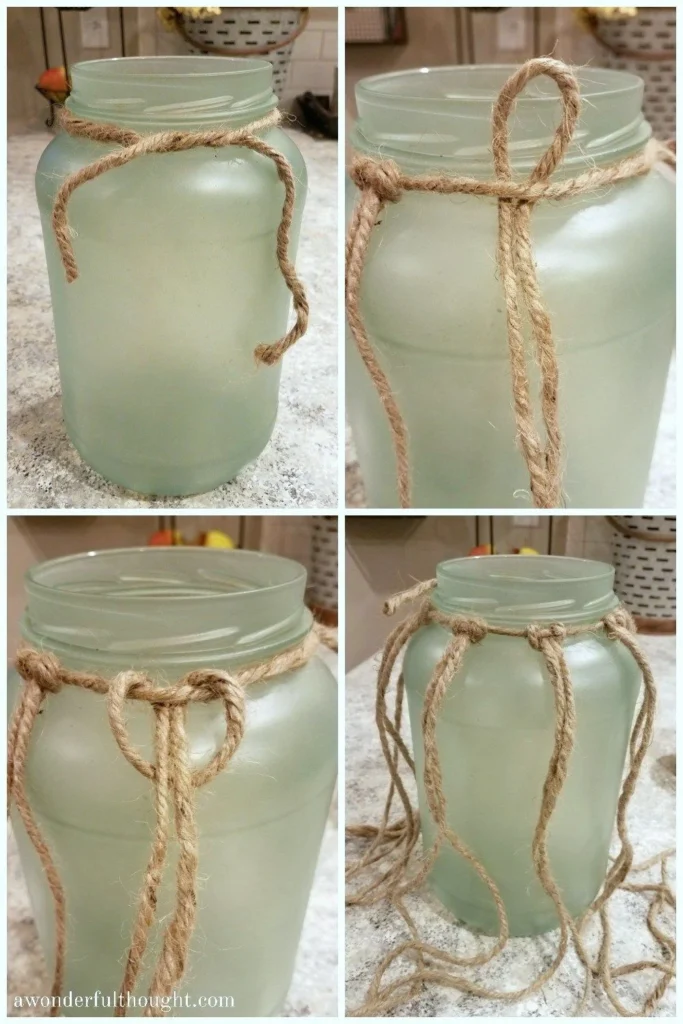
- 4. Wrap the Rope
- 5. Secure the Ends
- 6. Add Decorative Elements
- Design Ideas: Styling DIY Decorative Jars with Rope in Every Room
- Living Room Groupings
- Bedroom Nightstand Accents
- Kitchen Counter and Wall Décor
- Bathroom Organization
- Outdoor & Balcony Charm
- Quick Tips for Perfect Rope‑Wrapped Jars
- Common Mistakes and How to Avoid Them
- Over‑Applying Glue
- Uneven Rope Tension
- Choosing the Wrong Rope Type
- Neglecting the Jar’s Finish
- Frequently Asked Questions
- Conclusion
DIY decorative jars with rope – Transform Your Space with Simple Elegance
Whether you’re a seasoned interior enthusiast or just beginning to explore personal style, the humble glass jar can become a centerpiece of sophisticated décor when paired with natural rope. This DIY approach merges the organic warmth of rope with the sleek clarity of glass, creating a versatile accent that works in any room—from a breezy balcony to a polished kitchen island. In this guide we’ll walk you through material selection, step‑by‑step assembly, and creative styling options that keep your home feeling fresh, cohesive, and uniquely yours.
Beyond aesthetics, rope‑wrapped jars serve practical purposes: they can hold candles, display dried flowers, store bathroom essentials, or become a chic way to organize craft supplies. The beauty of the project lies in its adaptability—choose a thick jute rope for a rustic vibe, a slim sisal for a coastal feel, or a polished cotton blend for a modern minimalist look. By the end of this article you’ll have the confidence to transform everyday containers into conversation‑worthy décor pieces.
Ready to elevate your interiors without breaking the bank? Let’s dive into the essential steps, design ideas, and pro tips that make DIY decorative jars with rope a rewarding, budget‑friendly endeavor.
DIY decorative jars with rope: Materials, Tools, and Preparation

The foundation of any successful project is thoughtful preparation. Below is a concise checklist of what you’ll need, followed by brief explanations on why each item matters.
Essential Materials for DIY decorative jars with rope
- Clear glass jars – mason jars, apothecary jars, or recycled beverage bottles.
- Natural rope – jute, sisal, cotton, or hemp, ranging from ½‑inch to 1‑inch thickness.
- Adhesive – clear-drying craft glue or a hot‑glue gun for a strong bond.
- Scissors or a rope cutter, and a lighter or heat source for sealing ends.
- Optional accents – sand, shells, dried botanicals, LED tealights, or fabric liners.
Tools that streamline the process
- Measuring tape – to cut rope to the exact length needed for each jar.
- Clamp or clothespin – holds the rope in place while the glue cures.
- Sandpaper (fine grit) – smooths rough rope ends for a polished look.
- Protective gloves – especially when working with hot glue.
When selecting jars, consider the intended use. Tall, narrow jars showcase long stems of dried lavender, while squat, wide‑mouth containers are perfect for bathroom cotton balls or kitchen herbs. The versatility of DIY decorative jars with rope means you can mix and match sizes to create a curated grouping on a shelf or mantel.
Step‑by‑Step Guide to Crafting Your Rope‑Wrapped Jar
Follow these detailed steps for a flawless finish. The process is straightforward, but taking the time to execute each stage carefully will ensure durability and visual appeal.
1. Measure and Cut the Rope
Wrap a piece of rope around the jar to gauge the length needed for a full wrap, then add an extra 2‑3 inches for overlapping and securing the ends. Use a sharp cutter to achieve a clean cut, and gently sand the cut ends to avoid fraying.
2. Prepare the Jar Surface
Wipe the glass with a lint‑free cloth and a dab of rubbing alcohol. Removing dust and oils improves adhesive bonding, preventing the rope from slipping over time.
3. Apply Adhesive
Apply a thin, even line of clear glue along the interior side of the rope where it will touch the glass. If you prefer a heat‑free method, you can use a strong double‑sided tape as a temporary hold while the glue sets.
4. Wrap the Rope
Starting at the base, press the glued rope onto the jar, smoothing it as you ascend. Overlap slightly with each turn to create a continuous spiral. Use a clothespin to keep the rope taut while the adhesive cures (about 15‑20 minutes for most craft glues).
5. Secure the Ends
When you reach the top, trim any excess rope, then melt the tip with a lighter (for synthetic fibers) or gently tie a knot (for natural fibers). Apply a dab of glue to the final knot and press it firmly against the jar for a seamless finish.
6. Add Decorative Elements
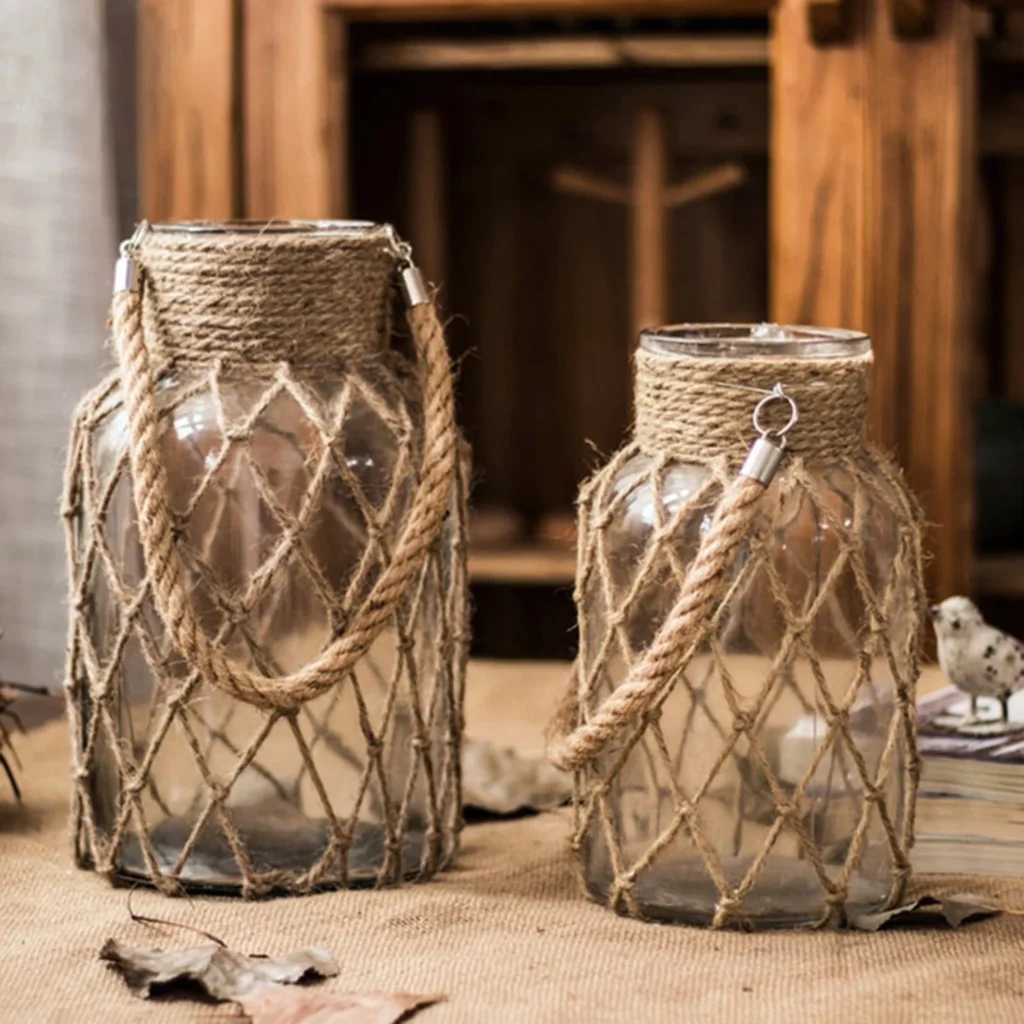
Insert your chosen accents—LED tealights for a soft glow, dried citrus slices for a fresh scent, or a layer of sand for a beachy vibe. The rope wrap provides a stable base that protects the jar’s surface while adding textural interest.
With these steps completed, you now have a handcrafted DIY decorative jar with rope ready to grace any shelf, bathroom vanity, or outdoor table.
Design Ideas: Styling DIY Decorative Jars with Rope in Every Room
Once you’ve mastered the basic technique, let creativity lead the way. Below are curated styling concepts that illustrate how rope‑wrapped jars can elevate specific spaces.
Living Room Groupings
- Cluster three jars of varying heights on a coffee table; fill them with ivory‑colored sand, small driftwood pieces, and a single succulents for a minimalist coastal feel.
- Use larger jars as candle holders during evenings; the rope adds a warm, tactile contrast to soft lighting.
- Pair the jars with a neutral woven basket to create a low‑profile side table that doubles as a decorative display.
Bedroom Nightstand Accents
- Place a small jar filled with lavender buds beside your lamp; the rope’s earthy texture complements soothing bedroom palettes.
- Combine two jars—one for jewelry, one for a scented oil diffuser—to keep surfaces tidy and stylish.
- Choose a rope color that matches your bedding trim for a cohesive look.
Kitchen Counter and Wall Décor
For culinary spaces, think functional elegance. A rope‑wrapped jar can become a chic utensil holder, a spice container, or a fresh‑herb display. Pair the jars with Simple Kitchen Wall Décor Ideas – Fresh, Functional & Stylish to create a coordinated backdrop that showcases both utility and artistry.
Bathroom Organization
- Store cotton balls, swabs, or bath salts in medium‑sized jars; the rope adds a spa‑like, natural element that contrasts nicely with sleek fixtures.
- Combine a few jars with a matching rope‑wrapped tray for a cohesive vanity arrangement.
- Choose a light‑colored rope to reflect moisture‑resistant finishes and keep the look fresh.
Outdoor & Balcony Charm
Rope is naturally weather‑resistant, making these jars ideal for patio or balcony décor. Fill them with dried flowers, seashells, or small fairy lights to create a whimsical vignette. For further inspiration on outdoor styling, check out Balcony Décor with Simple Lanterns – A Complete Guide where similar natural textures are celebrated.
Quick Tips for Perfect Rope‑Wrapped Jars
- Test a small glue patch on the rope first to ensure the adhesive doesn’t discolor the fibers.
- Use a rotating platform or turntable while wrapping to maintain even tension.
- Seal the bottom of the jar with a thin layer of clear epoxy if you plan to use it for liquids.
- Mix rope textures—pair a thick jute base with a thin cotton accent for visual depth.
- Allow the completed jar to cure for at least 24 hours before placing heavy objects inside.
Common Mistakes and How to Avoid Them
Even experienced crafters can stumble. Recognizing these pitfalls early saves time and material.
Over‑Applying Glue
Too much adhesive creates visible globs that can seep out from under the rope, marring the clean look. Apply a thin line only where the rope contacts glass; excess can be wiped away immediately.
Uneven Rope Tension
If the rope is too loose, it will sag and look sloppy; too tight, and the fibers may fray or split. Practice a gentle, consistent pull as you wrap, and use a clothespin to keep tension steady.
Choosing the Wrong Rope Type
Synthetic ropes may look sleek but can feel too plastic in a natural‑styled room. Conversely, overly rough fibers can snag when you handle the jar. Match rope texture to the room’s overall aesthetic for harmony.
Neglecting the Jar’s Finish
Skipping the cleaning step leads to adhesive failure. Even a faint film of oil can cause the rope to loosen over time. A quick alcohol wipe ensures a strong bond.
Frequently Asked Questions
Can I use recycled glass bottles for DIY decorative jars with rope?
Absolutely. Cleaned, dry bottles work just as well as purpose‑made mason jars. Ensure the surface is free of labels and residue before applying glue.
How do I make my rope‑wrapped jars weather‑proof for outdoor use?
Choose a rope treated for outdoor conditions, such as marine‑grade hemp, and seal the rope with a clear spray sealant. Also, apply a waterproof glue like epoxy for extra protection against rain.
Is there a recommended height for rope wraps on taller jars?
A common rule is to let the rope cover roughly two‑thirds of the jar’s height, leaving the top free for decorative inserts. This balances visual weight and keeps the focus on the jar’s interior.
Can I combine rope with other materials like twine or fabric?
Yes. Mixing rope with soft twine, burlap, or linen adds layers of texture. Just ensure each material is securely glued to the glass to prevent slipping.
What are some low‑cost alternatives to craft glue?
A strong double‑sided tape can hold the rope in place while you position it, then reinforce with a small amount of clear-drying craft glue for lasting adhesion.
Conclusion
By integrating DIY decorative jars with rope into your décor, you invite a blend of natural texture and refined simplicity that resonates across every room. The process is accessible, customizable, and offers endless opportunities to reflect personal style—whether you’re accenting a sleek kitchen, softening a modern bathroom, or adding charm to a balcony retreat. Experiment with rope colors, jar sizes, and interior accents to discover combinations that feel uniquely yours. As you explore these ideas, remember that the true beauty lies in the handcrafted touch; each jar becomes a small, purposeful piece of art that enhances everyday living. For more inspiration on cohesive interiors, browse our other guides and keep turning everyday objects into standout statements.