
Table of Contents
- DIY plant shelf with wooden boards: Design Planning
- Material Selection for a DIY Plant Shelf with Wooden Boards
- DIY plant shelf with wooden boards – Choosing the Right Wood
- Step‑by‑Step Construction Process
- Styling Tips: Turning Your Shelf into a Green Gallery
- Quick Home Décor Tips
- Common Mistakes and How to Avoid Them
- Frequently Asked Questions
- Can I use reclaimed wood for a DIY plant shelf with wooden boards?
- What is the best height for a floating plant shelf?
- Do I need to worry about UV damage to the wood?
- How often should I re‑seal the wooden boards?
- Can I combine this shelf with a built‑in lighting system?
- Integrating the Shelf into Different Rooms
- Maintenance and Longevity
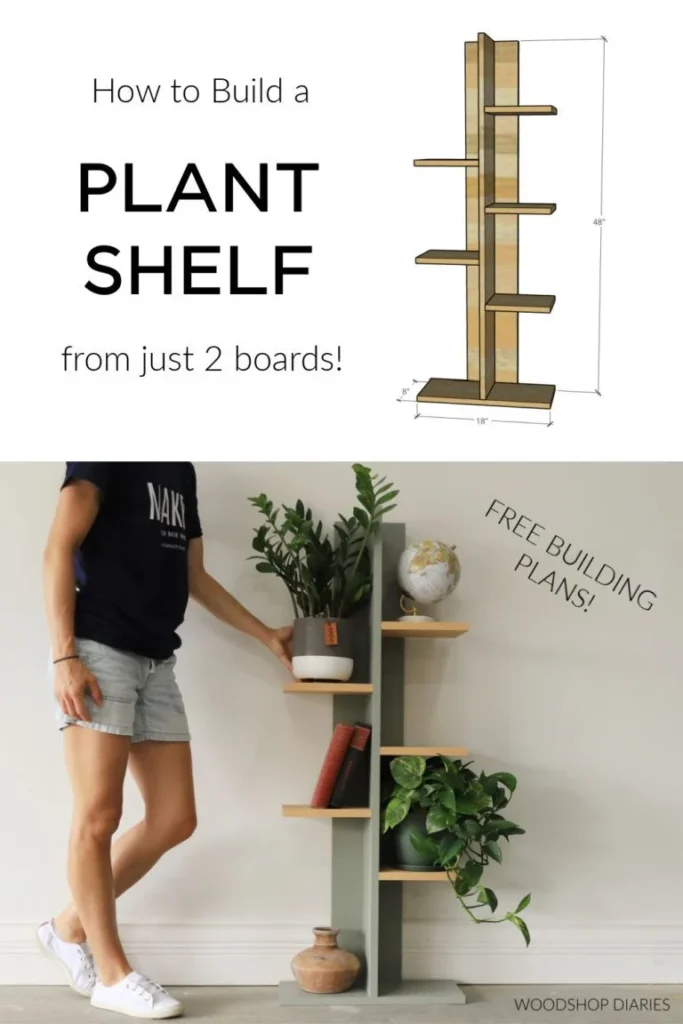
DIY Plant Shelf with Wooden Boards – A Step‑by‑Step Guide
Bringing nature indoors has never been easier, and a DIY plant shelf with wooden boards is one of the most rewarding projects you can tackle. Whether you’re a seasoned handyperson or a beginner looking for a manageable weekend craft, this tutorial offers clear instructions, design inspiration, and practical advice that fit any style—from modern minimalism to cozy rustic charm.
Plants not only improve air quality, they add texture, color, and a sense of calm to any space. Yet many homes lack the right shelving to showcase them without cluttering the floor. By constructing your own wooden board shelf, you gain full control over dimensions, finish, and placement, ensuring the final piece complements both your greenery and your interior design goals.
In the sections that follow, you’ll discover how to plan, cut, assemble, and finish a versatile DIY plant shelf with wooden boards. We’ll also cover styling tips, common pitfalls, and answers to the most frequently asked questions, so you finish the project confidently and with a beautiful result you’ll be proud of.
DIY plant shelf with wooden boards: Design Planning

Before the first cut, a solid design plan saves time, money, and frustration. Start by measuring the wall or corner where you intend to install the shelf. Consider the height of the tallest plant you own and the spacing you’ll need for pots of varying sizes. A good rule of thumb is to leave at least 12‑15 cm of vertical space between tiers to prevent leaves from brushing against each other.
Next, decide on the overall style. A DIY plant shelf with wooden boards can be as sleek as a floating wall unit with hidden brackets, or as rustic as reclaimed barn wood with visible nail heads. Sketch a simple diagram showing the number of shelves, spacing, and any decorative elements such as cut‑outs or back panels. This visual guide will become your roadmap when you head to the hardware store.
Don’t forget lighting. If your space lacks natural light, plan for a small LED strip or a clamp‑on lamp that can be integrated into the shelf. This small addition turns a functional piece into a focal point that highlights the foliage’s vibrant colors.
Material Selection for a DIY Plant Shelf with Wooden Boards
DIY plant shelf with wooden boards – Choosing the Right Wood
The heart of any sturdy plant shelf lies in the wood you select. For indoor projects, hardwoods such as oak, maple, or walnut provide durability and a refined finish. If you prefer a lighter budget, pine or poplar are excellent choices—just be sure to treat them with a sealant to resist moisture from soil and watering.
- Thickness: Boards between 1.5 cm and 2.5 cm (½‑1 in) offer enough strength without adding excessive weight.
- Grain Direction: Place the grain perpendicular to the length of the shelf to maximize load‑bearing capacity.
- Finish: A clear matte polyurethane protects the wood while letting the natural grain shine. For a more contemporary look, consider a whitewashed or charcoal stain.
When buying, inspect each board for warping, knots, or cracks. Even a small flaw can become a weak point once the shelf holds the weight of several pots. If you’re using reclaimed wood, sand it thoroughly and apply a moisture‑resistant primer before the final finish.
Step‑by‑Step Construction Process
Now that you have a design and the right materials, it’s time to assemble. Follow these steps for a seamless build:
- Cut the Boards: Using a circular saw or table saw, cut the top, bottom, and side pieces to the lengths indicated in your sketch. A miter saw ensures clean, square edges for a professional look.
- Drill Pilot Holes: To avoid splitting, drill 6 mm (¼ in) pilot holes at each joint where the shelves will attach to the sides.
- Assemble the Frame: Secure the side panels to the top and bottom using wood screws (3‑4 cm long). A carpenter’s square will keep the frame square.
- Install Shelves: Measure and mark the desired shelf heights, then attach each shelf with either brackets or direct screw‑throughs from the side panels. For a floating appearance, use concealed metal brackets that slip into routed channels.
- Sand and Finish: Lightly sand all surfaces with 120‑grit paper, then a final pass with 220‑grit for smoothness. Apply your chosen finish—two coats of polyurethane with light sanding between coats yields a durable, water‑resistant surface.
- Mount the Shelf: Locate wall studs with a stud finder, drill pilot holes, and attach a sturdy mounting bracket or French cleat system. Double‑check that the unit is level before tightening fully.
Once installed, arrange your plants. Vary heights and pot styles for visual interest. For a cohesive look, keep all containers within a similar color palette or material family.
Styling Tips: Turning Your Shelf into a Green Gallery
Even the most well‑crafted DIY plant shelf with wooden boards can feel flat without thoughtful styling. Here are three ideas to elevate the visual impact:
- Layer Textures: Mix ceramic, terracotta, and woven baskets. The contrast between smooth pot surfaces and the natural wood grain adds depth.
- Use Negative Space: Leave a few empty spots on each tier. This breathing room lets each plant stand out and prevents the shelf from looking overcrowded.
- Incorporate Decorative Objects: Small sculptures, vintage books, or a decorative tray can break up the greenery and tie the shelf into the room’s existing décor.
For additional inspiration, see our guide on minimalist balcony design ideas—the same principles of clean lines and balanced composition apply to indoor plant shelving.
Quick Home Décor Tips
- Choose pots with drainage trays to protect the wooden boards from water damage.
- Rotate plants every two weeks to ensure even light exposure.
- Install a discreet humidity sensor near the shelf to monitor conditions for tropical varieties.
Common Mistakes and How to Avoid Them
Even experienced DIYers can slip up. Below are frequent errors when building a DIY plant shelf with wooden boards and simple ways to prevent them:
- Skipping the Stain‑Resistant Finish: Untreated wood absorbs moisture, leading to warping. Always apply a water‑proof sealant before placing pots.
- Overloading Shelves: Exceeding the weight limit can cause sagging. Use a stud finder and secure the shelf to studs, and keep each tier’s load under 15 kg (33 lb).
- Improper Bracket Placement: Brackets placed too far from the ends can create stress points. Position them at least 10 cm (4 in) from each side for balanced support.
Frequently Asked Questions
Can I use reclaimed wood for a DIY plant shelf with wooden boards?
Absolutely. Reclaimed wood adds character and sustainability. Just sand thoroughly, treat with a moisture‑resistant primer, and apply a clear finish to protect against water from plant pots.
What is the best height for a floating plant shelf?
A floating shelf works well when its bottom edge sits about eye level (≈150 cm or 5 ft) for viewing comfort, while the top tier should stay at least 30 cm (12 in) above the highest plant to avoid crowding.
Do I need to worry about UV damage to the wood?
If the shelf receives direct sunlight, UV rays can fade lighter stains. Choose a UV‑blocking varnish or place a sheer curtain to filter harsh light while still allowing enough illumination for the plants.
How often should I re‑seal the wooden boards?
In most indoor environments, a fresh coat of polyurethane every 2‑3 years keeps the wood protected. High‑humidity areas like kitchens may require annual re‑sealing.
Can I combine this shelf with a built‑in lighting system?
Yes. LED strip lights with a dimmer are ideal—they generate minimal heat and can be hidden in the shelf’s back or under the top board, providing even illumination without detracting from the natural wood aesthetic.
For those interested in turning their hobby into a side hustle, read our article on selling home decor on Poshmark to learn how a well‑crafted DIY plant shelf with wooden boards can become a marketable product.
Integrating the Shelf into Different Rooms
While the primary appeal of a plant shelf is to showcase foliage, its versatility lets it shine in multiple settings:
- Living Room: Position the shelf behind a sofa or against a focal wall. Pair it with a neutral rug and a few statement art pieces for a balanced look.
- Bedroom: A low, horizontal version works well above a bedside table, providing both greenery and a place for a small reading lamp.
- Kitchen: Install a narrow shelf above the countertop to store herbs. Choose a finish that complements cabinetry for a seamless transition.
- Home Office: Use the shelf as a visual break behind the desk. Adding a few low‑light succulents can reduce eye strain and boost productivity.
Each environment benefits from a tailored approach. For a cohesive interior, align the wood tone with other furniture pieces—light pine for a Scandinavian vibe, or dark walnut for a sophisticated, modern feel.
Maintenance and Longevity
To ensure your DIY plant shelf with wooden boards remains a centerpiece for years, adopt a simple maintenance routine. Wipe the surface with a dry microfiber cloth weekly to remove dust and prevent it from settling on leaves. If you notice any water rings, gently rub the area with a mixture of equal parts water and white vinegar, then re‑apply a thin coat of finish to the spot.
Seasonal changes can affect humidity levels, especially in regions with dry winters. Using a room humidifier near the shelf helps protect both the wood and moisture‑loving plants. Finally, inspect the mounting hardware annually; tighten any loose screws and verify that the brackets remain securely anchored to the wall studs.
If you’re looking for broader DIY inspiration, our comprehensive guide on how to make home decor items offers project ideas that complement a wooden plant shelf, such as handmade macramé hangers or custom pottery.
By following these tips, your shelf will stay sturdy, stylish, and functional—making it a lasting part of your home’s décor narrative.
Ready to start your own project? Gather your tools, select the perfect wood, and let your creativity grow alongside your plants. The satisfaction of seeing a living, breathing display you built yourself is unmatched, and the results will enrich any room you choose.