Table of Contents
- How to Install Hardie Board Siding 4×8: Preparing the Wall Surface
- Key steps to prepare the wall
- How to Install Hardie Board Siding 4×8: Tools and Materials Checklist
- How to Install Hardie Board Siding 4×8: Cutting and Fitting the Panels
- Step‑by‑step cutting guide
- How to Install Hardie Board Siding 4×8: Nailing, Spacing, and Aligning
- How to Install Hardie Board Siding 4×8: Sealing and Finishing Details
- Finishing steps to protect your investment
- Quick Home Décor Tips for Complementing Hardie Board Siding
- Common Mistakes When Installing Hardie Board Siding 4×8 and How to Avoid Them
- Frequently Asked Questions
How to Install Hardie Board Siding 4×8 – A Complete Guide
Hardie board siding has become a favorite among homeowners who want a durable, low‑maintenance, and aesthetically pleasing exterior. The 4×8 panels offer a balance between easy handling and broad coverage, making them ideal for both new construction and renovation projects. Whether you’re a seasoned DIYer or a first‑time renovator, understanding the proper installation process is essential to ensure a long‑lasting, water‑tight finish.
In this guide we will walk you through every stage of the project: from selecting the right materials and preparing the wall to cutting, fastening, and sealing the panels. You’ll also find practical tips on dealing with common challenges, safety considerations, and ways to blend the siding with your home’s overall design aesthetic. By the end, you’ll feel confident tackling a Hardie board siding 4×8 installation on your own.
Before you dive in, gather all the tools, review local building codes, and consider how the new siding will complement your interior décor. A well‑executed exterior upgrade can dramatically boost curb appeal and even increase property value, while also providing a solid canvas for future interior design projects.
How to Install Hardie Board Siding 4×8: Preparing the Wall Surface

The foundation of a successful siding job starts with a clean, flat, and well‑ventilated wall. Any irregularities in the substrate can lead to cracks, water intrusion, or uneven panel alignment later on.
Key steps to prepare the wall
- Inspect for damage: Look for rot, mold, or loose sheathing. Replace any compromised sections before proceeding.
- Remove old siding: Carefully pry off existing material, preserving as much of the underlying sheathing as possible.
- Install a weather‑resistive barrier (WRB): A high‑quality house wrap or building paper adds an extra layer of protection against moisture.
- Check for level: Use a long level or laser line to verify the wall is plumb. Shim or plane where needed.
- Seal openings: Apply flashing around windows, doors, and other penetrations to prevent water infiltration.
When the surface is ready, you’ll have a solid canvas for the 4×8 Hardie board panels. Proper preparation also reduces the risk of future maintenance headaches, letting you focus on the aesthetic side of the project.
How to Install Hardie Board Siding 4×8: Tools and Materials Checklist

Having the right tools at hand not only speeds up the process but also enhances safety. Below is a comprehensive checklist that covers everything you’ll need from start to finish.
- Hardie board siding 4×8 panels (calculate 10% extra for waste)
- Fiber‑cement cutting saw or circular saw with a carbide‑tipped blade
- Safety gear – gloves, goggles, dust mask, hearing protection
- Level, chalk line, and measuring tape
- Stainless‑steel siding nails or screws (corrosion‑resistant)
- Nail gun or screw gun with appropriate fasteners
- Exterior caulk and backer rod
- Flashing tape, metal J‑channel, and corner beads
- Utility knife and metal shears (for trimming trim pieces)
Investing in high‑quality fasteners and cutting blades is especially important with fiber‑cement products. Cheap nails can rust, leading to premature failure, while dull blades cause ragged edges that affect the final look.
How to Install Hardie Board Siding 4×8: Cutting and Fitting the Panels

Accurate cuts are the secret to a professional‑looking installation. The 4×8 dimensions are convenient, but you’ll often need to trim panels to fit around windows, doors, and corners.
Step‑by‑step cutting guide
- Mark the cut line on the panel using a straight edge and a pencil.
- Secure the panel on a stable workbench or sawhorses.
- Set the blade depth just deep enough to cut through the fiber‑cement without damaging the backing.
- Make the cut slowly, allowing the blade to do the work; avoid forcing the saw.
- After cutting, sand the edge lightly to remove any burrs.
When fitting panels around openings, use a piece of scrap siding to create a template. This ensures consistent spacing and reduces waste. For tight corners, a coping saw can be used to make precise interior cuts.
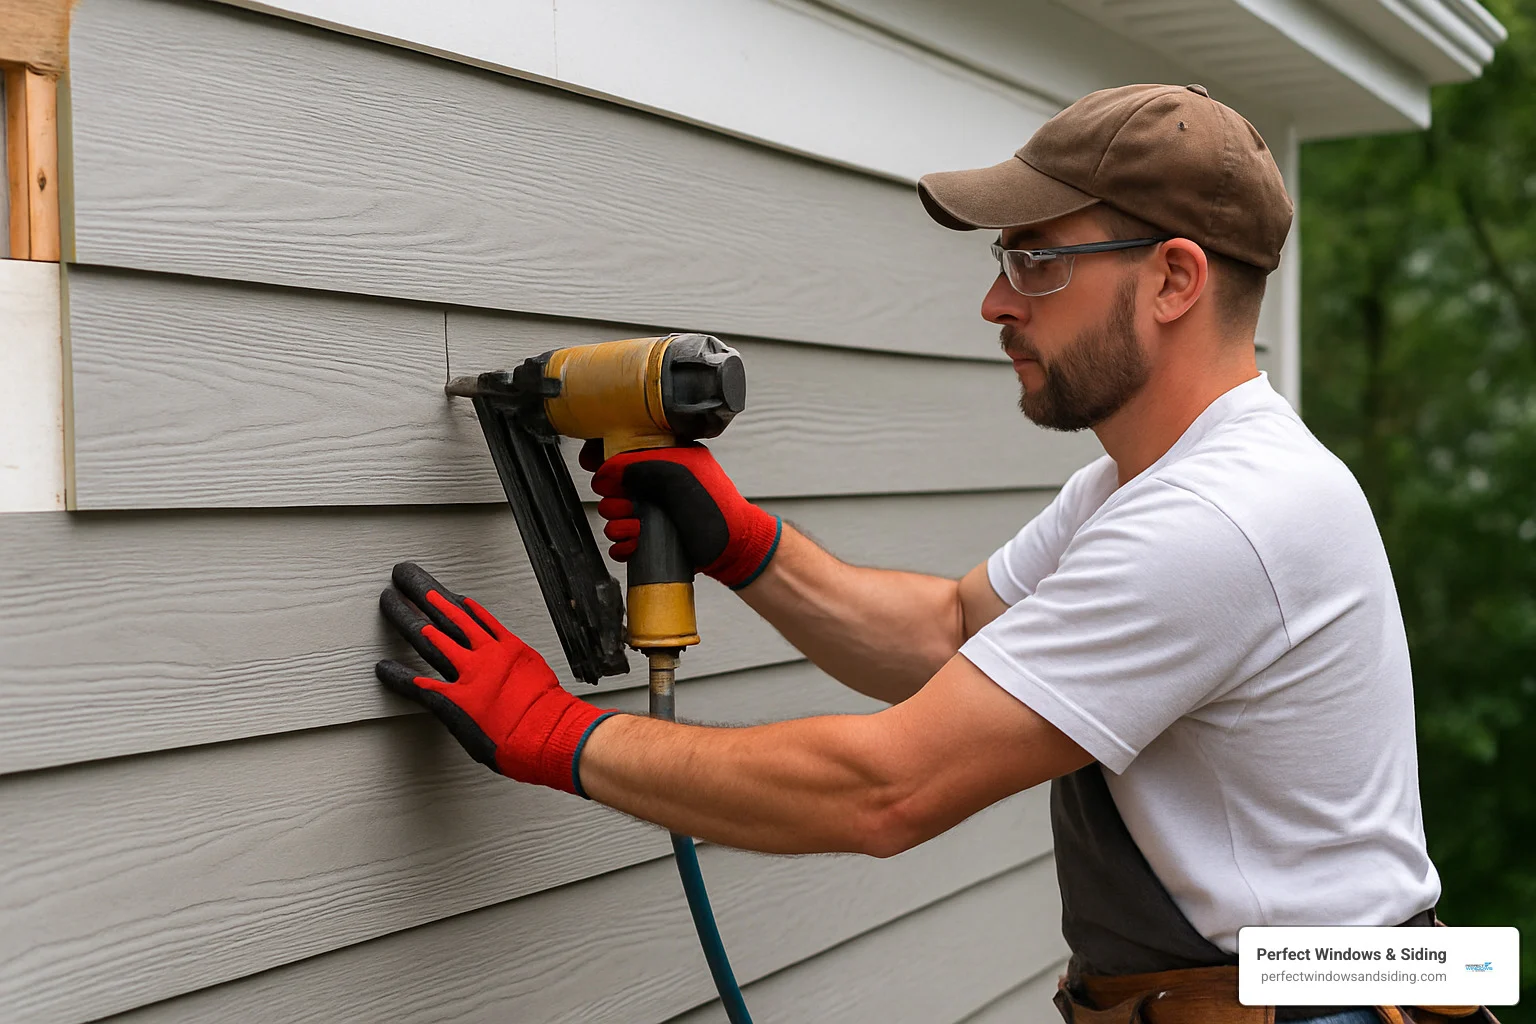
How to Install Hardie Board Siding 4×8: Nailing, Spacing, and Aligning
Correct fastener placement is essential for the board’s structural integrity and for allowing the material to expand and contract with temperature changes.
- Fasten panels every 12 inches vertically and every 24 inches horizontally, unless local code specifies otherwise.
- Place nails at least 3/8 inch from the edge to avoid cracking.
- Use a level or laser line to keep each row perfectly horizontal; a small deviation can become noticeable over several panels.
- Leave a 1/8‑inch gap between panels to accommodate expansion.
Stainless‑steel nails are recommended because they resist corrosion caused by moisture. For added security in high‑wind areas, consider using screws with a washer head. After each row is installed, double‑check alignment before moving to the next.
How to Install Hardie Board Siding 4×8: Sealing and Finishing Details
The final aesthetic and protective touches are what make the difference between a job that looks good for years and one that needs early repair.
Finishing steps to protect your investment
- Apply a high‑quality exterior caulk around all penetrations, seams, and flashing.
- Install metal J‑channel around windows, doors, and corners to create a clean, durable edge.
- Use corner beads on external corners for added reinforcement.
- After the siding is fully installed, consider a breathable, water‑based paint if you desire a colored finish; Hardie board holds paint well.
Don’t forget to clean off any dust from the panels before painting. Dust can prevent proper adhesion, leading to premature peeling. A gentle wash with water and a mild detergent, followed by thorough drying, prepares the surface perfectly.
Quick Home Décor Tips for Complementing Hardie Board Siding
While the focus is on exterior installation, the siding’s color and texture can influence interior design choices as well. Here are a few ideas to tie the exterior look with your home’s interior style.
- Choose a paint shade that echoes a hue from your living room décor for a seamless transition.
- Pair the rugged texture of Hardie board with warm, natural wood accents on a kitchen décor with clay pots to create an earthy vibe.
- Use matching trim colors inside the hallway to echo the exterior’s accent tone.
Common Mistakes When Installing Hardie Board Siding 4×8 and How to Avoid Them
Even experienced DIYers can slip up if they overlook small details. Recognizing these pitfalls early helps keep the project on schedule and within budget.
- Skipping the WRB: A water‑resistive barrier is non‑negotiable; without it, moisture can seep behind the siding.
- Using the wrong fasteners: Galvanized nails may rust; always opt for stainless‑steel or coated fasteners.
- Improper spacing: Forgetting the expansion gap can cause panels to buckle in hot weather.
- Rushing cuts: Rushed cuts produce jagged edges that compromise the seal and visual appeal.
- Neglecting flashing: Poorly installed flashing leads to water intrusion at critical points.
By checking each step against this list, you can avoid costly repairs later and enjoy a flawless finish that lasts decades.
Frequently Asked Questions
Can I install Hardie board siding over existing wood siding?
Yes, but you must first ensure the existing siding is in good condition, securely fastened, and flat. Install a WRB over the old siding before applying the new 4×8 Hardie board panels.
What is the recommended nail length for Hardie board?
A 1‑1/4 inch stainless‑steel nail is commonly used for 1/4‑inch thick panels. For thicker panels, a 1‑1/2 inch nail provides better hold.
Do I need to paint Hardie board after installation?
Hardie board is factory‑finished with a baked enamel coat that resists fading. However, painting allows you to customize color and provides an extra layer of protection. Use a breathable exterior latex paint.
How often should I caulk the seams?
Seal all seams during the initial installation. Re‑caulk every 5‑7 years, or sooner if you notice cracks or gaps.
Is Hardie board suitable for high‑humidity climates?
Absolutely. Its fiber‑cement composition resists moisture, mold, and rot, making it an excellent choice for humid regions.
Can I combine Hardie board with other siding materials?
Yes, mixing materials like stone veneer or vinyl trim can add visual interest. Just ensure proper flashing and transitions to maintain a weather‑tight envelope.
For more inspiration on how exterior upgrades can influence interior design, explore our guide on small living room Ottoman décor ideas. The right siding color can set the tone for the entire home, from the porch to the living room.
If you work from home and need an ergonomic setup, check out the best office chair for ADHD article. A comfortable workspace pairs nicely with a beautifully refreshed exterior.
Finally, pet owners will appreciate the durability of Hardie board when dealing with occasional scratches from playful pups. Learn gentle care tips in our bathing your pregnant dog guide, which also emphasizes using pet‑friendly cleaning products for exterior surfaces.
With careful planning, the right tools, and attention to detail, installing Hardie board siding 4×8 can be a rewarding DIY project that elevates both the look and performance of your home.
Take the next step, gather your materials, and start turning your exterior vision into reality. The transformation you achieve will not only protect your house but also provide a fresh backdrop for all your interior styling endeavors.